Pololu Blog »
Pololu Blog (Page 5)
Welcome to the Pololu Blog, where we provide updates about what we and our customers are doing and thinking about. This blog used to be Pololu president Jan Malášek’s Engage Your Brain blog; you can view just those posts here.
Popular tags: community projects new products raspberry pi arduino more…
Video: How to Assemble the 3pi+ 32U4 OLED Robot
In case you missed it, the 3pi+ now comes with a graphical OLED display! Accordingly, we have released an updated version of the 3pi+ assembly video. This video walks you through the steps found in the assembly section of the 3pi+ 32U4 User’s Guide. While our user’s guides aim to be as thorough as possible, some things are a lot easier to understand when you actually see someone doing it (like soldering the leads to the motor tabs!), so we hope you find this video a useful addition to our 3pi+ documentation.
Is there something you would like to see in a future 3pi+ video? Let us know in the comments below!
Performance graphs for our 25D Metal Gearmotors
|
|
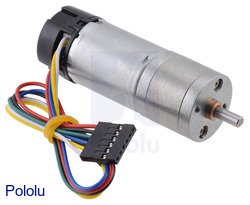
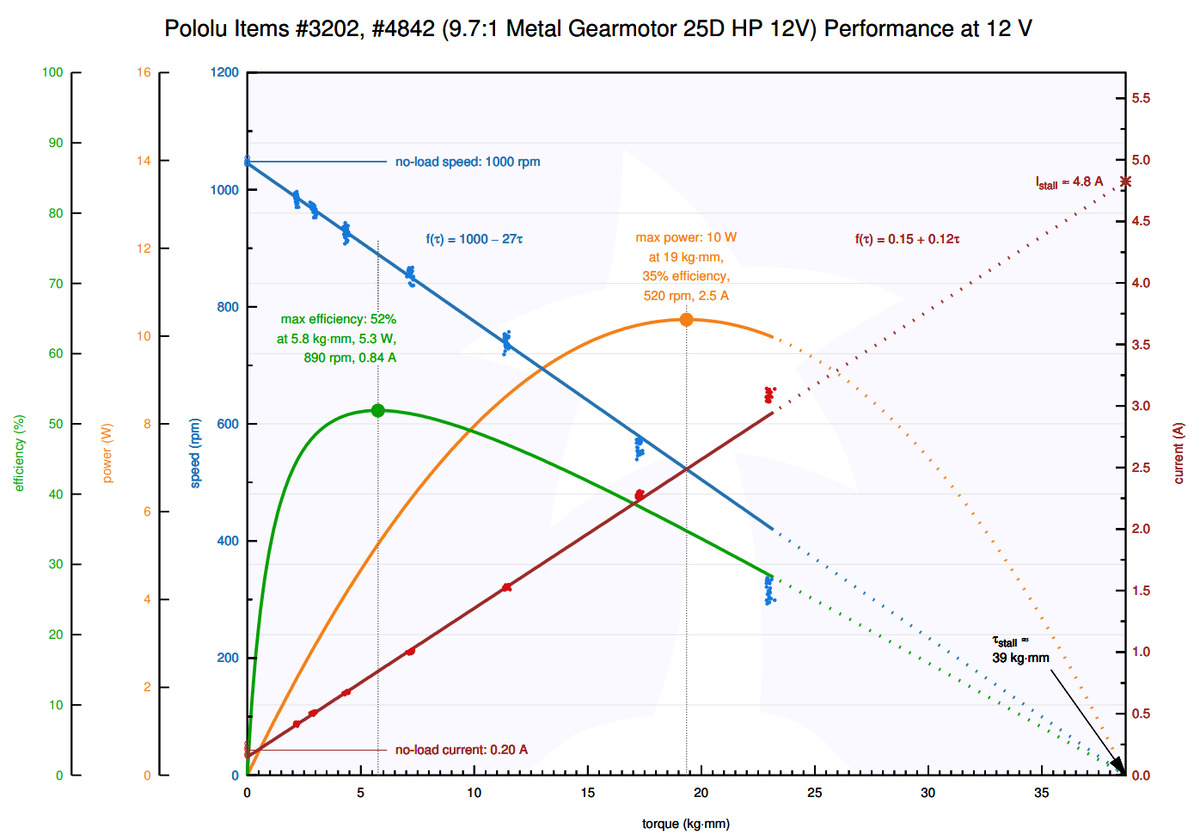
We have published performance graphs (2MB pdf) for our 25D Metal Gearmotors! Each chart is based on hundreds of individual measurements that reveal how the speed, current, power, and efficiency of that particular gearmotor version depend on the applied load (i.e. torque). Our test methodology is the same as the one we used to make our Micro Metal Gearmotor performance graphs, so you can see our blog post about that for more information.
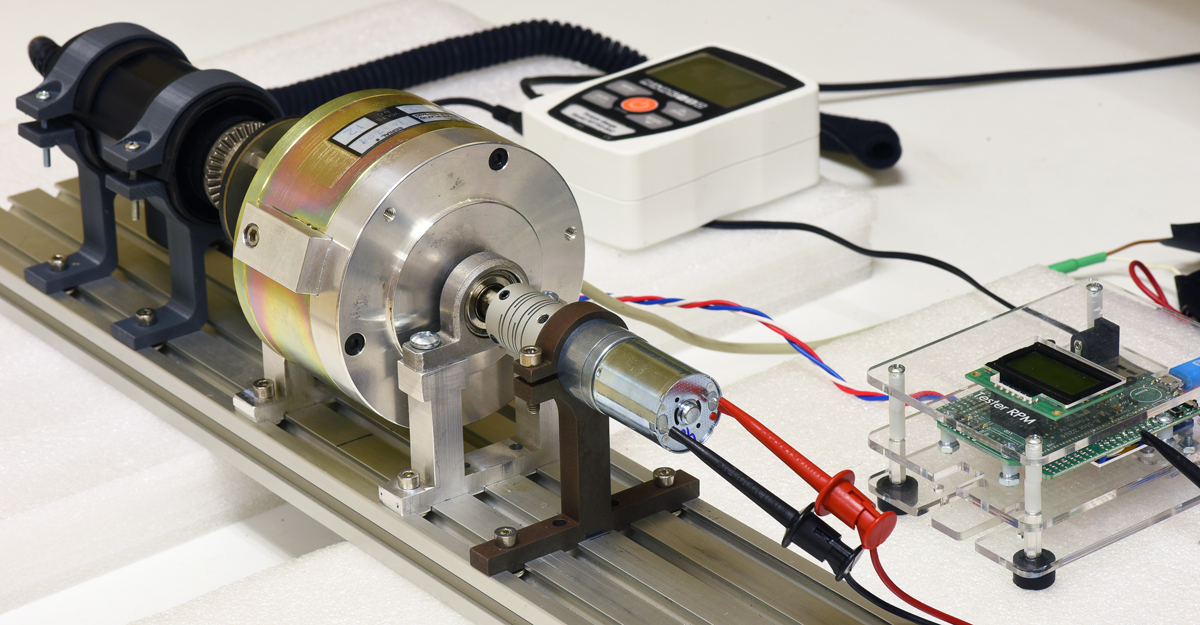 |
25D mm metal gearmotor undergoing dynamic performance testing. |
|---|
These characterizations are yet another way we set our gearmotors apart from the many similar-looking alternatives out there. When you get your gearmotors from us, you know what kind of performance to expect, and you can count on consistency from batch to batch.
If you have any questions or feedback about these graphs or if there is additional information you would like to see available for our motors, please feel free to contact us (or just leave a comment below).
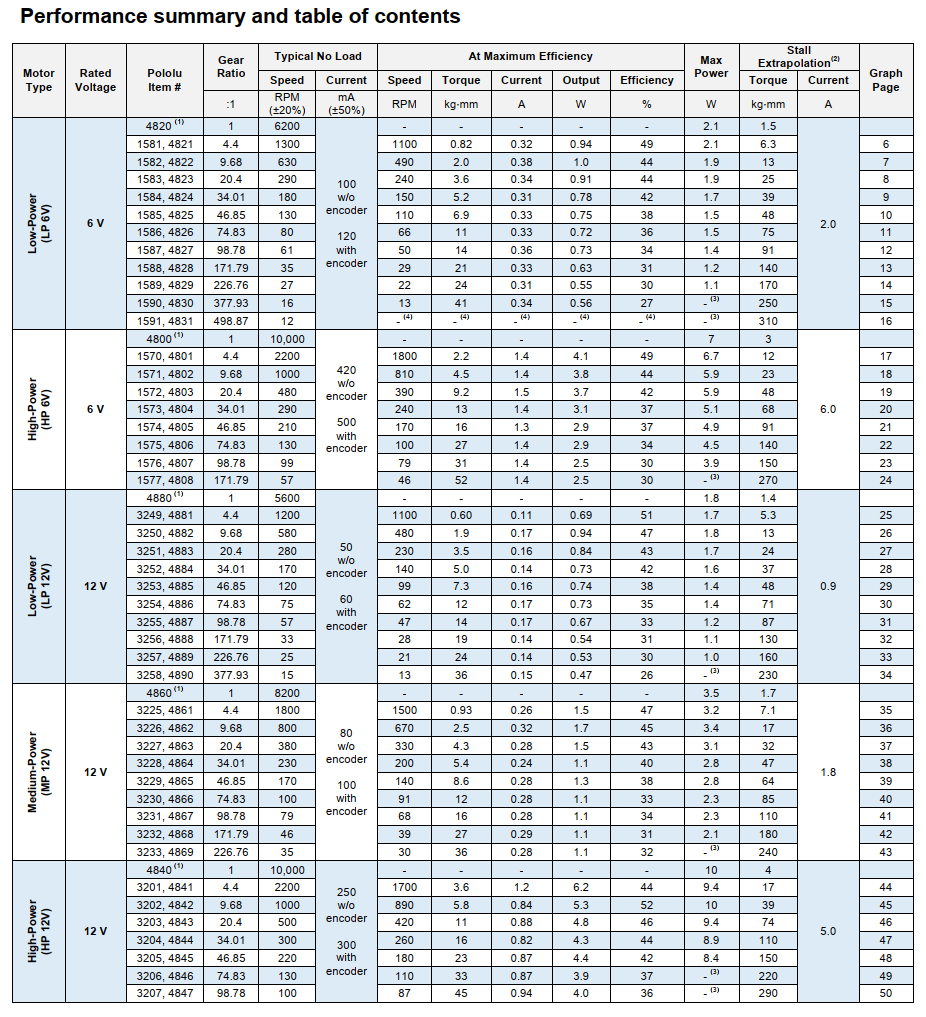 |
Performance summary table from 25D mm Metal Geamotor datasheet. |
|---|
Labor Day Sale going on now!

We are having a Labor Day sale starting now through Tuesday, September 7! Check out the sale page for more information. Please note that we will be closed Monday, so orders placed after 2 PM Pacific Time Friday, September 3 will be shipped on Tuesday, September 7.
Curtis's laser-cut arcade stick case
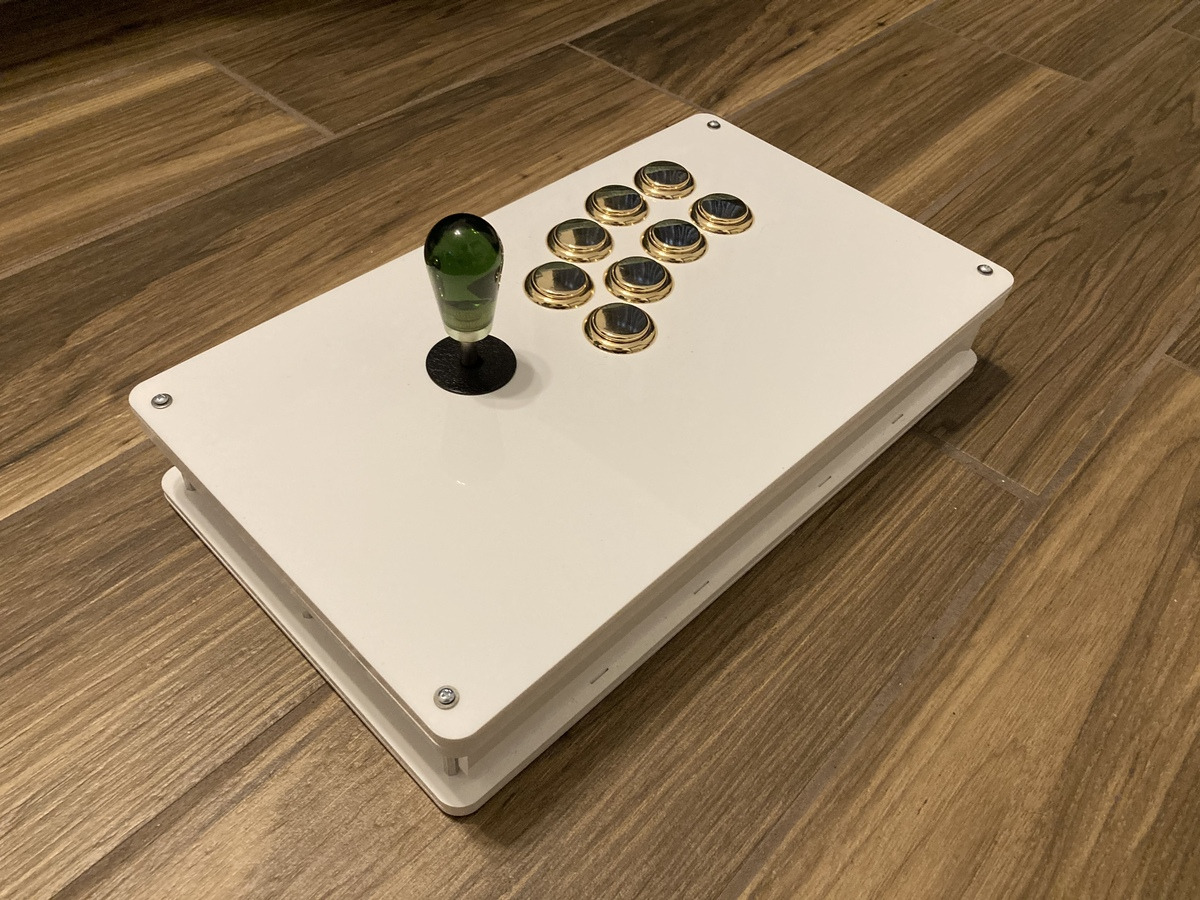 |
Hello, I’m Curtis, an engineering intern at Pololu. I’m studying mechanical engineering at University of California, Irvine. I’ve been playing a lot of Tekken during the pandemic. In fighting games like Tekken a lot of people use arcade sticks to play. So, I wanted to build my own.
I built an arcade joystick case using acrylic parts (3mm and 6mm thickness) that I made with our Custom Laser Cutting Service as well as various M-F standoffs, F-F standoffs and screws and nuts.
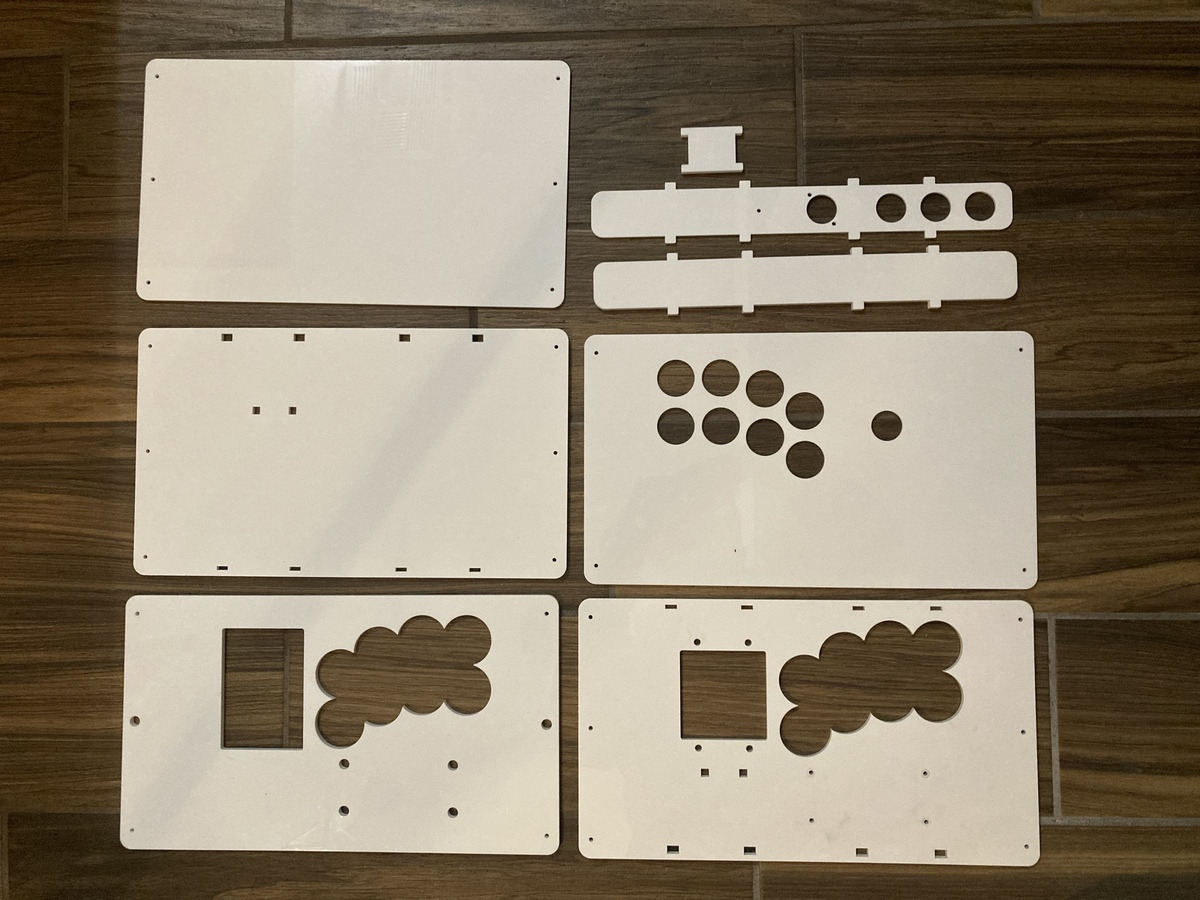
I designed the case myself in Solidworks. I decided on a length and width of 8" × 14" because that makes it large enough to be comfortable, while being small enough to fit in a backpack and carry around. The positioning of the buttons and joystick is based on Hori arcade sticks, with some modification to fit my hands. The difficult part was figuring out how to mount all the components. I ended up layering the acrylic pieces to form the top and bottom plates. This let me mount components in between the layers, which hid screws and made the case look better. I was also able to cut holes to position vertical supports, like the front and back walls, to increase the case’s rigidity.
 |
It’s designed to fit:
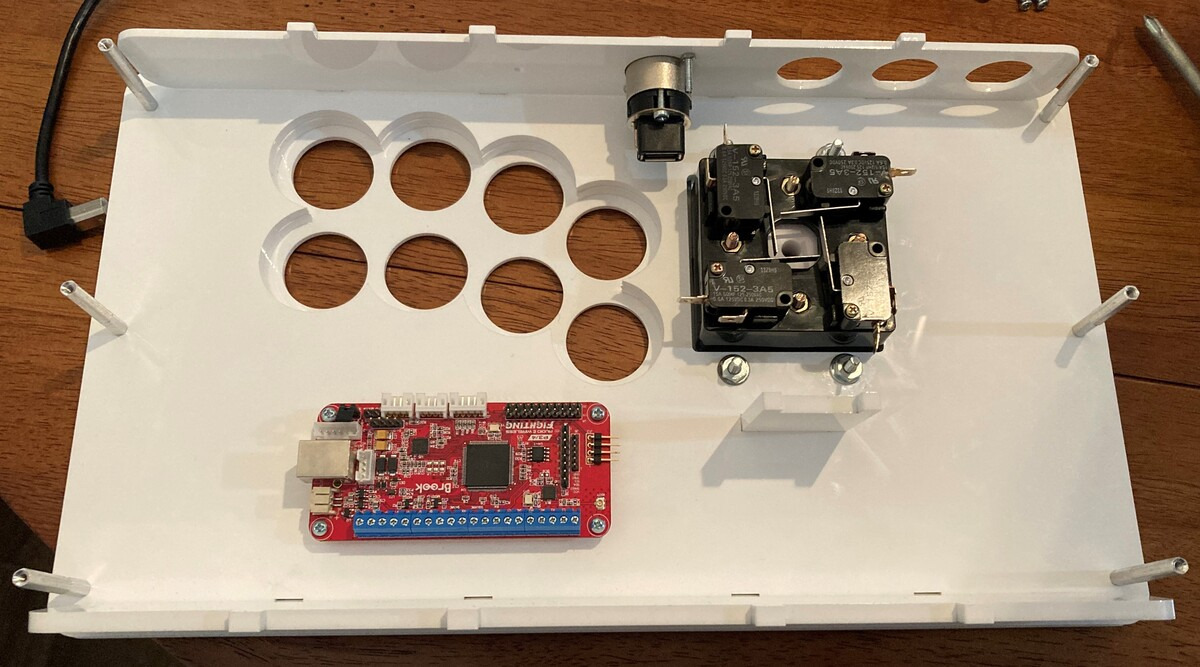
- 8 × 30mm and 3 × 24mm Sanwa buttons
- Neutrik USB type A to B pass-through
- Brook Wireless Fighting Board
- IST Alpha 49s Joystick.
PCBs from Brook are popular for arcade sticks. They have low latency and are compatible with PC and consoles. Button and joystick choices are based on personal preference, similar to mechanical keyboard switches. Sanwa buttons are popular as well, and pretty standard in a lot of arcade cabinets, so I picked them because I’m used to them. I chose the IST joystick because the joystick tension is stiffer, which I prefer because it makes quick movements easier.
It can be a little tricky to put together. I didn’t realize that the joystick switches had tabs that extended beyond the sides of the joystick, so it couldn’t slide into the case. To get around this, the joystick just has to be taken apart and put back together inside the case.
 |
Overall the case works really well. I was worried that the acrylic wouldn’t be stiff enough, but the case is rigid, and all the components fit.
You can download my CAD files (.DXF and .CDR) for the laser cut parts here (97k zip) to cut out the same case I designed, or as a starting point to design your own.
Related products

New 3pi+ 32U4 OLED Robot with graphical display!
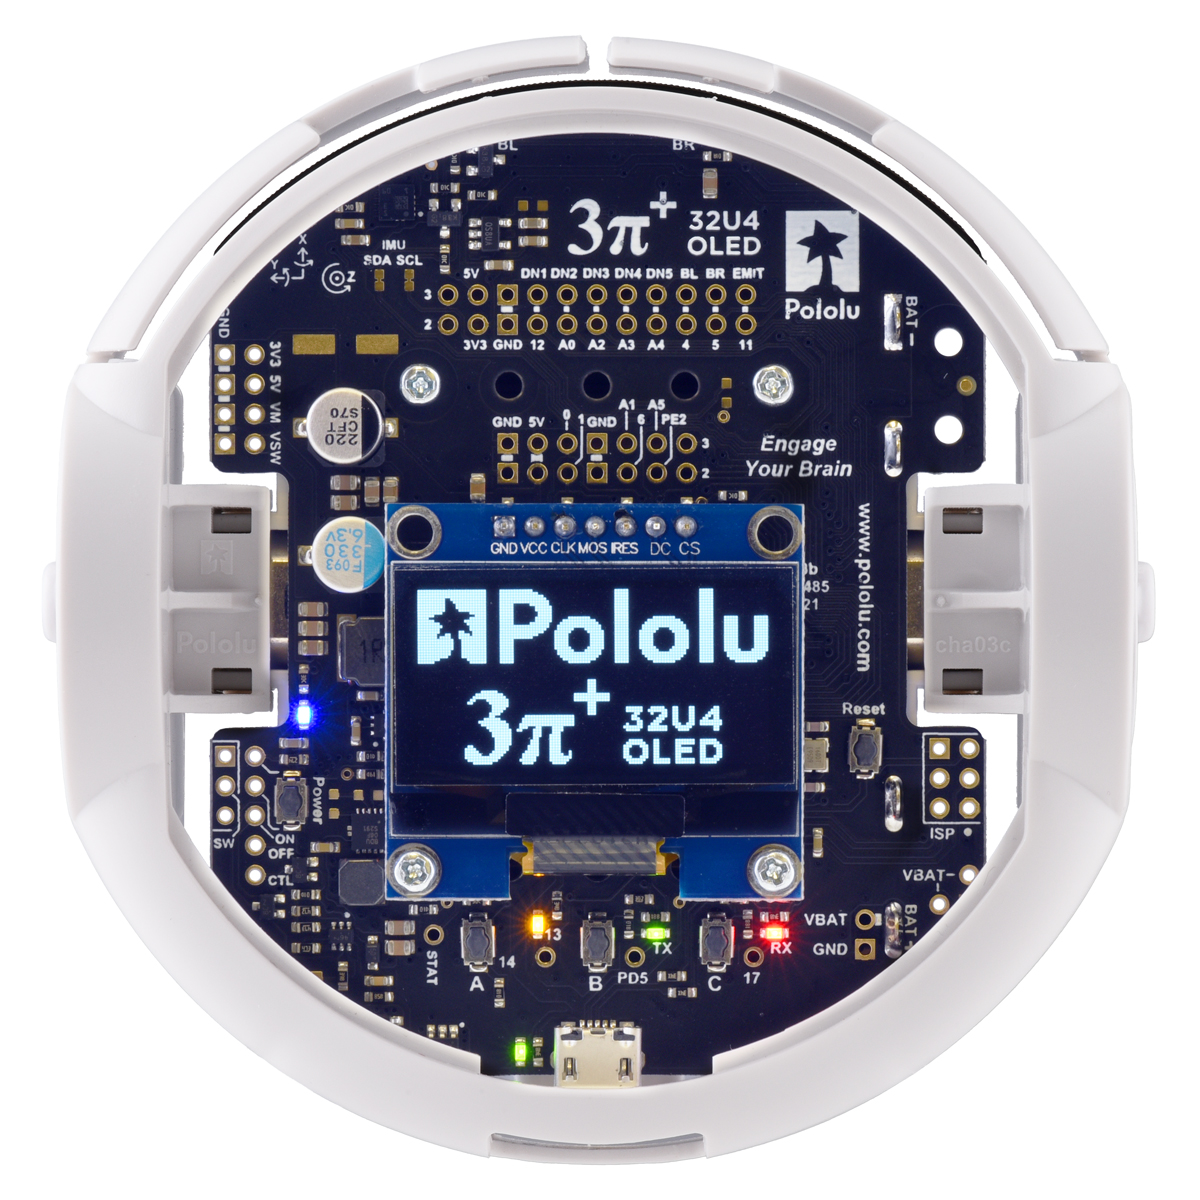 |
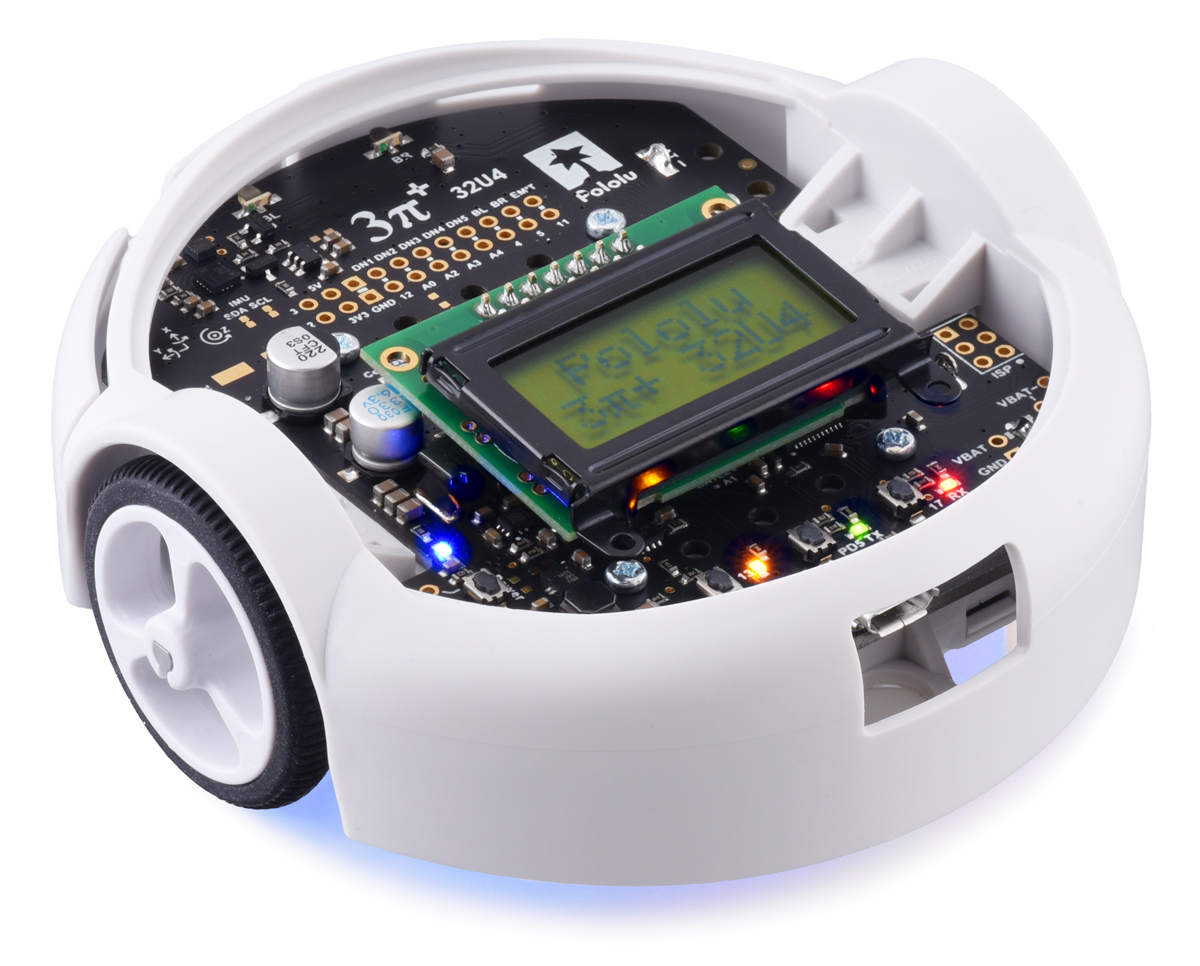
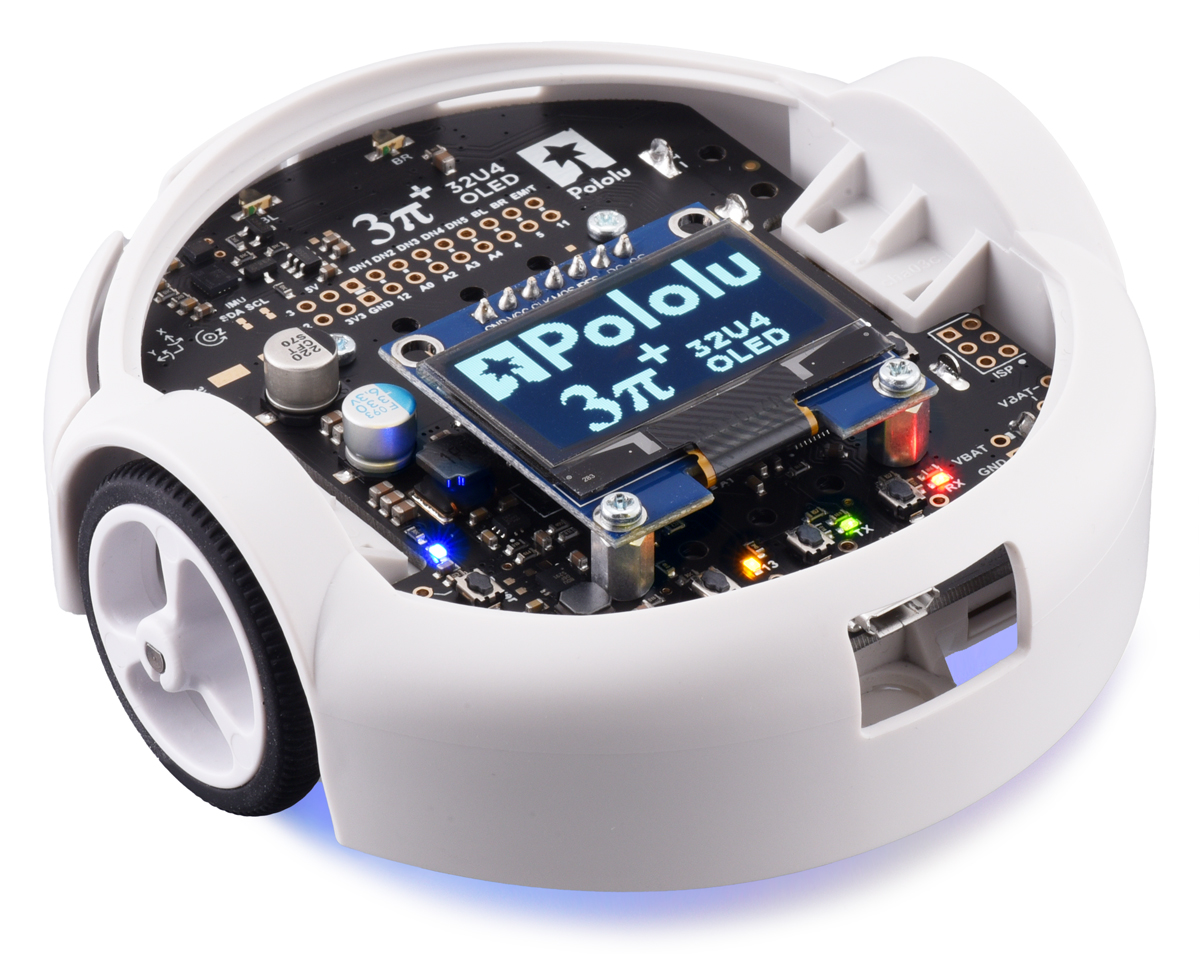
We are very excited to announce that the 3pi+ 32U4 OLED Robot is now available! This is an updated version of the original 3pi+ 32U4 Robot that replaces the old LCD with a monochrome 128×64 OLED display, giving it the ability to display fancy high-contrast graphics while following a line course, navigating a maze, or doing whatever it is that you want this compact but versatile mobile platform to do.
|
|
For more than 16 years, starting with some of our oldest products (from well before I joined Pololu), we have used HD44780-compatible alphanumeric liquid crystal displays on our robots and robot controllers. These LCDs have been around forever and are limited to displaying simple text on a fixed grid, but they are also ubiquitous: there are plenty of manufacturers still making displays that use the standard HD44780 interface.
 |
Pololu Orangutan Robot Controller connected to an AVR ISP (serial version). |
|---|
It’s unlikely that we would have much difficulty sourcing this kind of display any time soon (as long as the pandemic doesn’t mess things up too badly), so using them in our products has always been a safe option despite their graphical limitations. The original 3pi+ 32U4 that we released late last year was our most recent design to include LCD support.
Meanwhile, monochrome organic light-emitting diode (OLED) displays have become increasingly popular in electronics over the last decade or so, and it’s not hard to see why: you can draw graphics on them, they can fit more information on the screen, they’re easier to read in the dark, and they just plain look cooler. But even though you might be able to go to eBay or Amazon and order a cheap OLED display for your project when you want one, it’s critical that we find a dependable supplier for a component like this before we can start to design it into our products.
That is why the availability of the 1.3″ OLED module we announced recently was actually a pretty big deal for us: it means that we finally have a source that we can rely on for larger quantities of these displays. The 3pi+ 32U4 OLED is the first of what we hope will be many robots and control boards that make use of the graphical capabilities offered by an OLED screen.
 |
Like the original 3pi+ 32U4, the newer OLED version is available with three different motor options, either fully assembled or as a kit:
| 3pi+ 32U4 OLED Version | Products | Micro Metal Gearmotor | Top Speed | Comments |
|---|---|---|---|---|
| Standard Edition | assembled or kit | 30:1 MP 6V | 1.5 m/s | good combination of speed and controllability |
| Turtle Edition | assembled or kit | 75:1 LP 6V | 0.4 m/s | longest battery life, easiest to control, good for swarm robots or introductory robotics courses |
| Hyper Edition | assembled or kit | 15:1 HPCB 6V | ~4 m/s | very fast and difficult to control, easy to damage; only recommended for advanced users |
For anyone who wants to use different motors than the options above, the 3pi+ 32U4 OLED control board is likewise available separately and can be combined with a 3pi+ chassis and a pair of motors to build a custom robot.
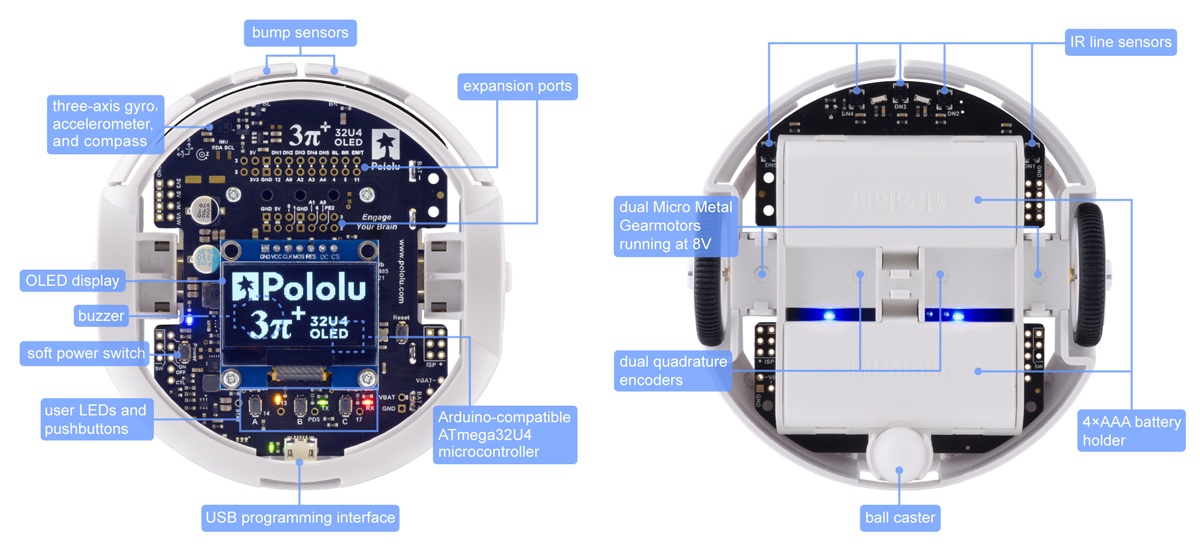
We will be phasing out the original 3pi+ 32U4 robots and kits (they will remain available by special order), but that does not mean the old versions are suddenly obsolete or that you will have to learn an entirely new platform to use the new OLED version. Aside from the display interface, the hardware on the LCD and OLED versions is exactly the same, with features including encoders, line sensors, front bump sensors, and a full IMU (inertial measurement unit).
From a software perspective, it can actually be pretty challenging to work with graphics, especially on a small processor like the ATmega32U4. The simplicity of a text LCD can be an advantage in that you can essentially just ask it to do something like printing the letter “A” on the first column of the second row. On a graphical display, even if you just want to show some text, you have to define the shape of the letter in pixels; optionally composite that shape into a memory buffer; and then send the complete pixel data to the display. That means you have a lot more control over how that letter “A” is shown, but it takes a lot more work to do it.
To help get you started, we’ve developed an LCD compatibility layer as part of our Arduino library for the 3pi+ 32U4. This makes it easier to use the OLED screen for common display tasks, and it’s straightforward to write programs that will work on either version of the robot with minimal changes, since you can update an existing program to run on the OLED version by changing just a single line of code.
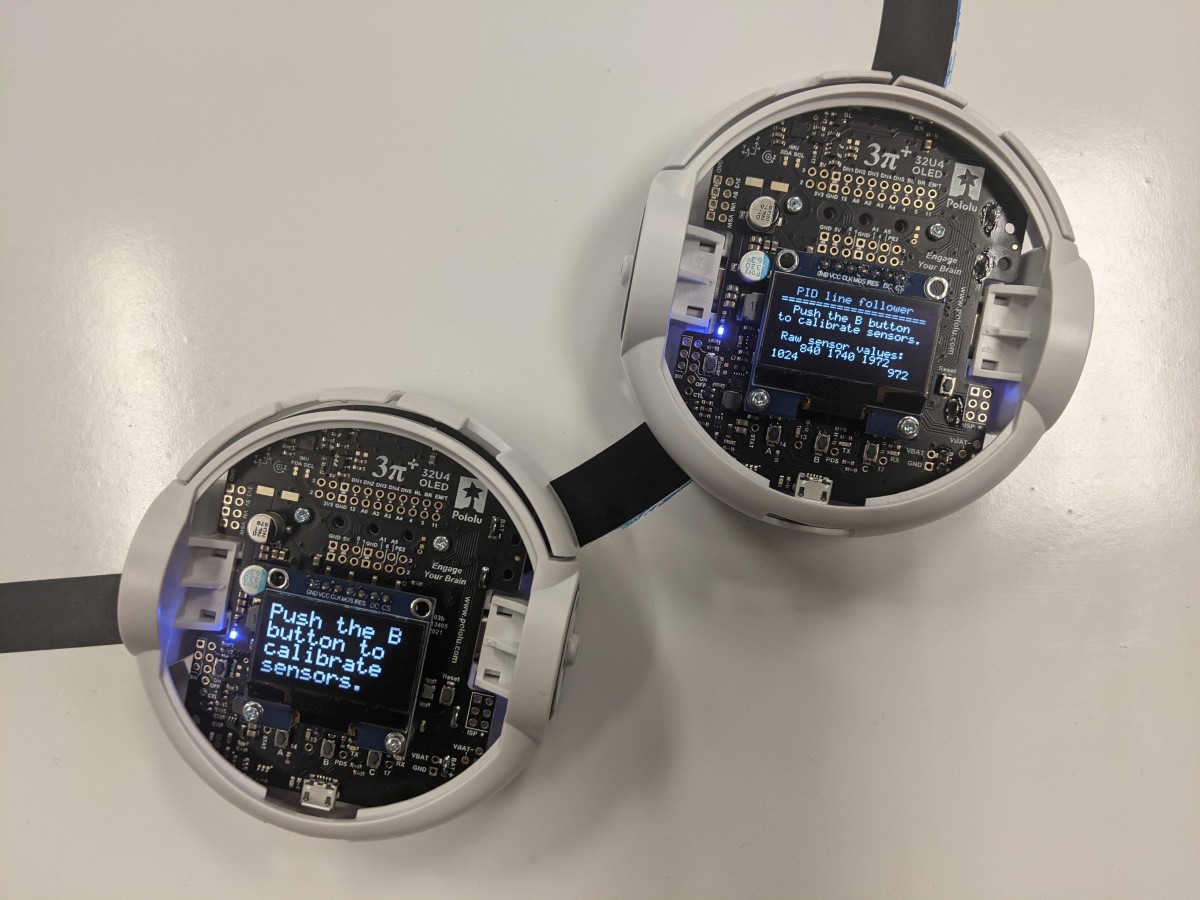
 |
A 3pi+ 32U4 OLED and an original 3pi+ 32U4 running nearly identical programs and displaying the same text. |
|---|
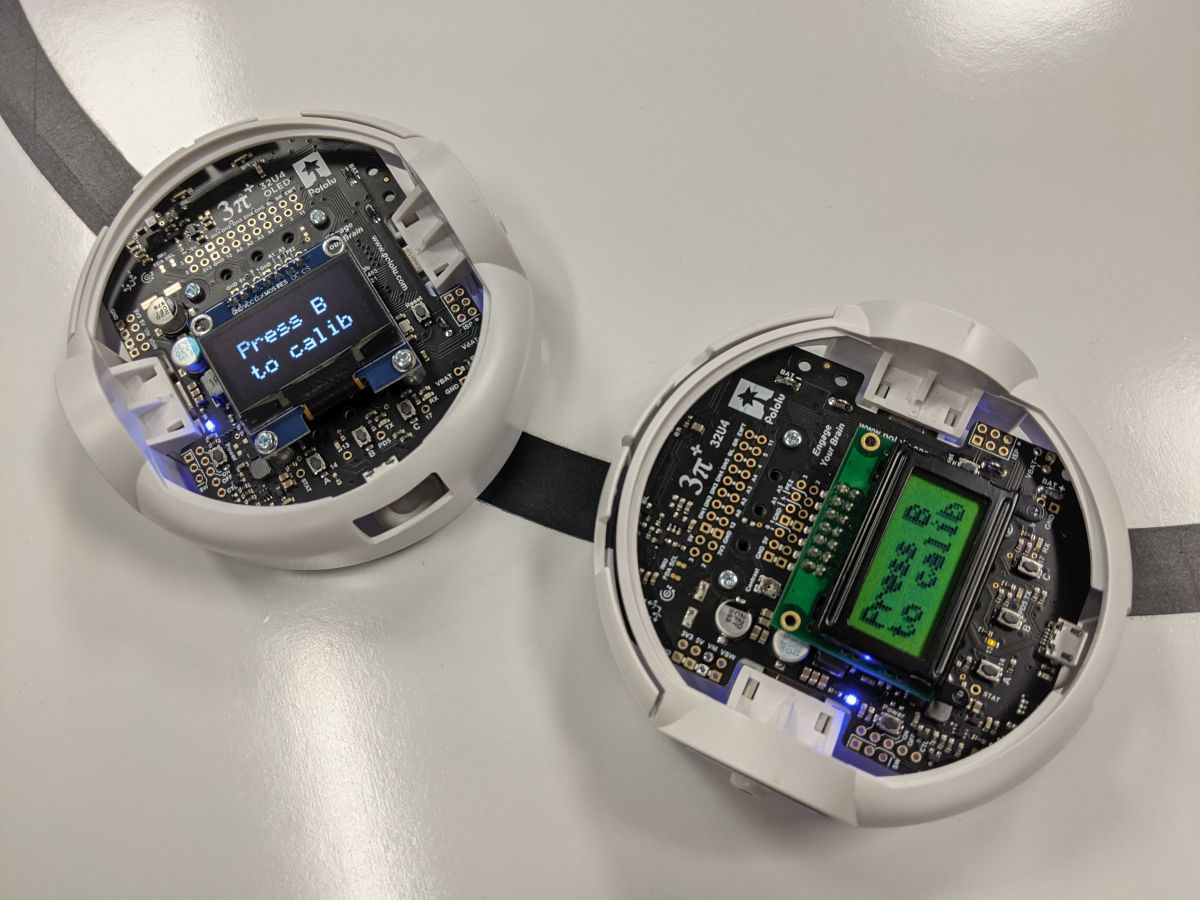
Additionally, the same library makes it trivial to get the benefit of a higher-density text area: you can easily “upgrade” from an 8×2 character grid to an 11×4 or 21×8 layout.
 |
Higher-density text layouts on the displays of some 3pi+32U4 OLED robots. |
|---|
We plan to continue improving our libraries to give you more options for efficiently working with both text and graphics on an OLED display; stay tuned for updates!
|
|
|

Related products


Zumo adapter for MicroPython Pyboard by MCHobby
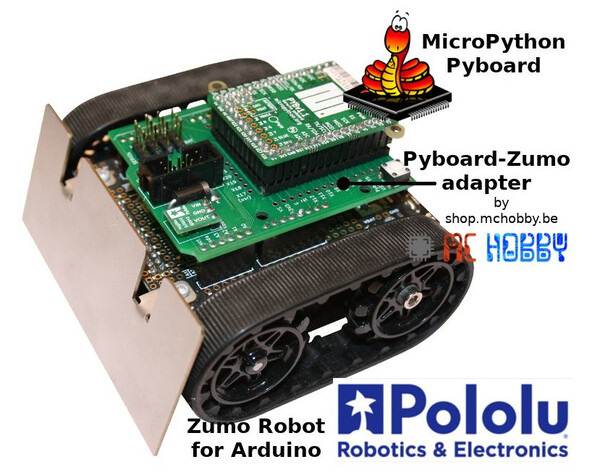 |
Belgian distributor MCHobby has released an adapter that allows a MicroPython Pyboard to control a Zumo Robot for Arduino. Using their MicroPython port of our Zumo Shield library, you can run programs like this on the Zumo:
from zumoshield import ZumoShield
zumo = ZumoShield()
zumo.motors.setSpeeds( 100, 100 ) # -400..0..400
zumo.motors.stop()
Even cooler, the on-board REPL allows live programming/debugging over USB. Here’s an example from their library documentation that shows a test of the Zumo’s accelerometer:
MicroPython v1.16-92-g98c570302-dirty on 2021-07-16; PYBv1.1 with STM32F405RG
Type "help()" for more information.
>>>
>>> import test_acc
x -241 y -23
x -236 y -16
x -233 y -68
x -223 y -81
x 1110 y -7073 <--- Knocked on the right side
x -309 y -35
x -242 y -69
MicroPython is a minimal Python interpreter designed to run on microcontrollers such as the the Espressif ESP8266 and ESP32, the Raspberry Pi RP2040, and a variety of Arm processors. The Pyboard we are talking about here is the official reference board for MicroPython, based on a powerful Arm Cortex-M4 processor by ST. As you can see in the pinout diagrams below, most of the pins of the Pyboard are also broken out on the Zumo adapter, and the two Pyboard buttons are duplicated in more convenient locations:
|
|
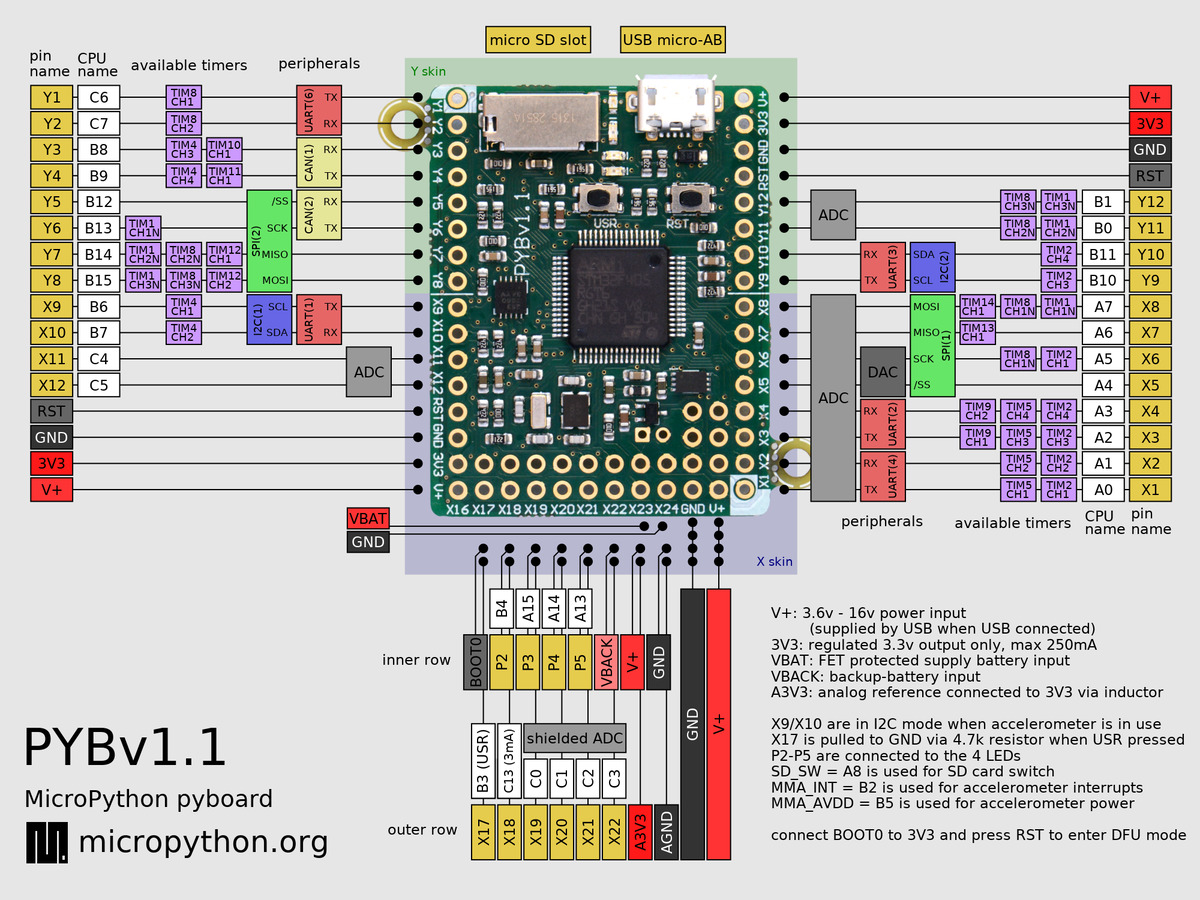
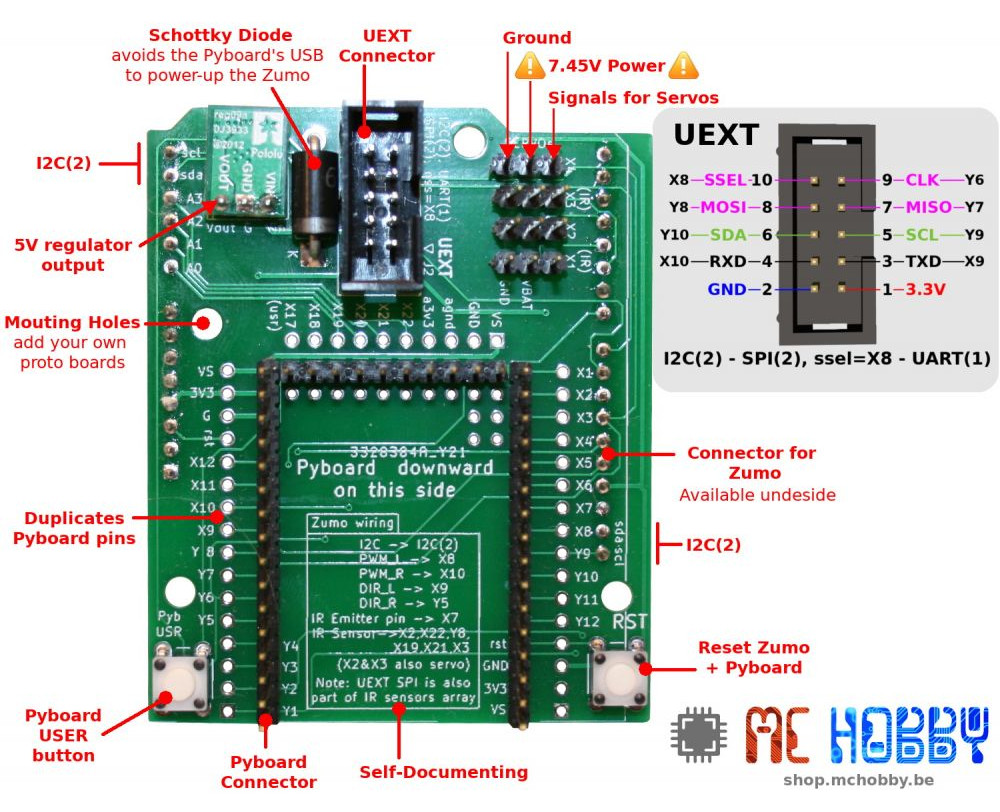
An included Pololu voltage regulator and power diode allow the robot to be fully powered with batteries and also to safely connect to USB for programming. The MCHobby libraries demonstrate how to access all of the Zumo features from the Pyboard, in particular including example MicroPython code for line following and maze solving. There are many more possibilities with MicroPython on the Zumo, and we’re excited to see what the community will do with it!
For more information or to buy a board, see the Adaptateur Pyboard pour ZUMO Robot product page.
Related products

New product: 1.3" graphical OLED display
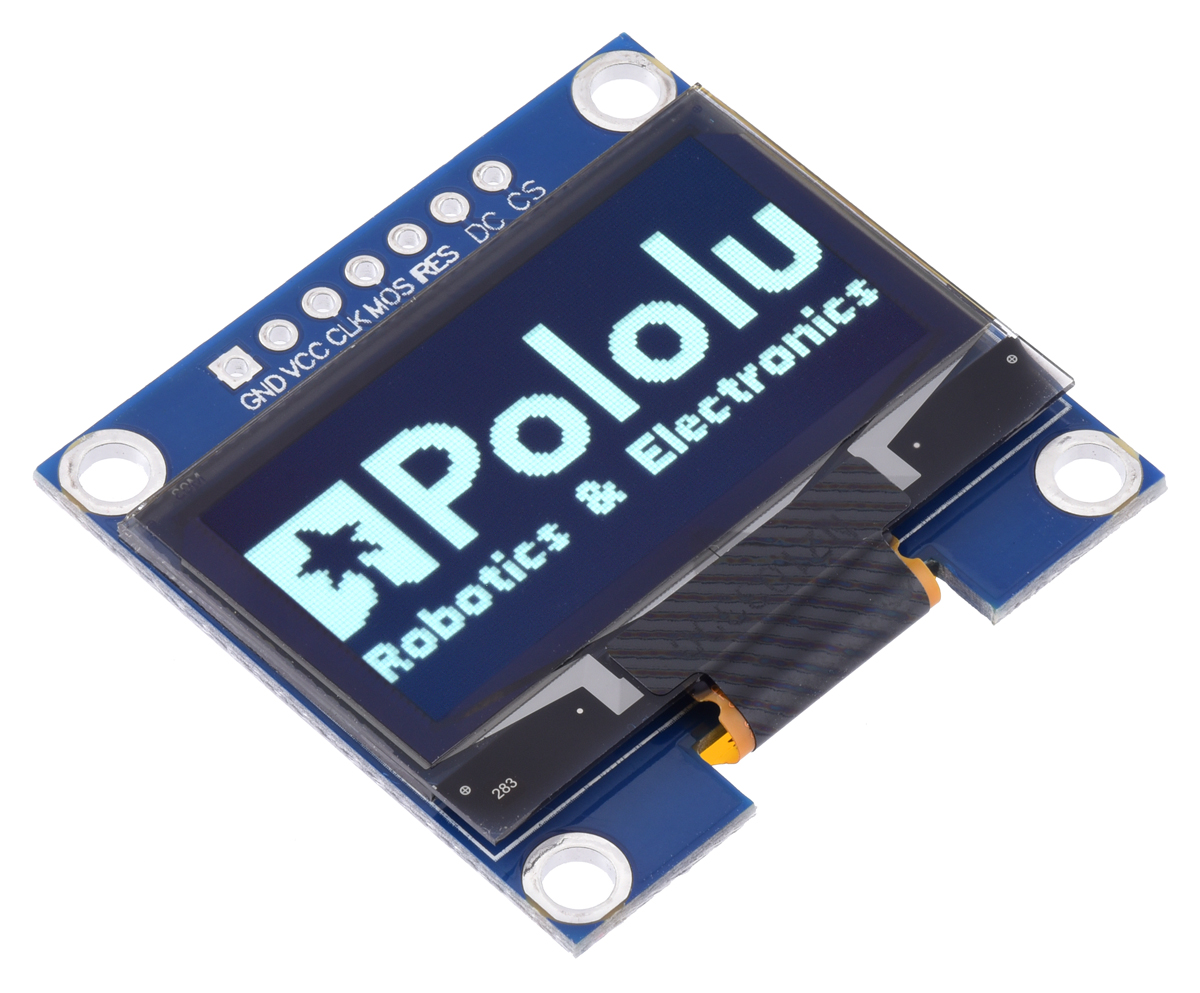 |
We’re now selling an OLED display module that you can use to add some fancy graphics to your project! This monochrome OLED screen measures 1.3 inches diagonally and uses a common SH1106 driver that can be controlled via SPI communication. (For more information, see its product page.)
 |
Graphical OLED Display: 128×64, 1.3", White Pixels, SPI, Blue PCB, controlled by an A-Star 328PB Micro running at 3.3V. |
|---|
With a 128×64 grid of individually-controllable, high-contrast pixels, this OLED display can show a lot more information (and looks a lot cooler) than simple text-only LCD screens. We’re working on something that can take advantage of these enhanced graphical capabilities, so keep an eye out for updates!
Related products

Independence Day Sale going on now!

We are having an Independence Day sale starting now through Monday, July 5! Check out the sale page for more information. Please note that we will be closed Monday, so orders placed after 2 PM Pacific Time Friday, July 2 will be shipped on Tuesday, July 6.
New product: 5V Step-Up/Step-Down Voltage Regulator S13V30F5
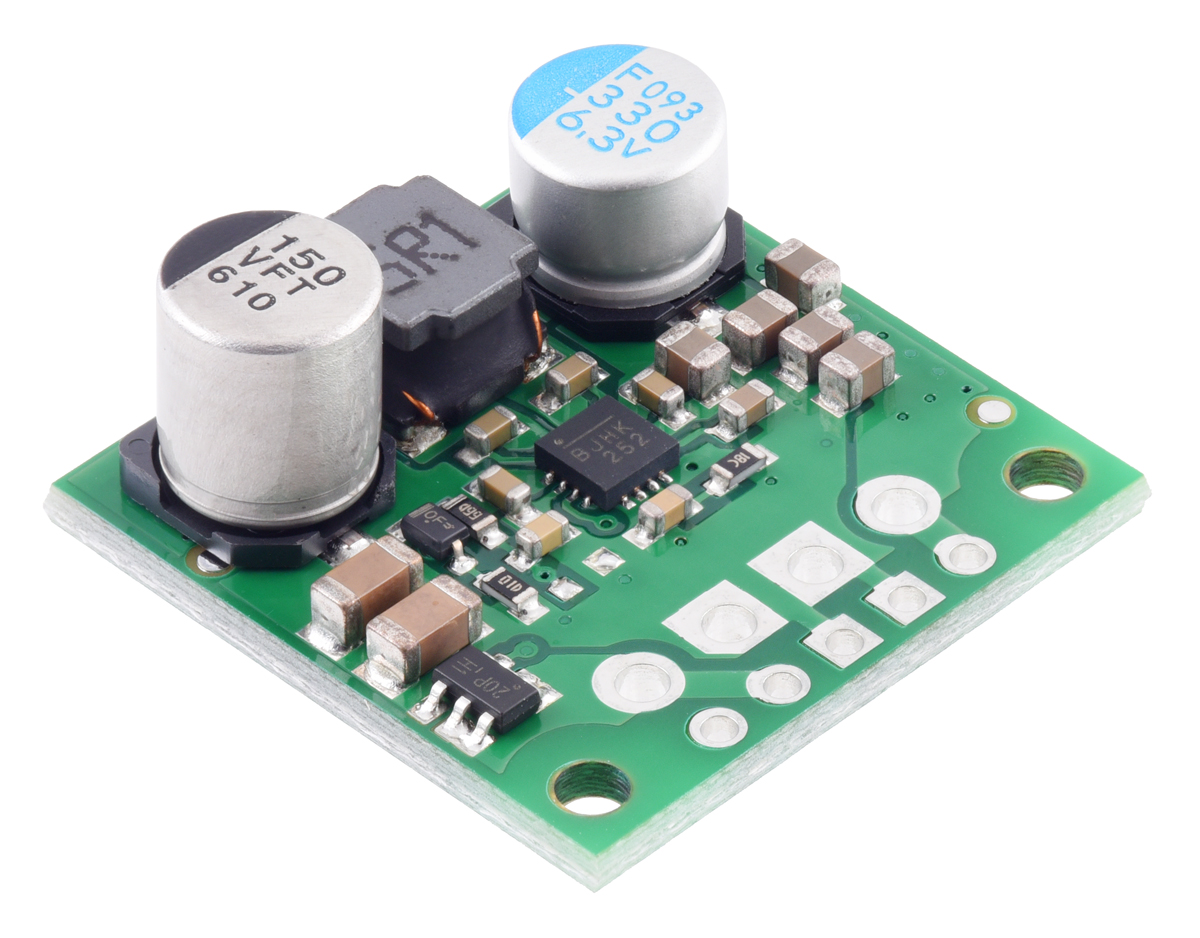 |
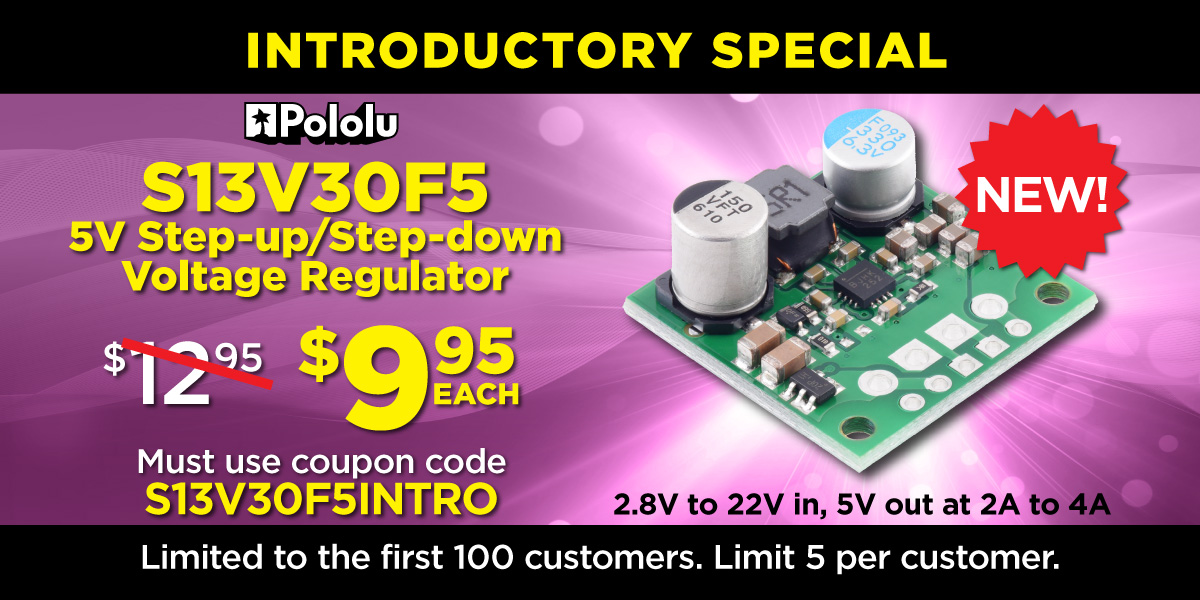
I started routing the PCB for the S13V30F5 5V step-up/step-down voltage regulator in January of 2020, and we were in the middle of testing the assembled prototypes when the pandemic shutdowns hit. Like lots of other things in 2020, the project got put on hold because appropriate testing requires a decent amount of equipment and is not the easiest thing to do remotely. That only makes it more exciting to announce that the S13V30F5, our most powerful step-up/step-down regulator, is now available! It operates from 2.8 V to 22 V and steps that voltage up or down as necessary to produce a fixed 5V output with typical efficiencies of 85% to 95%. As shown in the graph below, it can deliver around 3A continuously when the input is near 5V.
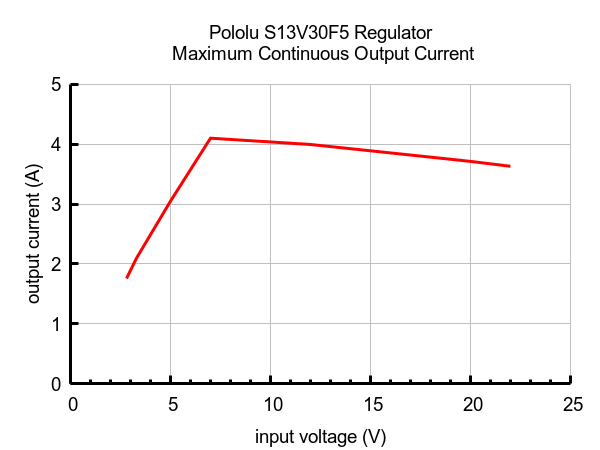 |
This new regulator measures just 0.9″ × 0.9″. That is almost half the size of our previously highest-power step-up/step-down units, the S18V20Fx family, which we have recently started rationing due to impacts from the global semiconductor shortages.
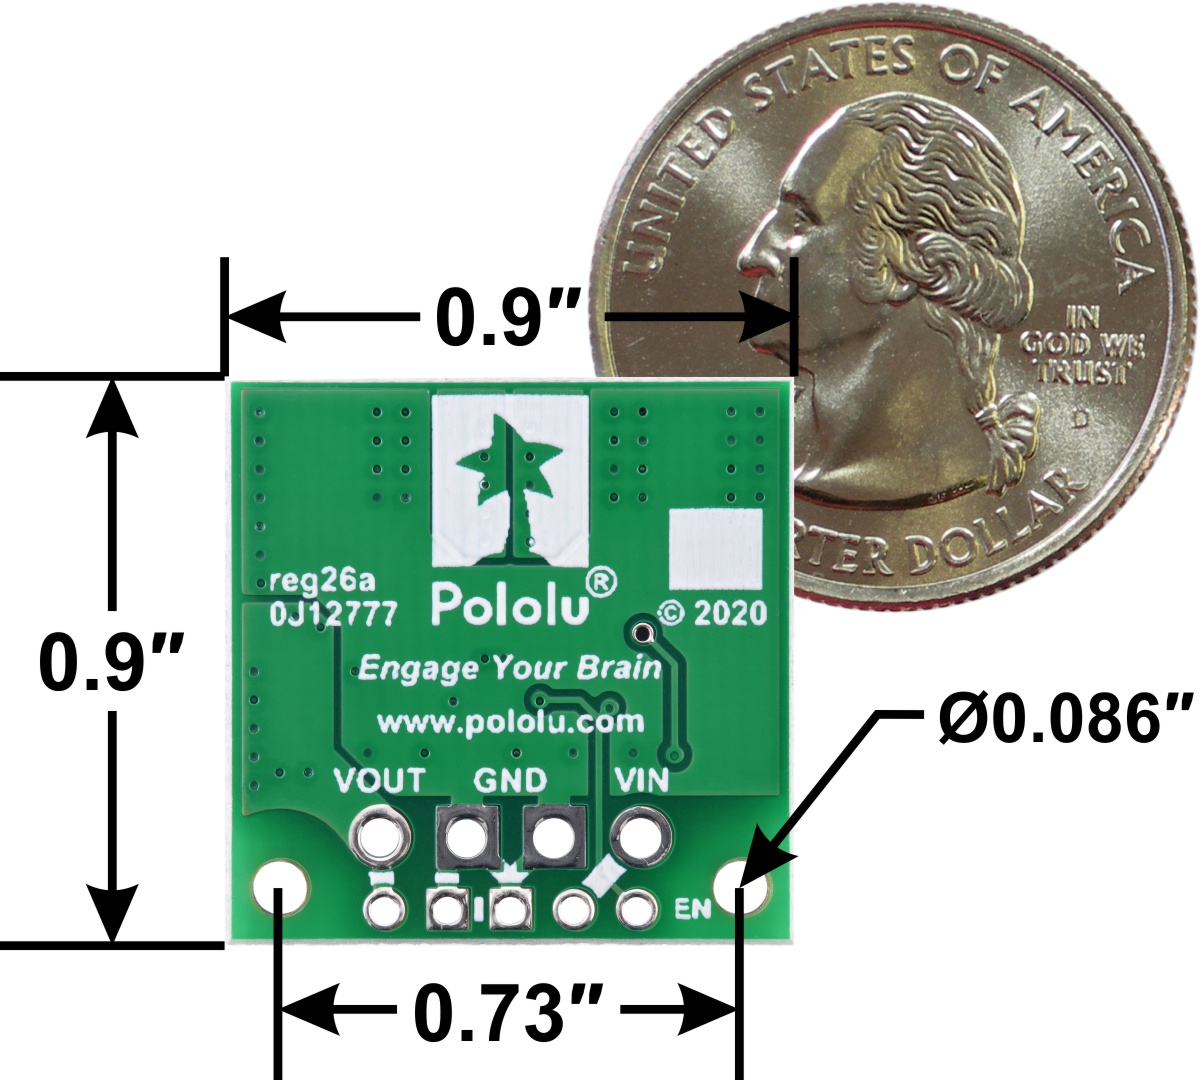 |
5V Step-Up/Step-Down Voltage Regulator S13V30F5, bottom view with dimensions. |
|---|
To help celebrate finally releasing the S13V30F5, we are offering an extra introductory special discount. The first hundred customers to use coupon code S13V30F5INTRO can get up to five units for just $9.95 each!
Related products

New high-speed linear actuators
We are excited to announce the addition of new GF23-series high-speed linear actuators to our already extensive linear actuator selection. This brand new Glideforce series from Concentric International is specifically designed for high-speed, light-duty applications, offering almost twice the speed of our previously fastest options while still supporting almost the same dynamic loads. This video demonstrates the speeds of the four types of light-duty actuators we carry:
They are available in 2″, 4″, 6″, 8″, 10″, and 12″ lengths with or without a feedback potentiometer. The table below shows how these new units compare to our other light-duty options, which are slower but stronger:
This brings our total selection of light-duty actuators to 48 options, and our total overall selection of linear actuators to 82 options, all stocked and available to ship the day you order.


Home | Forum | Blog | Support | Ordering Information | Wish Lists | Distributors | BIG Order Form | About | Contact
© 2001–2024 Pololu Corporation


