Pololu Blog »
Pololu Blog (Page 20)
Welcome to the Pololu Blog, where we provide updates about what we and our customers are doing and thinking about. This blog used to be Pololu president Jan Malášek’s Engage Your Brain blog; you can view just those posts here.
Popular tags: community projects new products raspberry pi arduino more…
New products: D36V6x step-down regulators

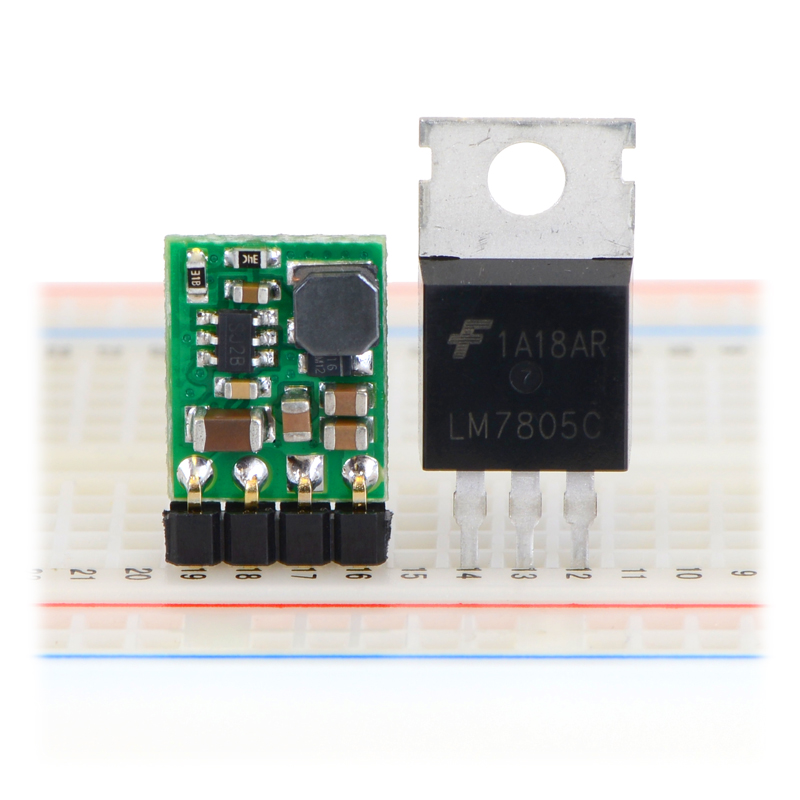 |
Pololu step-down voltage regulator D36V6Fx/D24V6Fx/D24V3Fx next to a 7805 voltage regulator in TO-220 package. |
|---|
Wrapping up our new product releases for the month and for the summer is our new D36V6x family of step-down voltage regulators. These small regulator modules support a large input voltage range and are a great alternative to old three-terminal linear voltage regulators that waste a lot of power and get really hot. These new regulators can take an input voltage anywhere from a few tenths of a volt over the set output voltage up through an absolute max of 50 V, and they can deliver up to 600 mA. We have them available in seven fixed voltage options and two adjustable versions:
- D36V6F3: Fixed 3.3V output
- D36V6F5: Fixed 5V output
- D36V6F6: Fixed 6V output
- D36V6F7: Fixed 7.5V output
- D36V6F9: Fixed 9V output
- D36V6F12: Fixed 12V output
- D36V6F15: Fixed 15V output
- D36V6ALV: Adjustable 2.5 – 7.5 V output
- D36V6AHV: Adjustable 4 – 25 V output
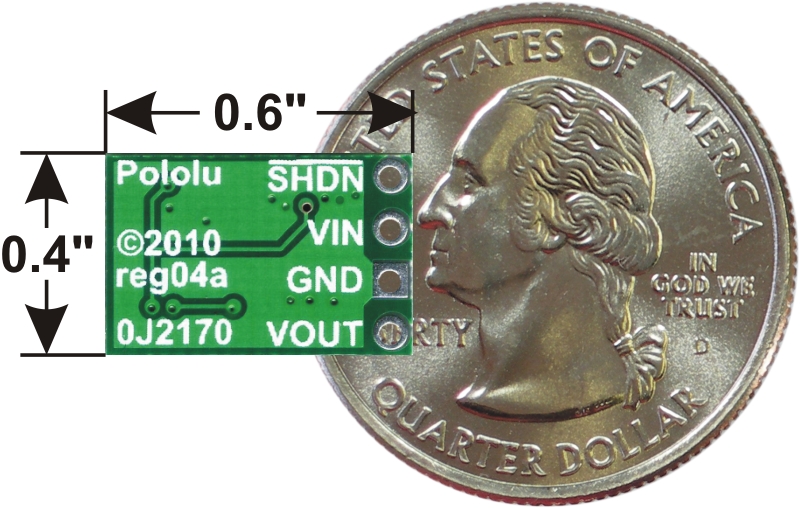 |
Pololu step-down voltage regulator D36V6Ax/D24V6Ax/D24V3Ax, bottom view with dimensions. |
|---|
You might notice that the board for the adjustable version shows a 2010 copyright year (the fixed version is an even smaller board, and we did not fit the year on there). That’s because these new regulators are actually old designs updated with new regulator chips that use the same package and pinout. The older products were our D24V3x and D24V6x families of regulators, which were based on the Texas Instruments LMR14203 and LMR14206 ICs. For the new D36V6x family, we are moving up to the newer LMR16006 regulator. This chip has several exciting new features that we think will make it our favorite general-purpose regulator for many of our products: higher maximum voltage, better low-dropout performance, and better quiescent current.
Higher maximum voltage
The LMR16006 has a 60 V maximum input voltage, up from the 42 V of the LMR1420x parts. Even 42 V covered most of our typical applications, but it’s not quite enough for 36V nominal applications, which are getting more common. Our more advanced, integrated products such as motor controllers are often limited by some complex part or circuit, such as a motor driver, and we would like the overall operating range of the product not to be reduced by the regulator. Many stepper motor drivers, such as TI’s DRV8825 or the Toshiba TB67S249FTG and TB67S279FTG that we released carriers for in June, support maximum input voltages of 45 or 50 volts. It’s nice not to be limited by your regulator when you are making systems with those kinds of parts.
For our new D36V6x modules, we are limited to the 50 V maximum of the capacitors from Vin to ground. Unfortunately, capacitor options get a lot more restricted (and expensive) once we go beyond 50 V, so we decided to stick with our old boards so that we could continue to offer these regulator modules at a low price while still providing some substantial improvements. We might still make a new board with higher-voltage capacitors for those who would like to make full use of the regulator’s 60 V maximum. (For anyone thinking of just removing the caps and putting on your own external ones, you might also want to change the diode, which is also a 60 V part.)
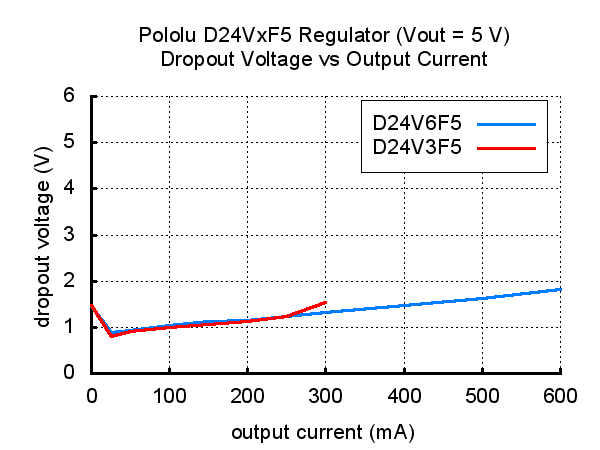
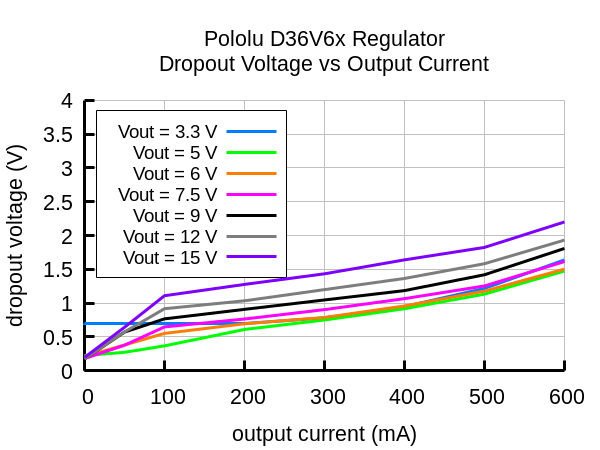
Better low-dropout performance
Having a higher maximum input voltage is nice, but often we’re trying to squeeze the most we can out of a dying battery, so it’s nice to have a low dropout, which is the voltage the regulator needs between the input and output. The older LMR1420x parts had an annoying quality of the dropout voltage going up as the load current went down. The newer LMR16006 has a nice, low dropout as the current goes down, so if you don’t need much current, you can get 5 V out with just 5.2 or 5.3 volts in. Here is a comparison of the dropout performance of the old and new regulators:
|
|
Lower quiescent current
The new regulators also have much lower quiescent current, which is the current the regulator uses when it’s just sitting there and your load isn’t drawing anything. On the old regulators, the quiescent current was under 2 mA, and we did not characterize it beyond that. For these new regulators, it’s typically under 200 microamps, ten to twenty times better than the old regulators. I realize it’s not that amazing for modern regulators, but it’s nice to know that your low-cost, general-purpose regulator module isn’t wasting a lot of power.
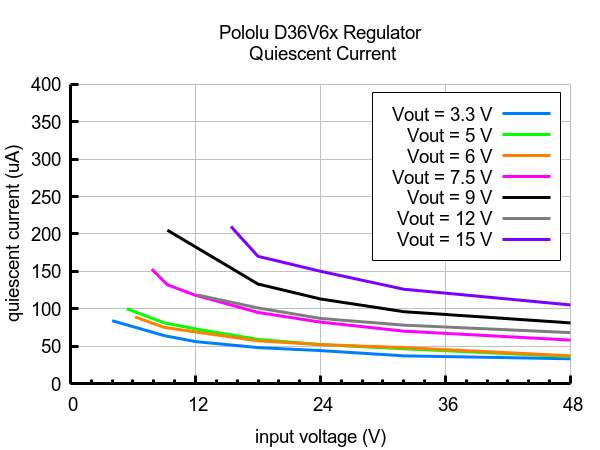 |
Typical quiescent currents of Step-Down Voltage Regulator D36V6Fx. |
|---|
Even when we put a new chip onto an old circuit board as I have described, we still test and characterize with different parts to get a good overall result. In the case of these regulators, where the circuit is quite simple, this phase of development is much more time consuming than laying out a circuit board. We build and test dozens of prototypes with different inductances, and even though you can’t see it in the pictures, we build the different voltage versions of the regulators with different inductors to get the best performance we can (within a given inductor type and size).
So how about getting a few to have around for general-purpose use on your next project? You can get one for just $3 as part of our introductory promotion using coupon code D36V6XINTRO, limited to the first 100 customers and to three per item (so you could get up to 27 regulators at that price if you get three of each voltage version). It’s always difficult for us to predict which versions will be how popular, so initial stock is limited, but we make these here in Las Vegas, so even if the version you want goes out of stock, you can backorder it with the promotional price, and we should be able to ship within a day or two.
Related products


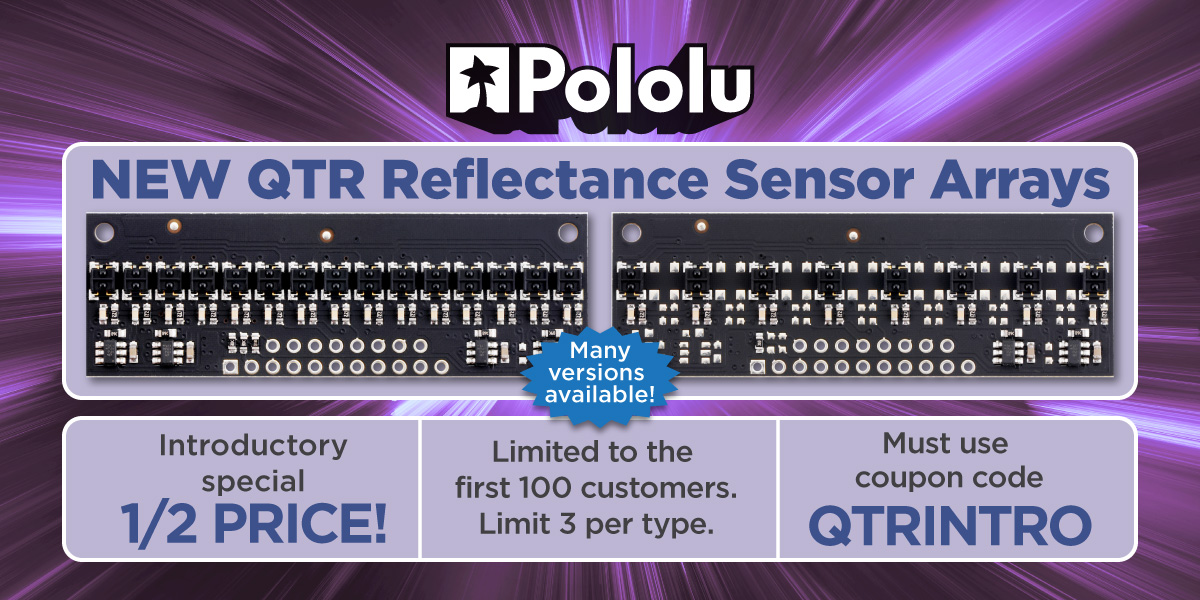
New products: 1- and 31-channel QTR HD reflectance sensor arrays
This week, we released what we expect to be the extremes of our new line of QTR HD reflectance sensor arrays, with two sizes of a single-sensor board on the small end and a massive 31-sensor array for the maximum size. This picture shows the relative sizes of the boards, along with some of the intermediate sizes we have available:
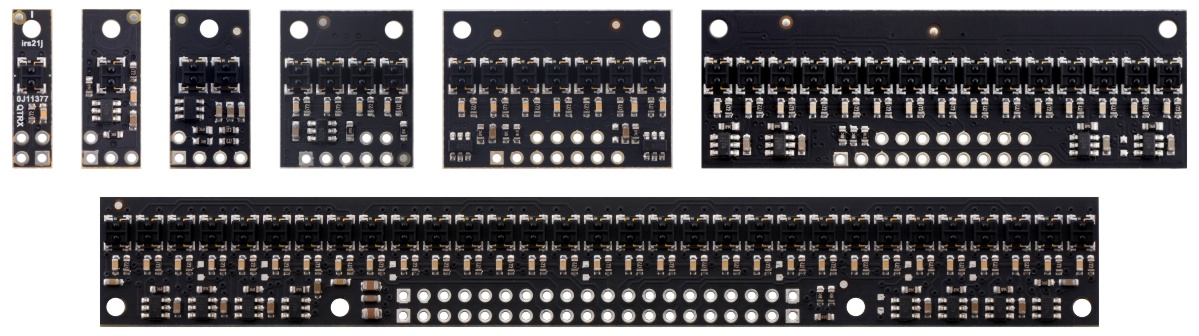 |
The QTR Reflectance Sensor Arrays are available in many different sizes. |
|---|
We made the two single-sensor sizes because we could make good arguments for each one. Part of the point of doing a single-sensor board is to make it really small, so you can fit it into tight spaces. But “really small” means different things depending on the dimensions you care about. So we have one version that is only 5 mm (0.2") wide, with components on both sides of the PCB, and one version that is 7.5 mm (0.3") wide, with components on just one side. The 7.5 mm wide version is a little thinner and flatter because it doesn’t have parts on one side, can be used with a 3×1, single row connector, and costs slightly less because of the single-sided assembly.
|
|
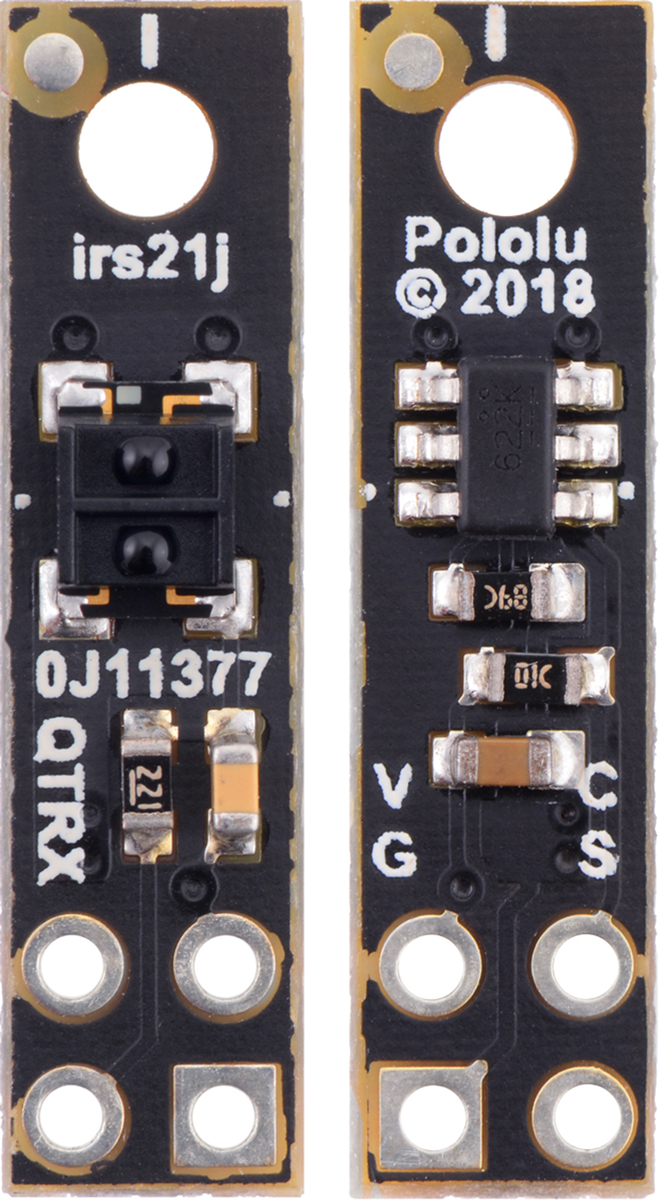
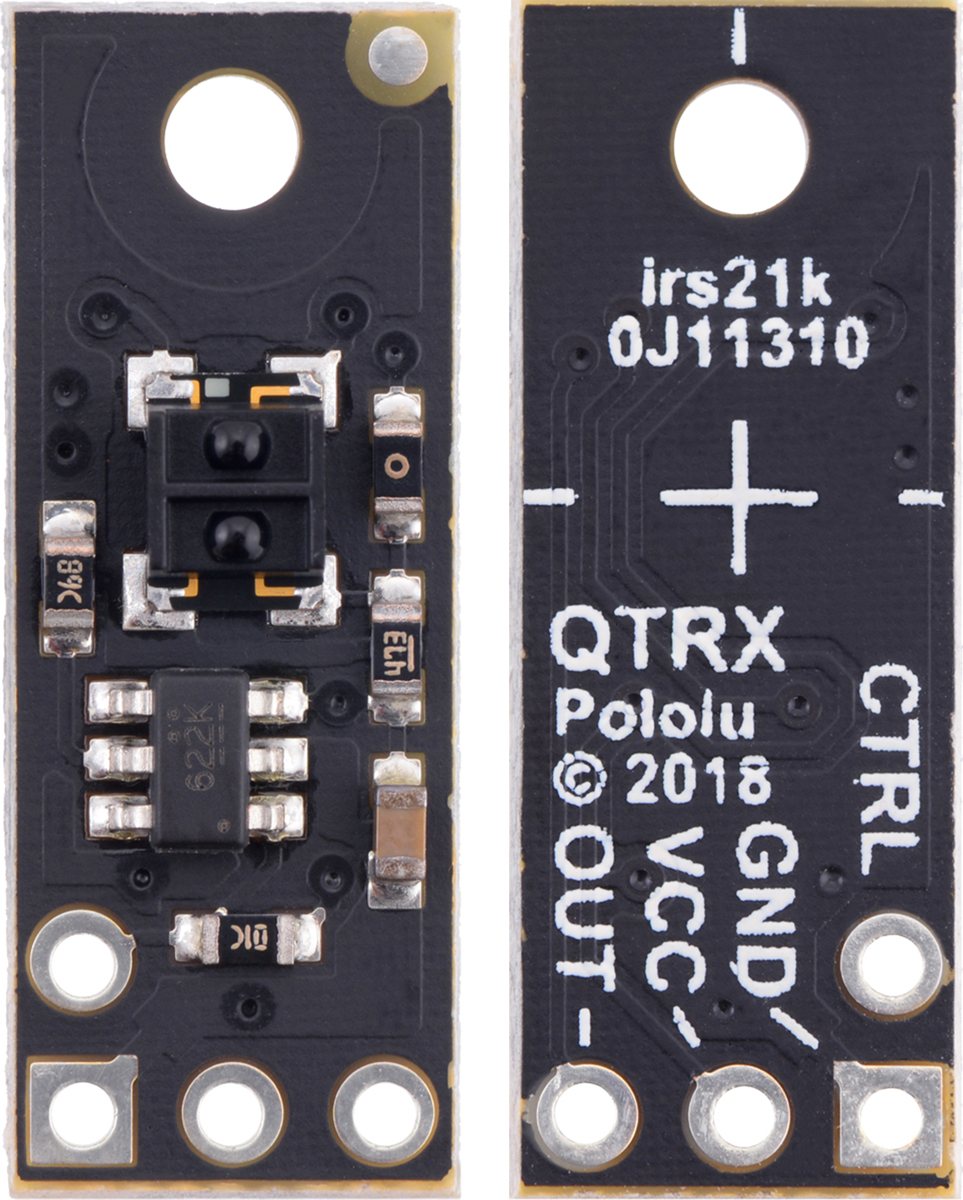
As I mentioned in some of my earlier posts (here and here) about this new line of sensor arrays, we are using two sensor types: more economical units we are calling “QTR”, and higher-performance units with lenses that we are calling “QTRX”. The main appeal of the QTRX sensors is that they can give the same readings at much lower IR emitter currents, which can really make a big difference for big sensor arrays. But if you crank up the current in those QTRX sensors, you can also get more distance. We did not do that on the QTRX arrays because the sensor modules leak light out the sides and interfere with each other when they are closely spaced, but with these single-channel boards, we are also making available the QTRX sensors with the higher 30 mA maximum emitter current, which allows for a range of up to about 8 cm (about 3 inches). We are calling these sensors QTRXL.
This video (taken with an old camera that does not have as much IR filtering as most newer cameras) shows the IR light leakage around the side of the QTRX sensor module:
I should point out that all of these new QTR modules offer variable brightness control by varying the current through the emitter using the control pin. However, if you want to take advantage of the maximum brightness and range, and have several sensors close to each other, you will need some barriers between them to prevent them from blinding each other (or just turn on one emitter at a time).
The 31-sensor arrays are huge! Well, at least compared to the tiny single-sensor boards.
 |
QTRX-HD-31RC Reflectance Sensor Array. |
|---|
The routing on those boards is quite complex because adjacent IR emitters are not just wired in series (because we want to have separate even/odd emitter control, plus the alternate density population options I discussed in this post), so we ended up having to go to a 4-layer PCB to route it. This did let us make the vertical dimension a little lower, so the board is just 16.5 mm tall, compared to the 20 mm board height for the versions with 15 and fewer sensors. The 31-channel board is also 0.062" (1.6 mm) thick, compared to the thinner 0.040" (1 mm) boards we use for the lower channel counts. You can compare all the dimensions of the various boards in the detailed dimension diagram (2MB pdf).
The sixteen new boards we released this week brings the total available in this new QTR HD product line to 40. You can see the options neatly summarized in the tables below to pick the best array for your application.
| QTR sensors 2.9 V to 5.5 V; 30 mA max LED current(1); 5 mm optimal range |
|||||||||||||||||||||||||||||||||||||
| Board width |
Configuration | Max board current(2) |
Max range | Output type |
Name | 1-piece price |
|||||||||||||||||||||||||||||||
|---|---|---|---|---|---|---|---|---|---|---|---|---|---|---|---|---|---|---|---|---|---|---|---|---|---|---|---|---|---|---|---|---|---|---|---|---|---|
| 5.0 mm | 1 sensor (HD) |
32 mA | 30 mm | analog | QTR-HD-01A | $3.25 | |||||||||||||||||||||||||||||||
| RC (digital) | QTR-HD-01RC | ||||||||||||||||||||||||||||||||||||
| 7.5 mm | 1 sensor (MD) |
32 mA | 30 mm | analog | QTR-MD-01A | $2.75 | |||||||||||||||||||||||||||||||
| RC (digital) | QTR-MD-01RC | ||||||||||||||||||||||||||||||||||||
| 10.2 mm | 4 mm × 2 |
32 mA | 30 mm | analog | QTR-HD-02A | $3.33 | |||||||||||||||||||||||||||||||
| RC (digital) | QTR-HD-02RC | ||||||||||||||||||||||||||||||||||||
| 17.0 mm | 4 mm × 4 |
62 mA | 40 mm | analog | QTR-HD-04A | $4.97 | |||||||||||||||||||||||||||||||
| RC (digital) | QTR-HD-04RC | ||||||||||||||||||||||||||||||||||||
| 29.0 mm | 8 mm × 4 |
62 mA | 40 mm | analog | QTR-MD-04A | $5.26 | |||||||||||||||||||||||||||||||
| RC (digital) | QTR-MD-04RC | ||||||||||||||||||||||||||||||||||||
| 4 mm × 7 |
125 mA | 40 mm | analog | QTR-HD-07A | $8.31 | ||||||||||||||||||||||||||||||||
| RC (digital) | QTR-HD-07RC | ||||||||||||||||||||||||||||||||||||
| 61.0 mm | 8 mm × 8 |
125 mA | 40 mm | analog | QTR-MD-08A | $9.90 | |||||||||||||||||||||||||||||||
| RC (digital) | QTR-MD-08RC | ||||||||||||||||||||||||||||||||||||
| 4 mm × 15 |
250 mA | 50 mm | analog | QTR-HD-15A | $16.88 | ||||||||||||||||||||||||||||||||
| RC (digital) | QTR-HD-15RC | ||||||||||||||||||||||||||||||||||||
| 125.0 mm | 4 mm × 31 |
495 mA | 50 mm | analog | QTR-HD-31A | $35.11 | |||||||||||||||||||||||||||||||
| RC (digital) | QTR-HD-31RC | ||||||||||||||||||||||||||||||||||||
| QTRX sensors 2.9 V to 5.5 V; 3.5 mA max LED current(1); 10 mm optimal range |
|||||||||||||||||||||||||||||||||||||
| Board width |
Configuration | Max board current(2) |
Max range | Output type |
Name | 1-piece price |
|||||||||||||||||||||||||||||||
| 5.0 mm | 1 sensor (HD) |
5 mA | 30 mm | analog | QTRX-HD-01A | $3.75 | |||||||||||||||||||||||||||||||
| RC (digital) | QTRX-HD-01RC | ||||||||||||||||||||||||||||||||||||
| 7.5 mm | 1 sensor (MD) |
5 mA | 30 mm | analog | QTRX-MD-01A | $3.25 | |||||||||||||||||||||||||||||||
| RC (digital) | QTRX-MD-01RC | ||||||||||||||||||||||||||||||||||||
| 10.2 mm | 4 mm × 2 |
5 mA | 30 mm | analog | QTRX-HD-02A | $4.99 | |||||||||||||||||||||||||||||||
| RC (digital) | QTRX-HD-02RC | ||||||||||||||||||||||||||||||||||||
| 17.0 mm | 4 mm × 4 |
9 mA | 40 mm | analog | QTRX-HD-04A | $8.25 | |||||||||||||||||||||||||||||||
| RC (digital) | QTRX-HD-04RC | ||||||||||||||||||||||||||||||||||||
| 29.0 mm | 8 mm × 4 |
9 mA | 40 mm | analog | QTRX-MD-04A | $8.41 | |||||||||||||||||||||||||||||||
| RC (digital) | QTRX-MD-04RC | ||||||||||||||||||||||||||||||||||||
| 4 mm × 7 |
17 mA | 40 mm | analog | QTRX-HD-07A | $14.05 | ||||||||||||||||||||||||||||||||
| RC (digital) | QTRX-HD-07RC | ||||||||||||||||||||||||||||||||||||
| 61.0 mm | 8 mm × 8 |
17 mA | 40 mm | analog | QTRX-MD-08A | $16.22 | |||||||||||||||||||||||||||||||
| RC (digital) | QTRX-MD-08RC | ||||||||||||||||||||||||||||||||||||
| 4 mm × 15 |
34 mA | 50 mm | analog | QTRX-HD-15A | $29.10 | ||||||||||||||||||||||||||||||||
| RC (digital) | QTRX-HD-15RC | ||||||||||||||||||||||||||||||||||||
| 125.0 mm | 4 mm × 31 |
68 mA | 50 mm | analog | QTRX-HD-31A | $60.01 | |||||||||||||||||||||||||||||||
| RC (digital) | QTRX-HD-31RC | ||||||||||||||||||||||||||||||||||||
| QTRXL sensors 2.9 V to 5.5 V; 30 mA max LED current(1); 20 mm optimal range |
|||||||||||||||||||||||||||||||||||||
| Board width |
Configuration | Max board current(2) |
Max range | Output type |
Name | 1-piece price |
|||||||||||||||||||||||||||||||
| 5.0 mm | 1 sensor (HD) |
32 mA | 80 mm | analog | QTRXL-HD-01A | $3.75 | |||||||||||||||||||||||||||||||
| RC (digital) | QTRXL-HD-01RC | ||||||||||||||||||||||||||||||||||||
| 7.5 mm | 1 sensor (MD) |
32 mA | 80 mm | analog | QTRXL-MD-01A | $3.37 | |||||||||||||||||||||||||||||||
| RC (digital) | QTRXL-MD-01RC | ||||||||||||||||||||||||||||||||||||
| 1 Can be dynamically reduced to any of 32 available dimming levels. 2 With all LEDs on at max brightness setting. |
|||||||||||||||||||||||||||||||||||||
Our introductory promotions are still going strong! Be one of the first 100 customers to use coupon code QTRINTRO and get any of these new sensors at half price! (Limit 3 per item per customer.)
Related products


New products: Robot Arm Kit for Romi (and also just the gripper)

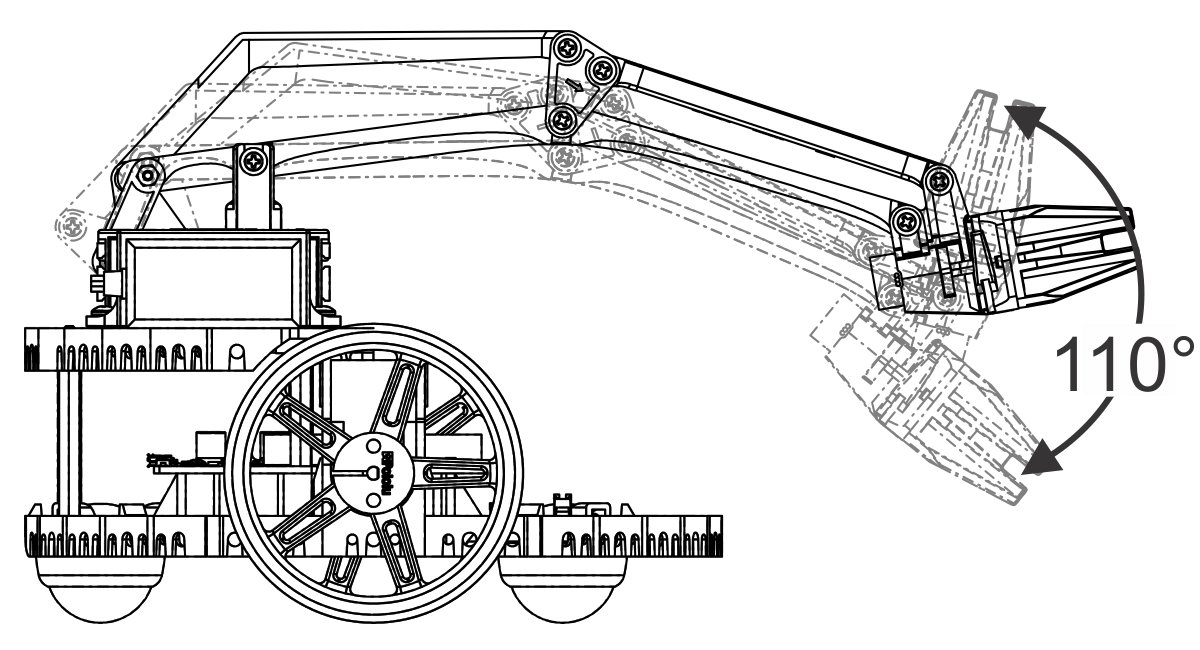
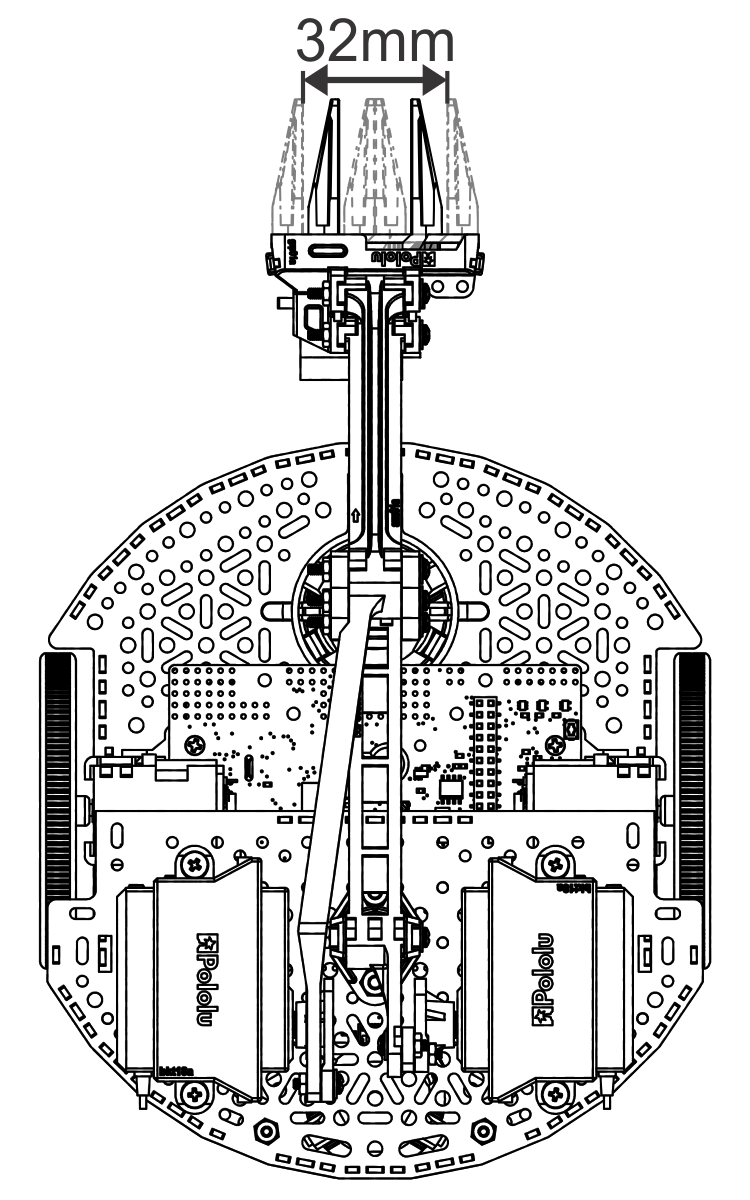
I’m super excited to announce our newest product, the Robot Arm Kit for Romi. The Romi arm is designed to mount to the back half of a Romi chassis with two fixed servos controlling the height and angle of the gripper through a nifty linkage system.
|
|
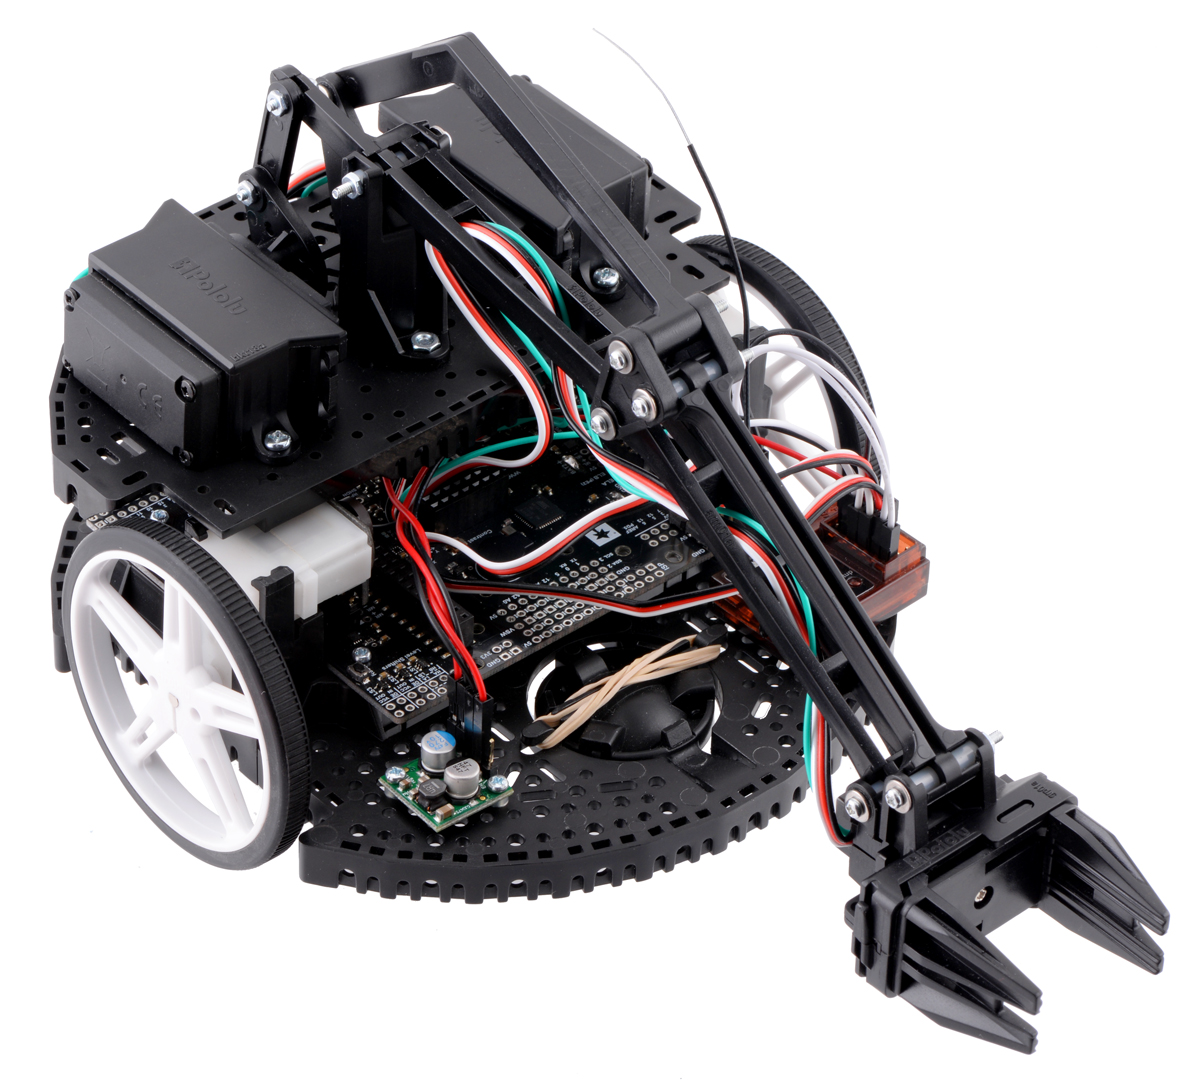
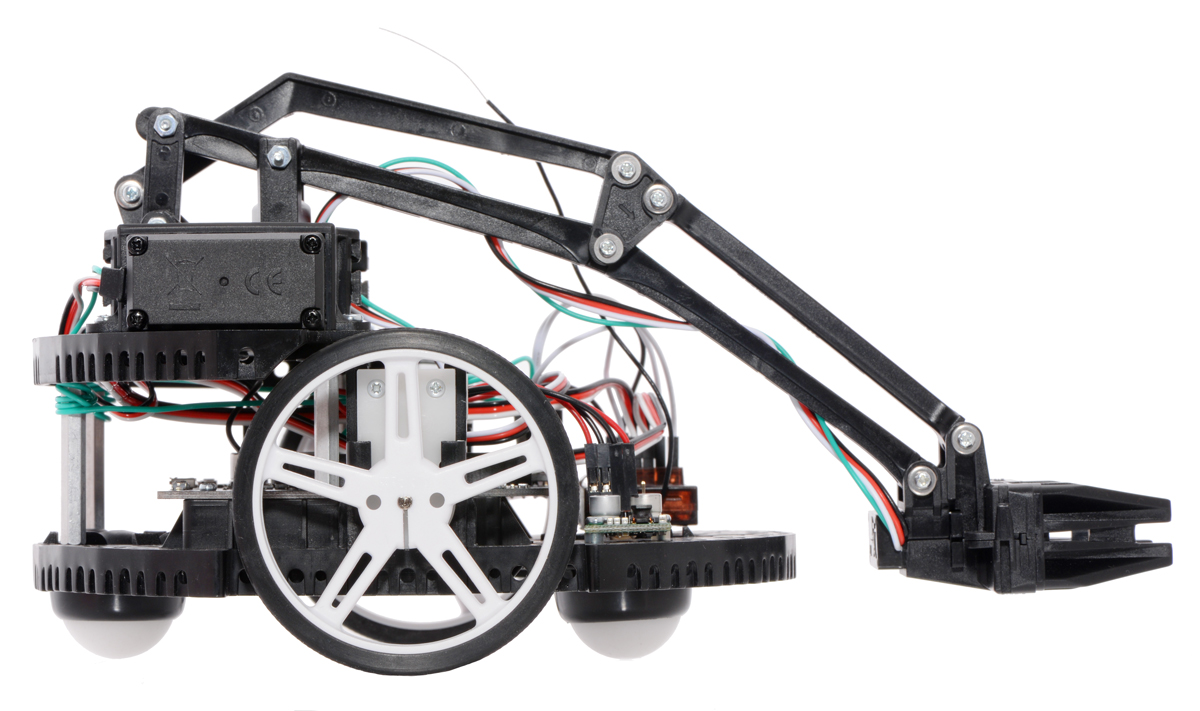
The gripper itself uses a micro servo with two parallel fingers or paddles that open and close through a rack and pinion arrangement. Here is a quick video demonstration of a Romi chassis with the arm attachment:
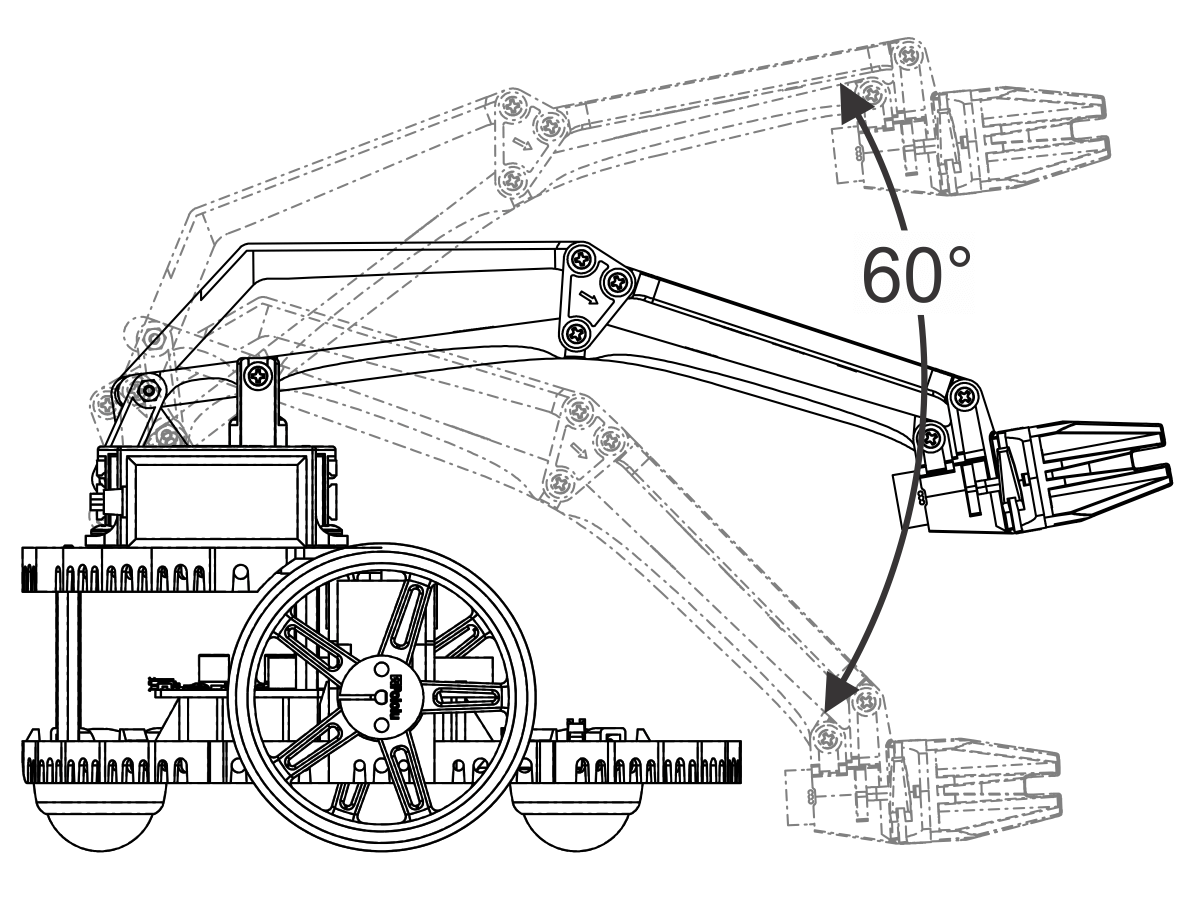
You can see the available range of motion in the drawings below:
|
|
|
The kit ships with all mechanical parts, including special servos with a fourth wire for reading the position of the output shaft:
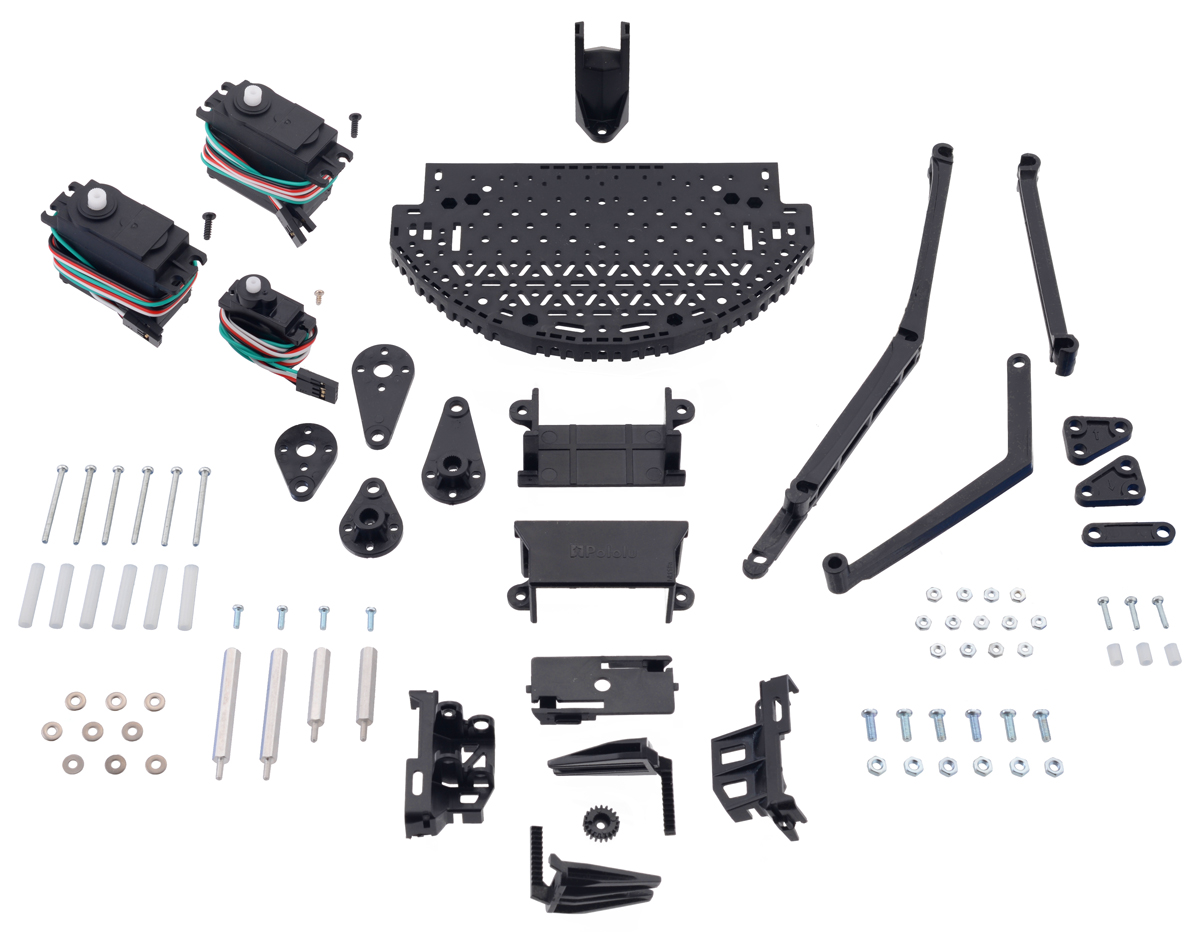 |
Contents of the Robot Arm Kit for Romi. |
|---|
We are also making the gripper used on the arm available as a standalone Micro Gripper Kit with Position Feedback Servo. Here is a picture of the assembled gripper:
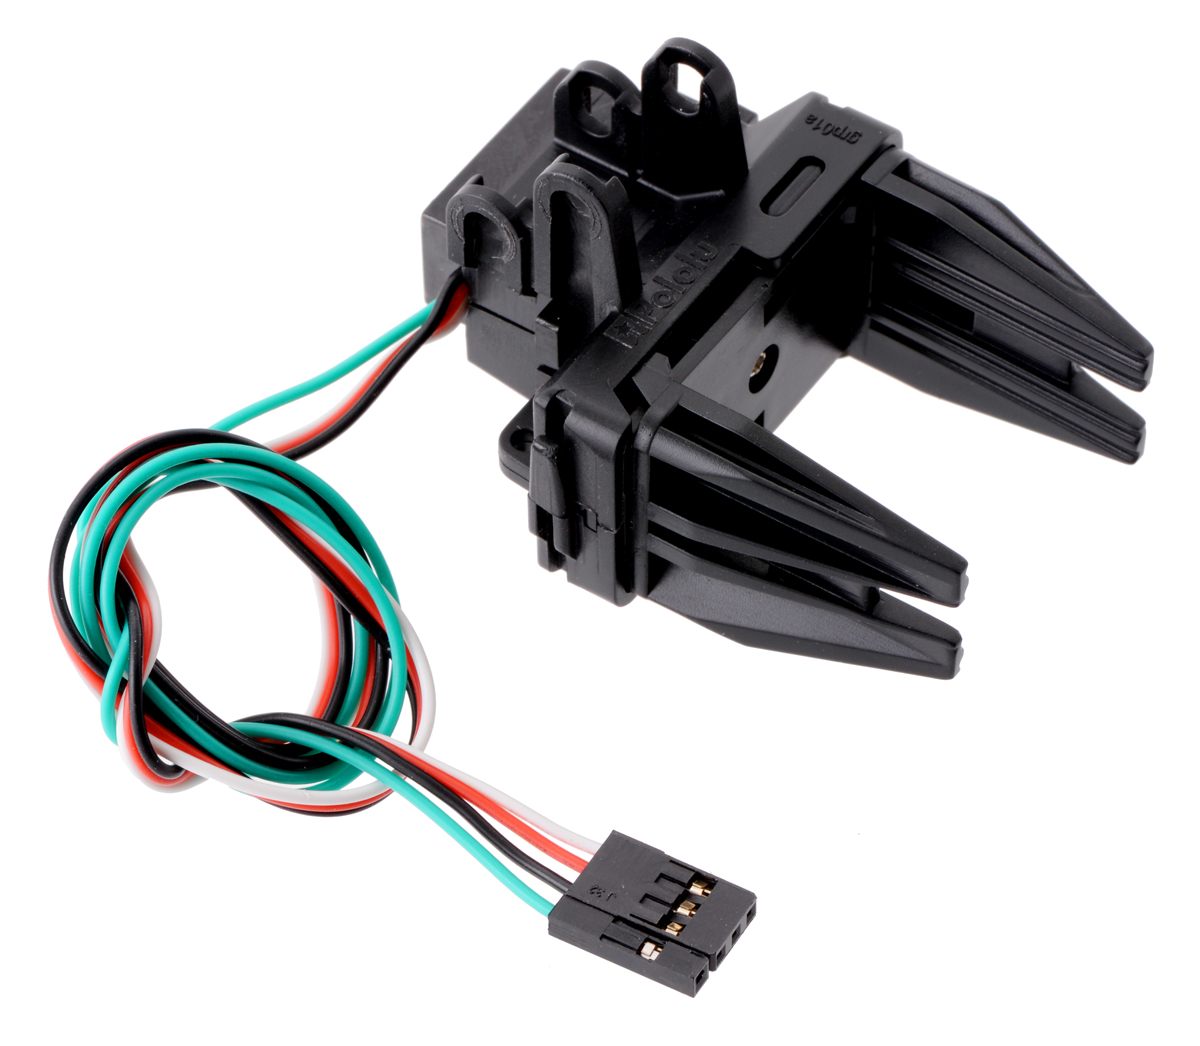 |
Fully assembled Micro Gripper with Position Feedback Servo. |
|---|
Products like this arm kit, with many injection-molded components, are some of the most complicated and time-consuming products we make. As those of you who have followed our growth over the past decade are probably aware, we try to develop our more complete robot kits incrementally, starting with components like just a wheel or a motor bracket, and then using those components in the more integrated robots. For example, we came out with this line of wheels in 2010:
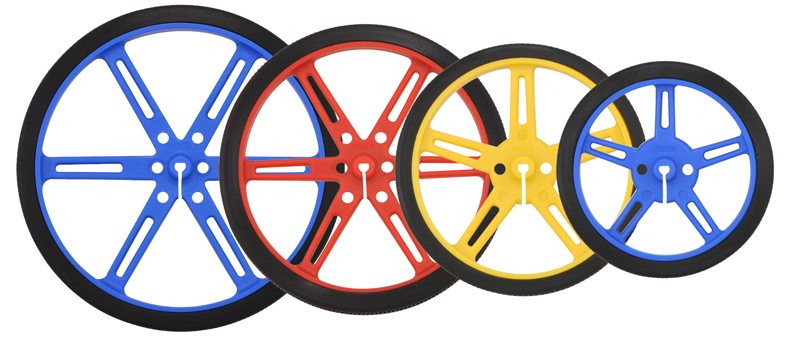 |
Pololu Wheels with 90, 80, 70, and 60 mm diameters in three colors: blue, red, and yellow. |
|---|
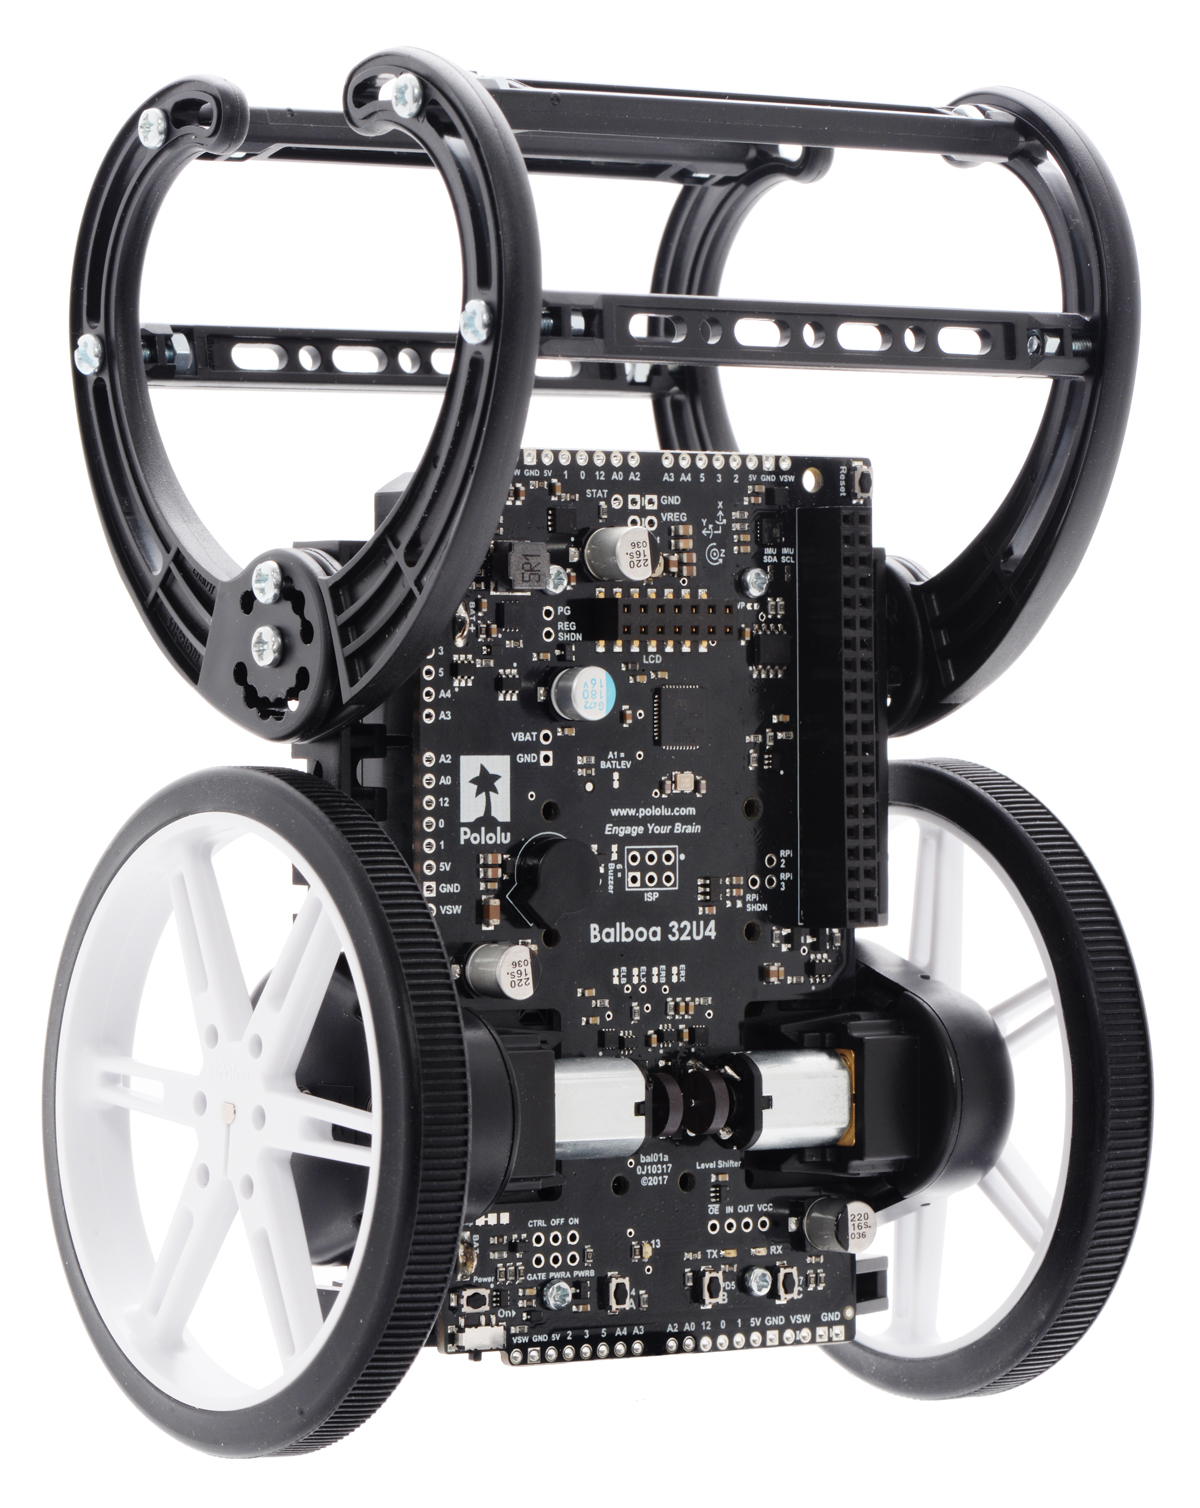
The Romi and Balboa robots, which use those wheels, did not come out until 2016 and 2017.
|
|
If you look at the parts that go into just the gripper portion, you can see that each of the components is roughly as complicated as one of those wheels, and you can’t really do much with just one of those parts:
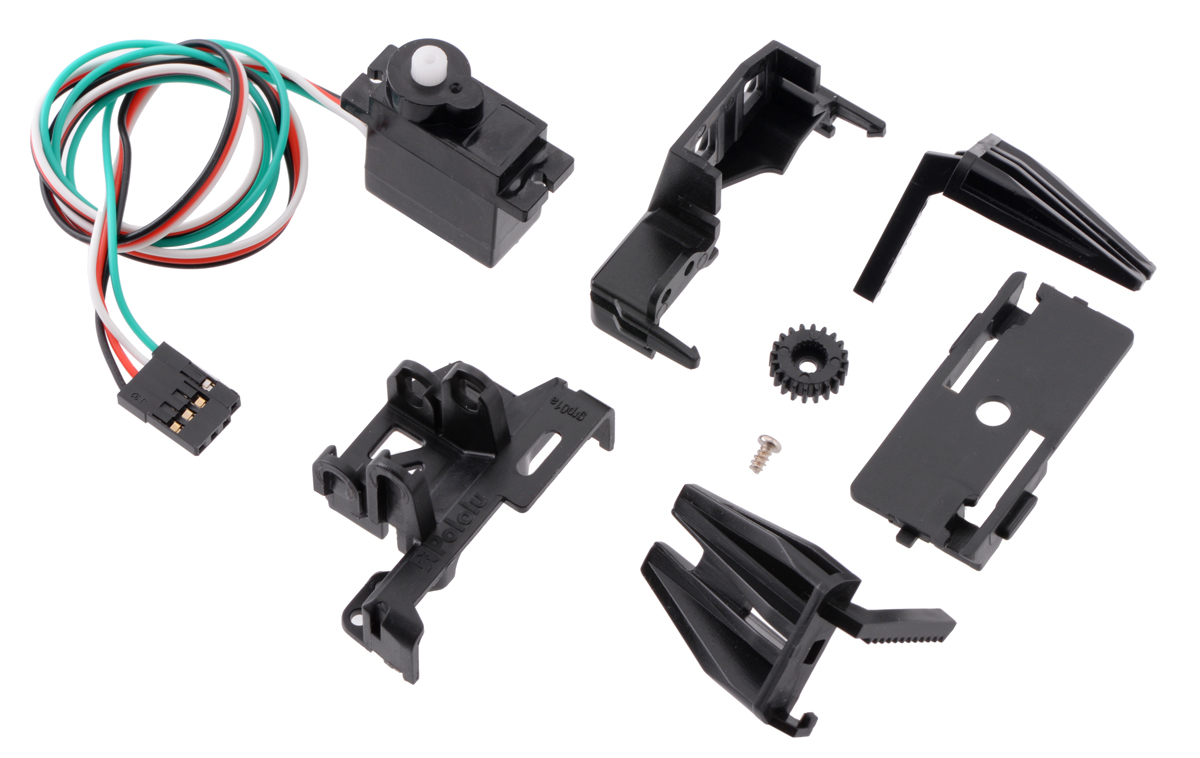 |
Contents of the Micro Gripper Kit with Position Feedback Servo. |
|---|
So, a lot of work goes into designing these kits. We also do not machine the molds or do the injection molding in-house (we did that on the first few parts for the 3pi robot), so that adds a lot of delays compared to our electronics boards, which we make in the same building that we design them in. We do 3D print prototypes to maximize the chances that we get the designs right, but there are invariably little modifications that we end up having to make when the components are this complicated, which is why it takes us years to go from the initial idea to the released kit.
We are at least sticking to our incremental product release approach as far as integration with electronics goes: at the time of the Romi arm attachment release, we do not have a specific solution for controlling the robot, which we will be working on next. Therefore, this kit is currently intended for advanced users who are comfortable powering and controlling several servos on their own.
As with all of our new product releases this year, we are offering substantial introductory discounts for the first customers to try out our new designs. You can use coupon code ROMIARMINTRO to get the whole arm for just $49 and code GRIPPERINTRO to get just the gripper for only $13. Each coupon is limited to 100 uses and 3 units per customer.

Related products


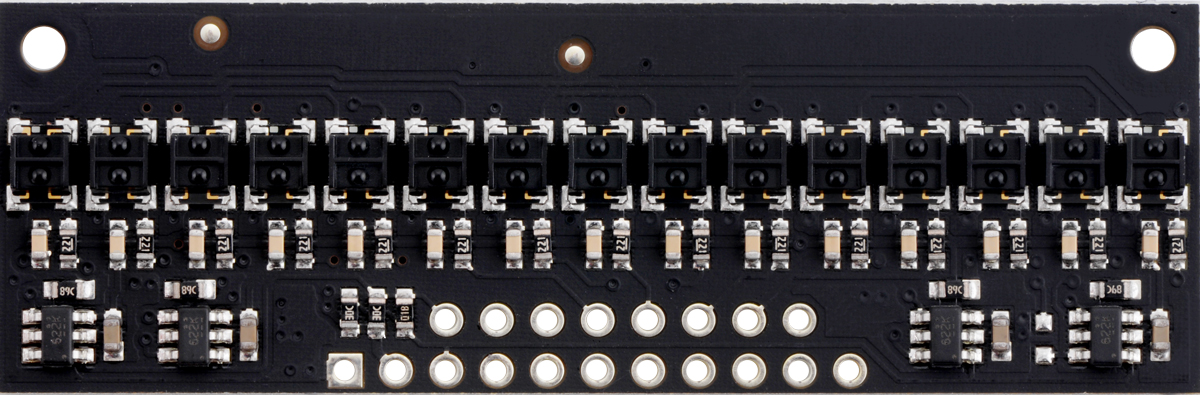
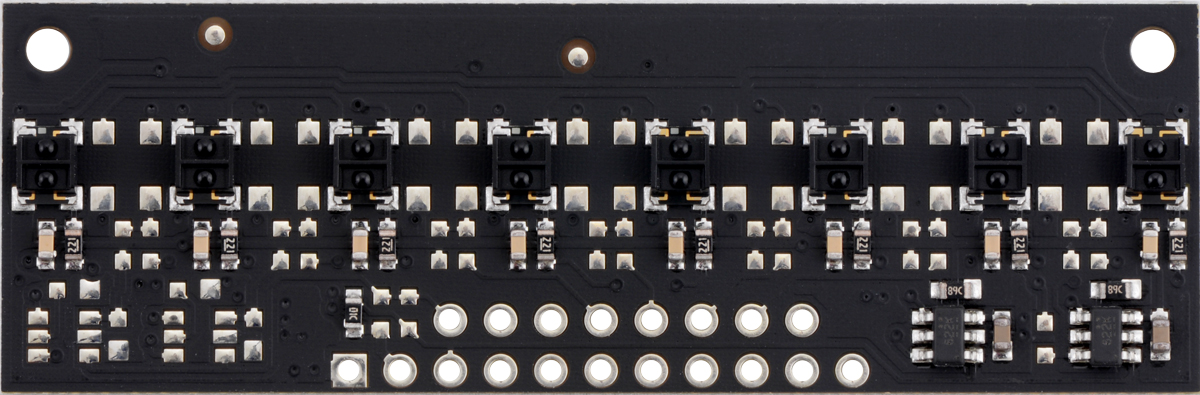
New products: more new QTR HD sensor arrays by student engineering interns
All the student engineering interns we had over the summer from out-of-town colleges are headed back to school, so I get to announce the release of products they worked on over the summer. The new QTR sensors we are releasing today include the 15-channel version laid out by seventeen-year-old Chris H.
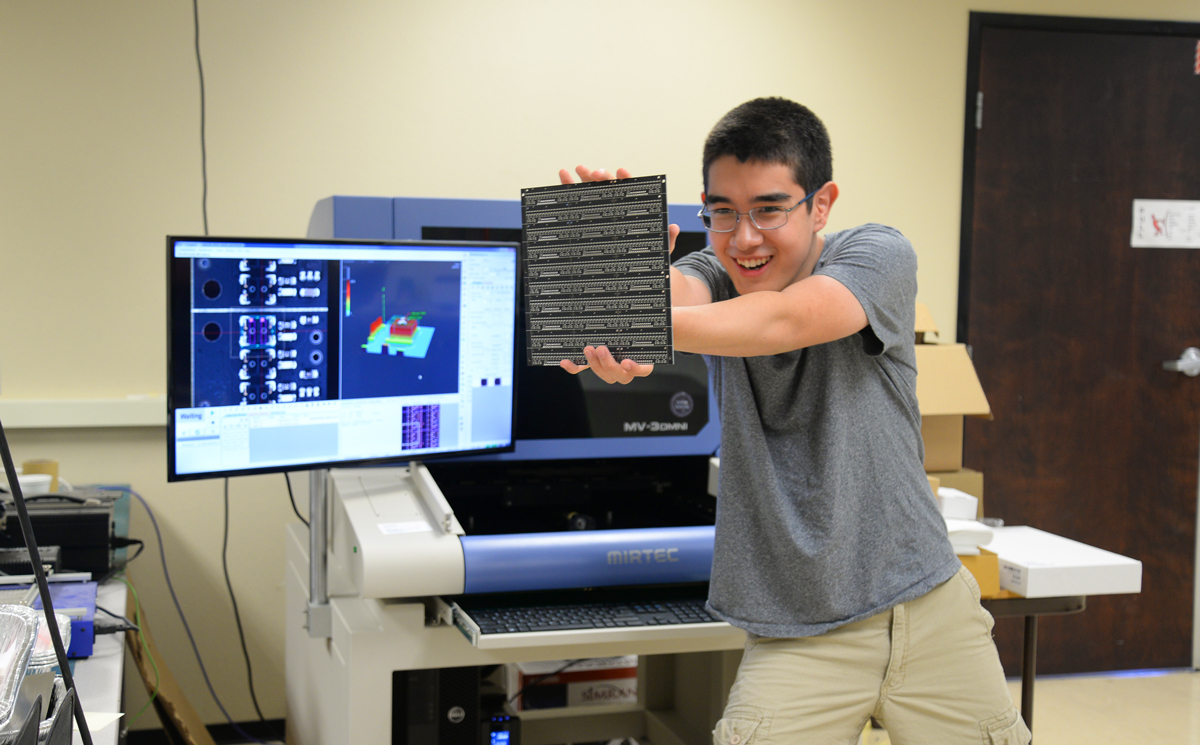 |
Hadouken! (2018 summer engineering intern Chris couldn’t come up with a clever pun to use for this picture of him posing with a circuit board he designed.) |
|---|
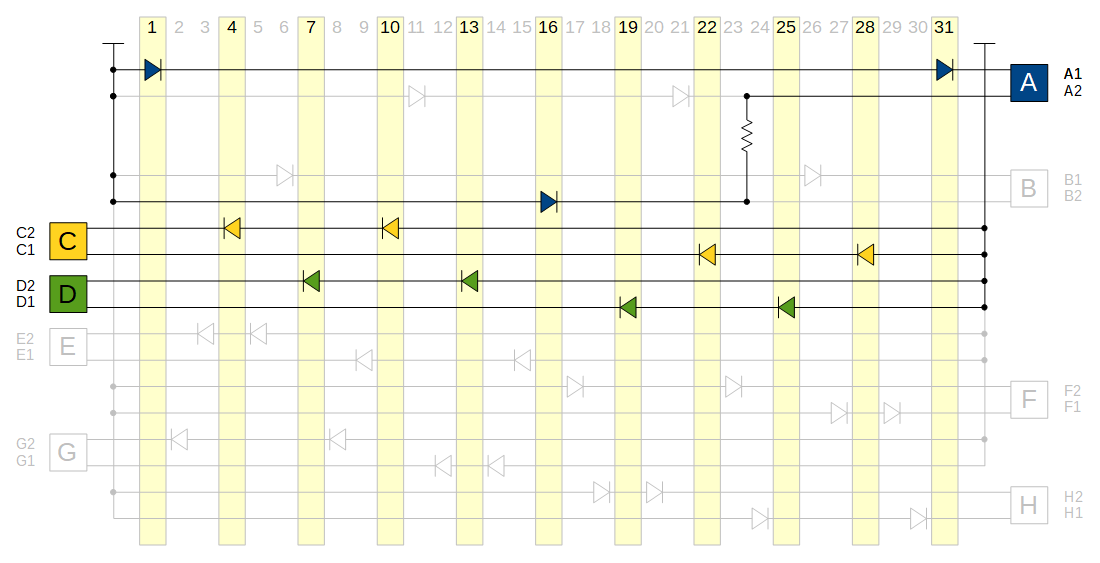
You can see more about our new line of QTR reflectance sensor arrays in the first blog post I wrote about them a few weeks ago. One cool design and manufacturing aspect I did not mention then is that we designed these boards so that they could be populated at various densities. For example, that lets us make an 8-channel version with 8 mm sensor pitch on the same board that also works as a 15-channel array with 4 mm sensor pitch:
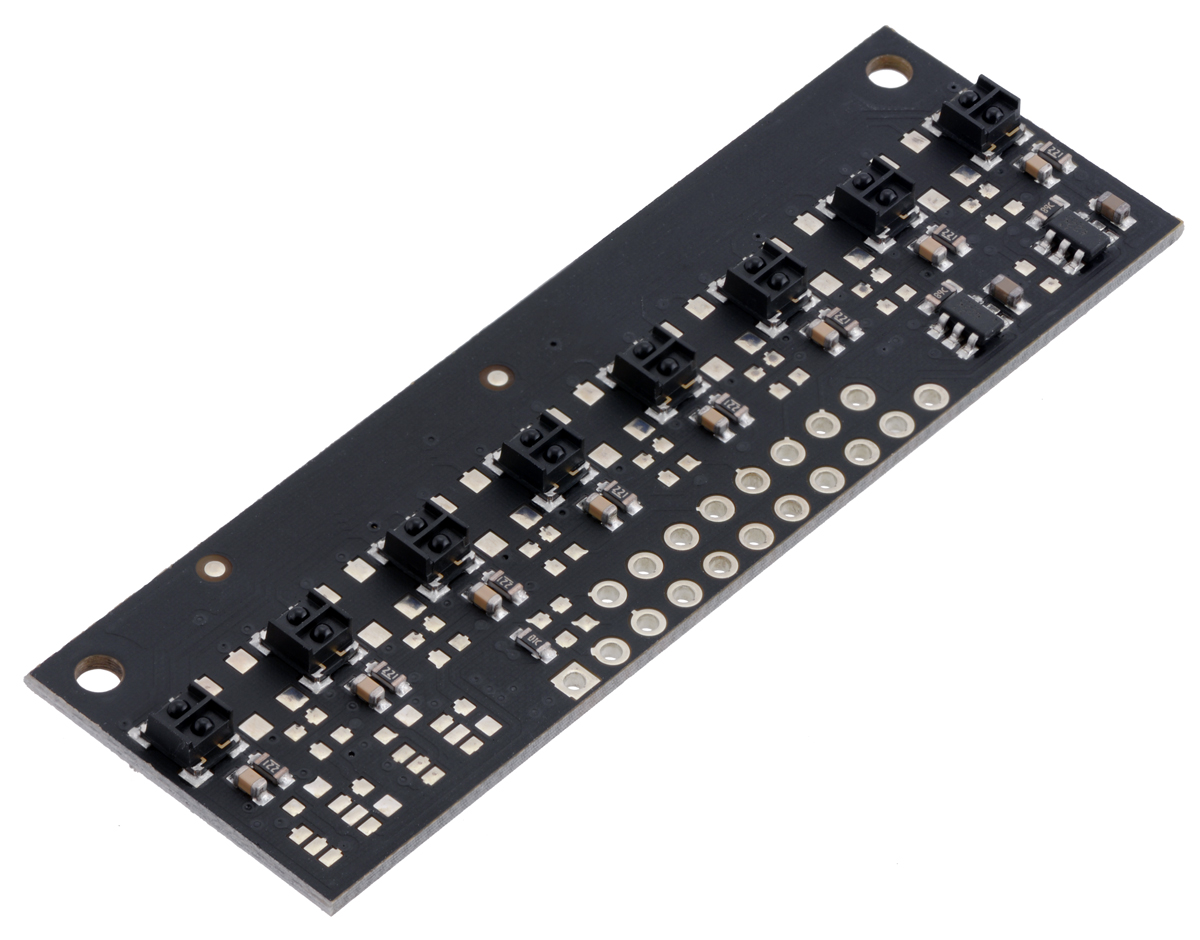 |
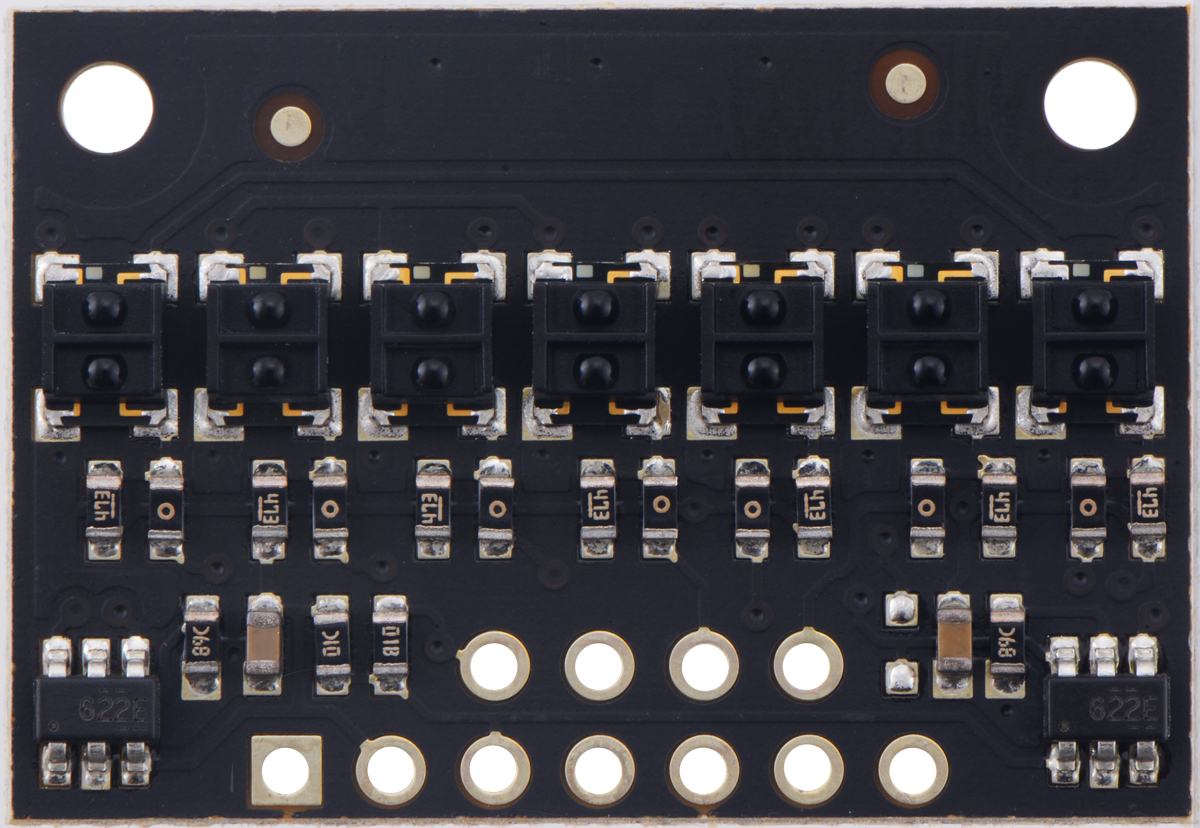
QTRX-MD-08RC Reflectance Sensor Array. |
|---|
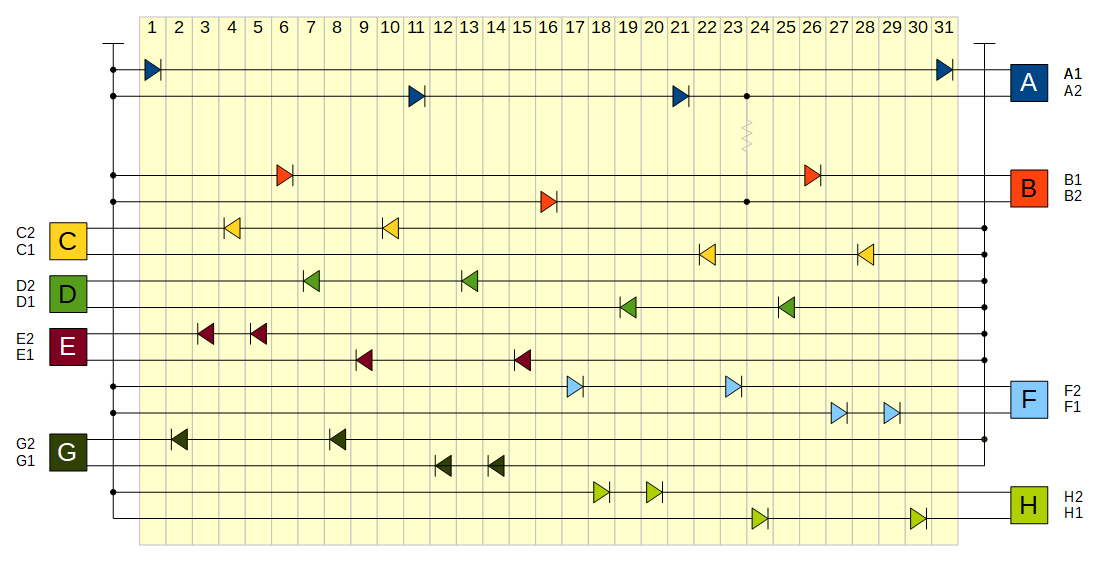
Here are some diagrams showing some of the thought that went into the soon-to-be released 31-channel version, which can also be populated to be an 8 mm pitch, 16-sensor array; a 12 mm pitch, 11-channel array; and a 20 mm pitch, 7-channel array:
|
|
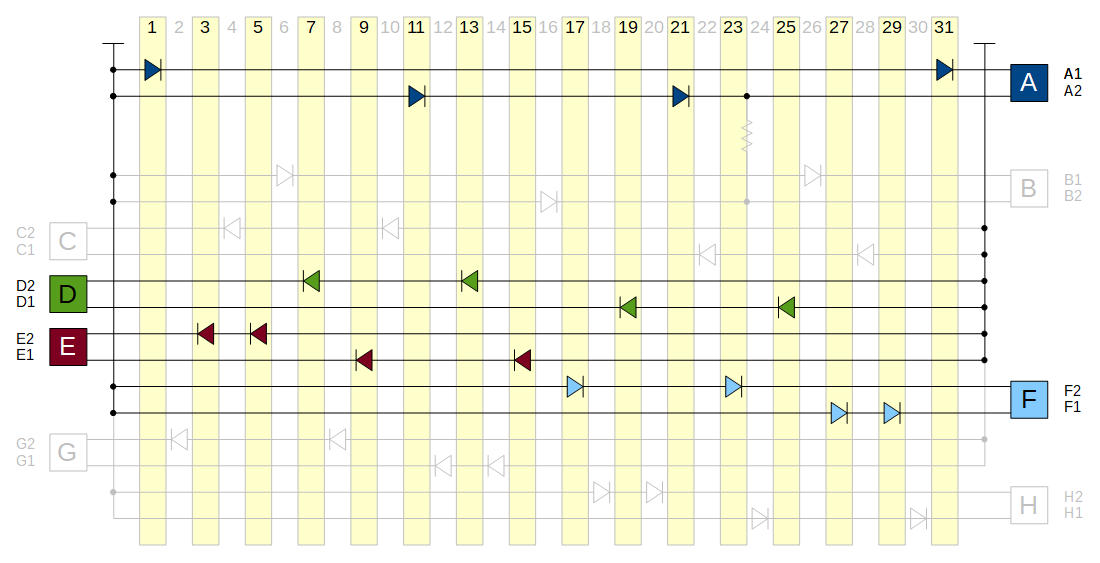
|
|
With so many combinations of sensor types and output circuits, we won’t make every one of the possible arrangements a stock product, but the idea is that if you have an application where a particular sensor pitch is ideal for you, we can quickly make some for you without having to lay out new PCBs.
We expect eight channels on an 8 mm pitch to be a popular variant, so those will be stock products. We have also added the corresponding 4-channel version (using the same boards used for the full-density, 7-channel product), so this new product announcement covers twelve new stock sensor arrays:
|
|||
|
|||
|
Our introductory promotions are still going strong! Be one of the first 100 customers using coupon code QTRINTRO and snag any of these new sensors at half price! (Limit 3 per item per customer.)
Related products


New product: USB 2.0 Type-C Connector Breakout Board
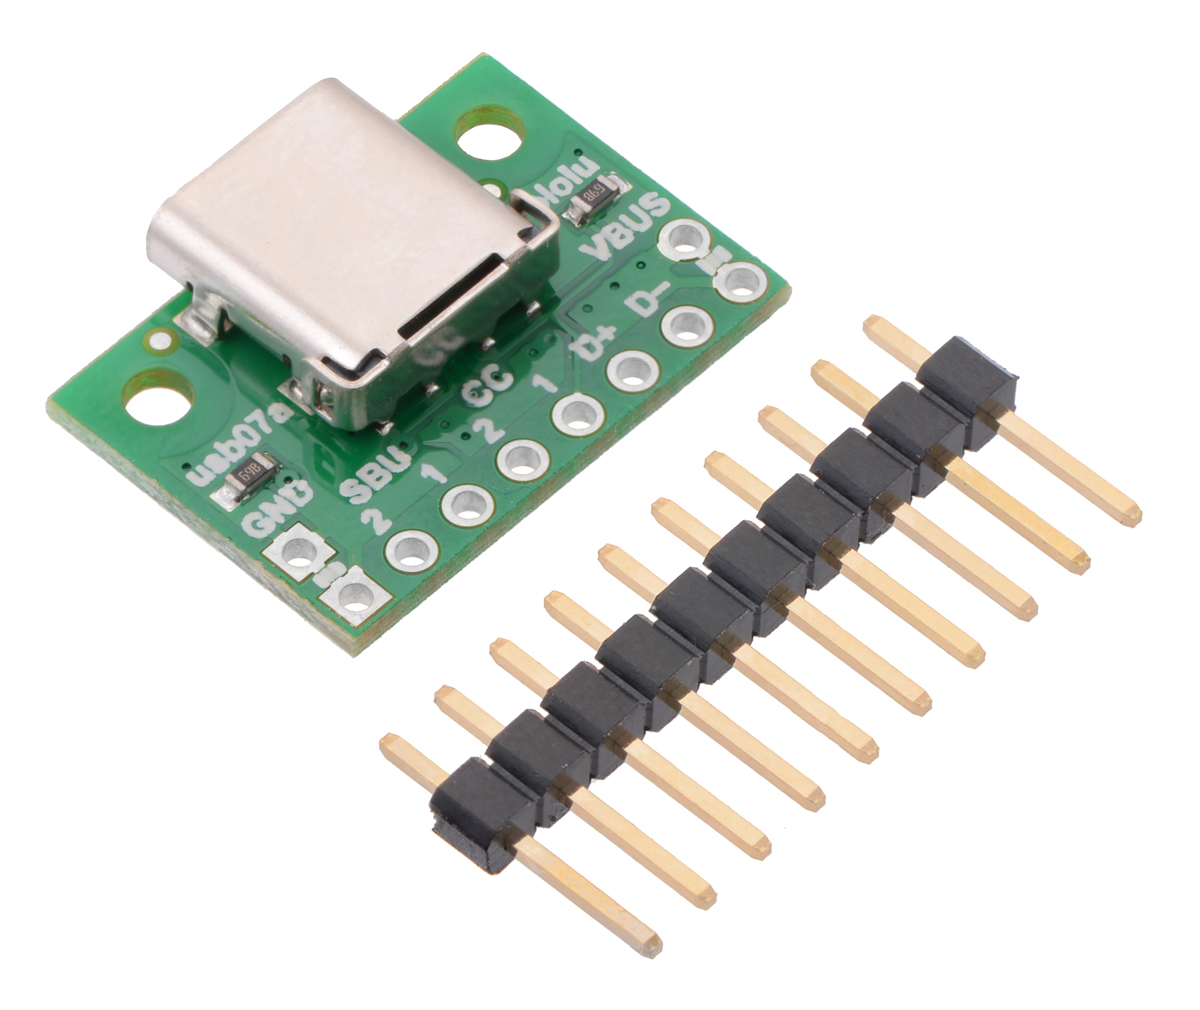 |
We have just released our USB 2.0 Type-C Connector Breakout Board. The Type-C connector has become increasingly common on devices like smartphones and notebook computers over the past few years, and it offers a number of interesting improvements over the legacy USB A and B connectors it is supposed to replace.
One of the most noticeable features is that the connector is reversible: you can plug a Type-C cable into a receptacle with either side up, and since Type-C ports can be used for both USB hosts and USB devices, the two ends of the cable can be interchangeable too. The USB-C specification also provides for negotiation of increased power (up to 20 V and 5 A) and alternate uses of the USB interface wires.
 |
All of this flexibility comes at a cost. The Type-C connector itself, which measures about 1 cm (0.4″) square, has 24 separate tightly-packed pins:
- 4 power pins (VBUS)
- 4 ground pins
- 4 USB 2.0 data pins (D+ and D−, each duplicated for reversibility)
- 8 USB 3.1 SuperSpeed data pins
- 2 configuration pins
- 2 auxiliary (sideband) pins
Making all the required connections for a prototype or hobby project is therefore a much more daunting task with a USB-C receptacle compared to a Type-A or Type-B connector with only 4 or 5 pins. This is where our Type-C connector breakout board comes in, exposing all the pins necessary for USB 2.0 communication along a row of 0.1″-spaced holes. (Note that the board does not break out the USB 3.1 SuperSpeed differential pairs.)
If you are designing something that uses USB-C, you also need to consider what to do with the Configuration Channel (CC) pins. These pins are used to determine the role of a port when it is connected—whether it is a USB host or device, and whether it provides or consumes power—and they are also used to configure more advanced functionality like higher-voltage power delivery and alternate modes that allow other protocols over the USB interface.
Since we expect many users of this breakout board to employ it as a USB device port, we populate the board with pull-down resistors on the CC pins that make it a straightforward replacement for a Type-B, Mini-B, or Micro-B port. If you have a different application in mind, you might want to disconnect or remove the resistors yourself, or you can contact us about customizing the termination resistors.
We are interested in hearing any feedback you might have about the USB Type-C connector in general, this board in particular, and any follow-on boards you would like to see. Are you excited about using Type-C connectors instead of Micro-B? Would you have a use for the USB 3.1 SuperSpeed pins brought out to 0.1″-spaced holes? Do you want something with an on-board configuration controller that makes it easier to set up USB Power Delivery or other advanced functionality? Please share your thoughts in the comments below.
As with all our new products this year, we are offering a special introductory promotion. You can get up to three of the new breakout boards for just $1.92 each, limited to the first 100 customers using coupon code USBCINTRO.

Related products

New products: U3V70x high-current boost voltage regulators

Today we are finally releasing our new U3V70x family of boost regulators, which are now our highest-current boost regulators. (I said “finally” because we have had the boards designed for over six months, but we just finally received the main ICs for our production builds even though I ordered them last year.) Besides supporting the most current of any of our boost regulators, we also have an adjustable version with a multi-turn trimmer potentiometer, which makes setting the output voltage to a particular value much easier than when the whole output voltage range is represented by the 250 degrees or so of a single-turn pot. The regulators operate with input voltages down to 2.9 V, and the adjustable output version can be set to an output in the range of 4.5 V to 20 V. Talking about the current on boost regulators is tricky since it’s so dependent on input and output voltages, so it’s best to just show you a few performance graphs:
|
|


For those who don’t need adjustability (that multi-turn pot is expensive!), we offer fixed-voltage versions in six standard voltages:
- U3V70F5: Fixed 5V output
- U3V70F6: Fixed 6V output
- U3V70F7: Fixed 7.5V output
- U3V70F9: Fixed 9V output
- U3V70F12: Fixed 12V output
- U3V70F15: Fixed 15V output
We can also make customized fixed versions for you with other voltages between 4.5 V and 20 V.
 |
Comparison of the newer U3V70A boost regulator (top) to the older U3V50ALV (bottom). |
|---|
It’s exciting that these new regulators are smaller than what used to be our highest-power boost regulator (the U3V50x family) despite handling more current. One way we kept the size smaller is by using only ceramic capacitors. One consequence of that is that the new regulator outputs are slightly noisier, so if that is important for your application, you might want to add some external capacitors to further smooth out the voltage. The older design also supports a higher maximum output voltage, so if you need more than 20 V, our U3V50F24 fixed 24 V and U3V50AHV adjustable 9 V to 30 V units are still our highest-power options.
As with all our new products this year, we are offering a special introductory promotion. You can get up to three of each version for just $9 (which is an especially good deal for the adjustable regulator!), limited to the first 100 customers using coupon code U3V70XINTRO.
Related products


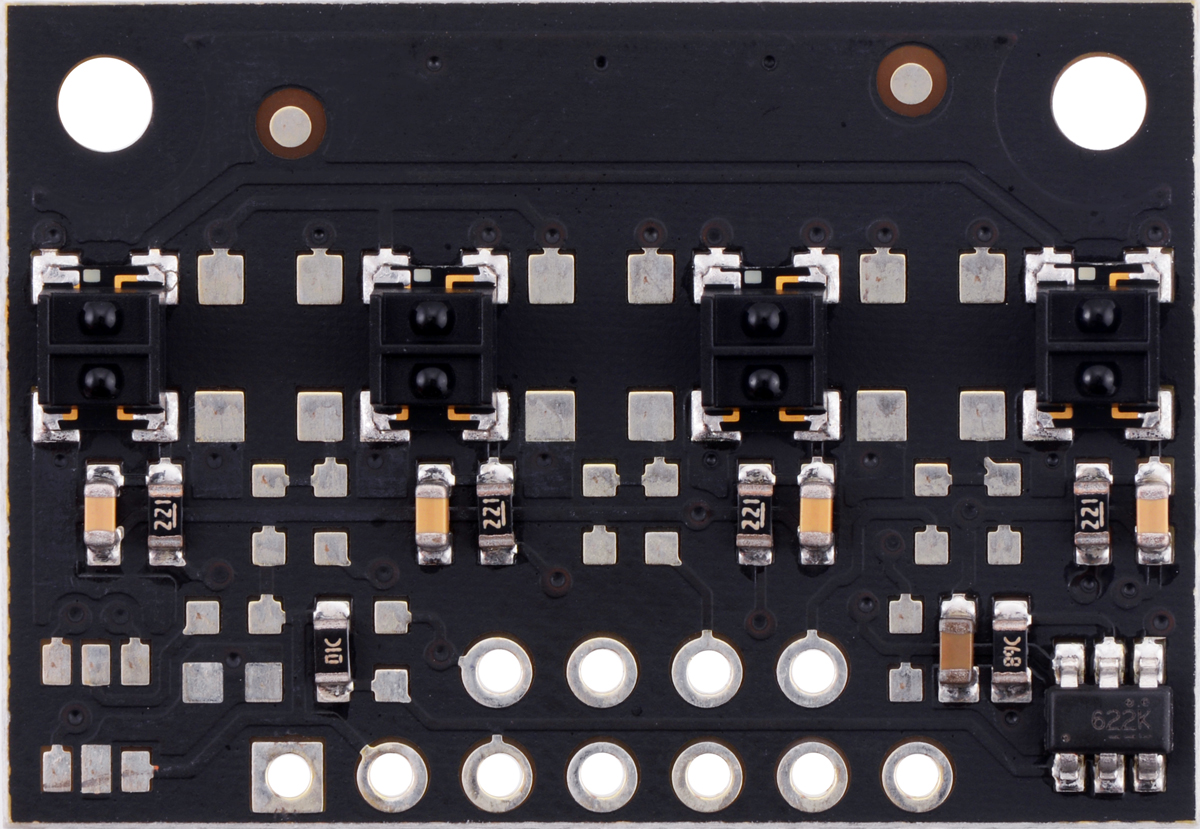
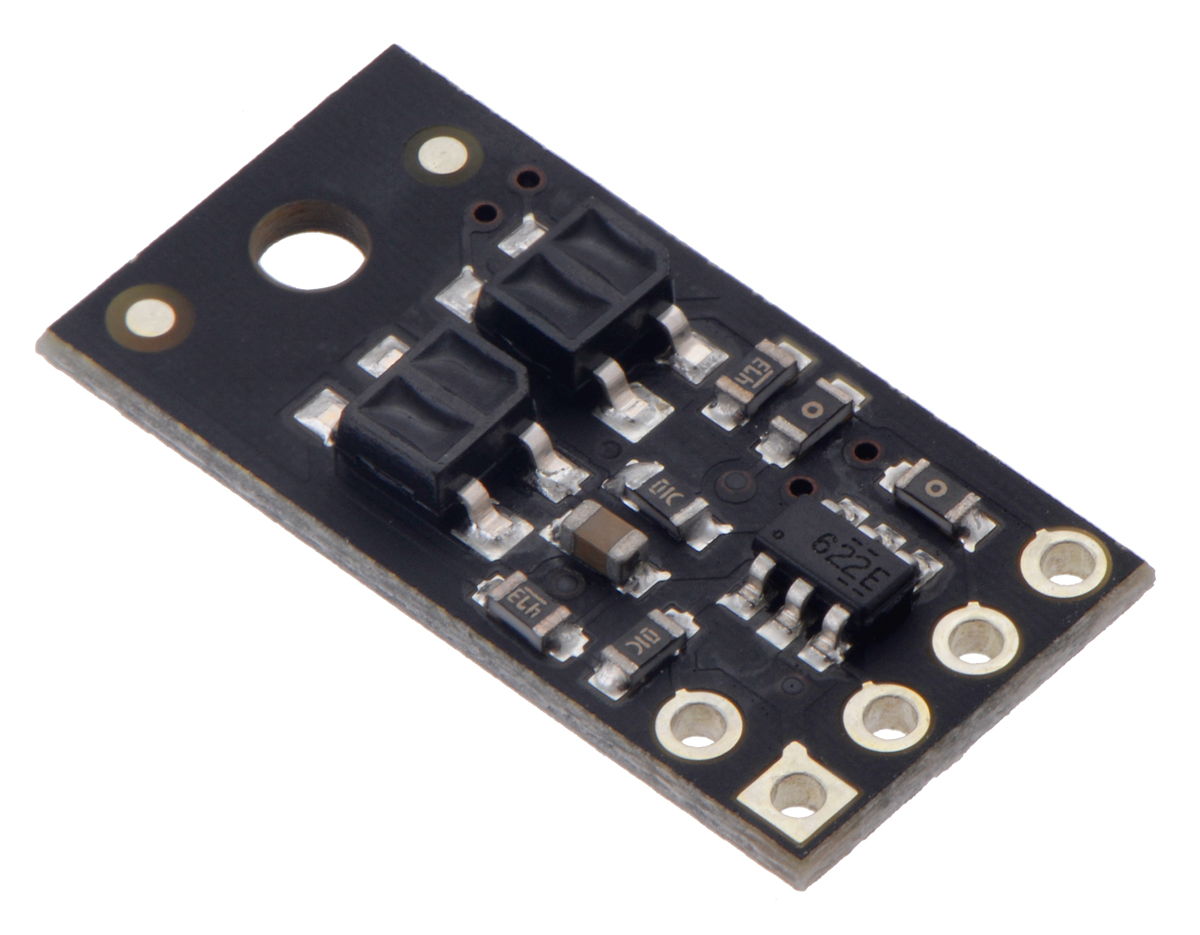
New products: QTR HD sensor arrays by student engineering interns
 |
Some of the Pololu summer 2018 student engineering interns posing with QTR HD circuit boards they designed. |
|---|
Hi everyone! My name is Matthew, and I am one of nine student engineering interns working at Pololu this summer. As I was preparing to head back to MIT for my sophomore year of studying Mechanical Engineering, I was graciously inflicted with the responsibility of announcing our second wave of high-density QTR reflectance sensor arrays. These two- and four-sensor boards, along with all of the other soon-to-be-released QTR sensor arrays, were designed by us student interns. For many of us, these boards were the first we ever routed, so it’s especially exciting to see them be real products going out into the world. While I did not personally lay out any of the boards being released today, we all thoroughly cross-checked each other’s work (the first board I directly routed should be released next week).
|
|
Because of their small size, these boards have one LED brightness control pin. All boards with more than four sensors will have separate LED brightness control for odd-numbered and even-numbered LEDs.
|
|
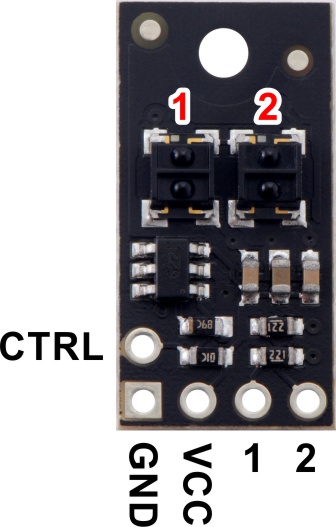
As Jan mentioned in the first blog post introducing this line of sensors, each board is available in analog and RC configurations and with two different sensor types. This post therefore covers the release of eight new products:
- QTR-HD-02RC Reflectance Sensor Array
- QTR-HD-02A Reflectance Sensor Array
- QTRX-HD-02RC Reflectance Sensor Array
- QTRX-HD-02A Reflectance Sensor Array
- QTR-HD-04RC Reflectance Sensor Array
- QTR-HD-04A Reflectance Sensor Array
- QTRX-HD-04RC Reflectance Sensor Array
- QTRX-HD-04A Reflectance Sensor Array
We have also released an update to our QTR Arduino library for use with these new QTR sensor arrays.
As we have been doing with all our new products this year, we are offering an extra special introductory discount on these boards! The first 100 customers using coupon code QTRINTRO will get half off on up to three of each sensor.

Related products


New linear actuators and Jrk settings files
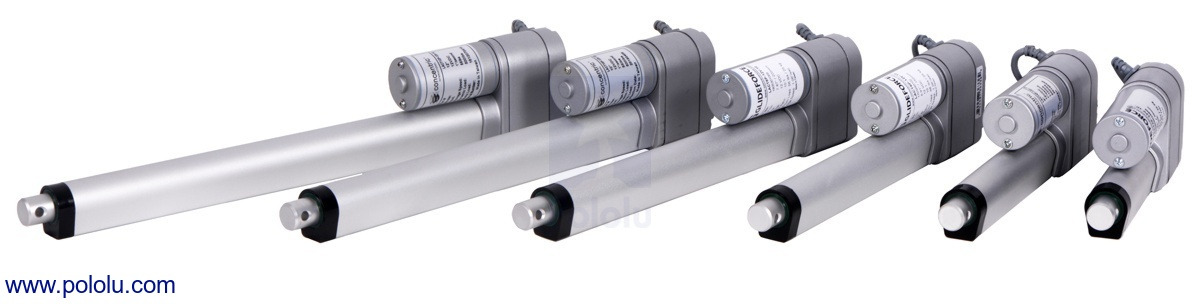 |
We’ve expanded our line of Glideforce Light-Duty Linear Actuators to now include options with a 10:1 gear ratio. As you might know if you are a long time customer, we’ve carried our light-duty actuators in 20:1 and 5:1 gear ratios for many years. The 20:1 actuators have nice load capabilities, but they’re kind of slow. The 5:1 actuators are speedy, but they can’t push around the larger loads that the 20:1 actuators can. These new 10:1 actuators fall in the middle, offering a great blend of force and speed.
We carry these new actuators in stroke lengths ranging from 2–12 inches and in versions with and without feedback, bringing our total line of light-duty actuators to 28 options.
| Actuator Type |
Max Dynamic Load |
No-Load Speed @ 12 V |
Max-Load Speed @ 12 V |
Current Draw @ 12 V |
Nominal Stroke Length |
With Feedback |
Without Feedback |
|---|---|---|---|---|---|---|---|
| Light-Duty (LD) 5:1 |
15 kgf [34 lbs] |
4.4 cm/s [1.7″/s] |
3.6 cm/s [1.4″/s] |
1.2 A – 3.2 A |
4″ | LACT4P-12V-05 | LACT4-12V-05 |
| 12″ | LACT12P-12V-05 | LACT12-12V-05 | |||||
| Light-Duty (LD) 10:1 |
25 kgf [55 lbs] |
2.8 cm/s [1.1″/s] |
2.3 cm/s [0.9″/s] |
1.2 A – 3.2 A |
2″ | LACT2P-12V-10 | LACT2-12V-10 |
| 4″ | LACT4P-12V-10 | LACT4-12V-10 | |||||
| 6″ | LACT6P-12V-10 | LACT6-12V-10 | |||||
| 8″ | LACT8P-12V-10 | LACT8-12V-10 | |||||
| 10″ | LACT10P-12V-10 | LACT10-12V-10 | |||||
| 12″ | LACT12P-12V-10 | LACT12-12V-10 | |||||
| Light-Duty (LD) 20:1 |
50 kgf [110 lbs] |
1.5 cm/s [0.57″/s] |
1.2 cm/s [0.48″/s] |
1.2 A – 3.2 A |
2″ | LACT2P-12V-20 | LACT2-12V-20 |
| 4″ | LACT4P-12V-20 | LACT4-12V-20 | |||||
| 6″ | LACT6P-12V-20 | LACT6-12V-20 | |||||
| 8″ | LACT8P-12V-20 | LACT8-12V-20 | |||||
| 10″ | LACT10P-12V-20 | LACT10-12V-20 | |||||
| 12″ | LACT12P-12V-20 | LACT12-12V-20 | |||||
For actuators with feedback, a built-in potentiometer is linked to the shaft position allowing for precise control of the actuator’s extension. Our line of Jrk G2 Motor Controllers with Feedback are a great solution for use with any of our linear actuators with feedback, and our most affordable option, the Jrk G2 21v3, is a great choice for use with our light-duty actuators specifically.
In separate but related news, we’ve also either created or updated Jrk settings files for all our linear actuators with feedback for use with our Jrk G2s:
- Light-duty actuators with the 5:1 gear ratio: Jrk 21v3 settings file for use with LACTxP-12V-5 (2k txt)
- Light-duty actuators with 10:1 or 20:1 gear ratios: Jrk 21v3 settings file for use with LACTxP-12V-10 or LACTxP-12V-20 (2k txt)
- Medium-duty actuators: Jrk 24v13 settings for MD linear actuators (2k txt)
- Industrial-duty actuators: Jrk 24v21 settings for ID linear actuators (2k txt)
These settings files can be opened in the Jrk configuration utility and then uploaded to your Jrk G2 motor controller. Please make sure to follow the detailed instructions on your actuator’s product page.
So what does one of these settings files do for you? The Jrks use a PID control loop to control the position of a motor based on feedback from that motor. PID stands for proportional, integral, and derivative, and for a control loop to work well, the PID coefficients must be tuned for the specific system they are being used in. The Jrk uses the coefficients for those terms along with the along with the difference between the motor’s actual position and its target position to calculate what the power to the motor should be. The details of this calculation are discussed in the Jrk’s user’s guide. Tuning the PID coefficients so your motor goes where you want it to can sometimes be difficult. The Jrk settings files provide a set of parameters that should work well for most uses of the linear actuators. Some systems might require more fine tuning, but even in those cases, the files should provide a good starting point.
I created these files by first starting with the default settings for the Jrk motor controller. I left the settings on the Motor, Errors, and Advanced tabs of the Jrk configuration utility on their defaults (with the exception of one of the files for the light-duty actuators having the motor direction reversed). On the input tab, I also left the input mode in Serial so you can control the linear actuator directly from the software. On the feedback tab, I set the feedback mode to analog voltage so the Jrk can read the potentiometer wiper of the linear actuator. To get the feedback values, I connected an actuator to the Jrk and ran the feedback setup wizard. (You might need to rerun this wizard for the specific actuator you have connected to your Jrk. The instructions on the actuators’ product pages go into more detail about this.)
Once all that was done, I configured the PID settings and worked out the PID coefficients by testing each type of actuator with the Jrks. We wanted to provide files that worked generally well across all the stroke length options for each type of actuator, so a lot of actuators were tested to come up with coefficients that worked well for all of them.
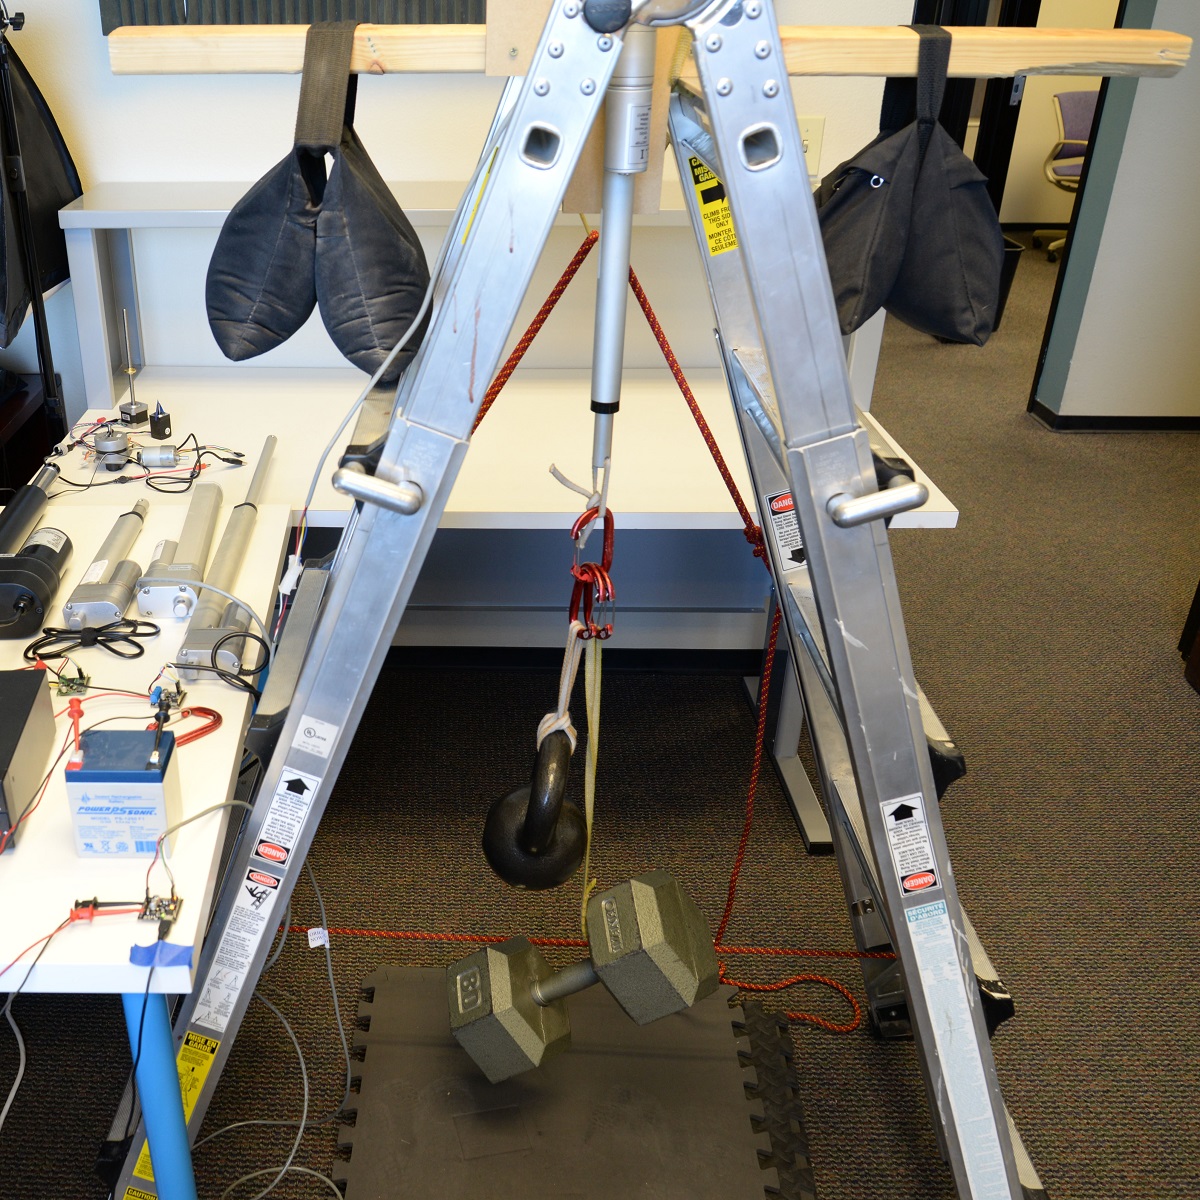
 |
Many of the actuators used for creating Jrk settings files (can you find all 12?). |
|---|
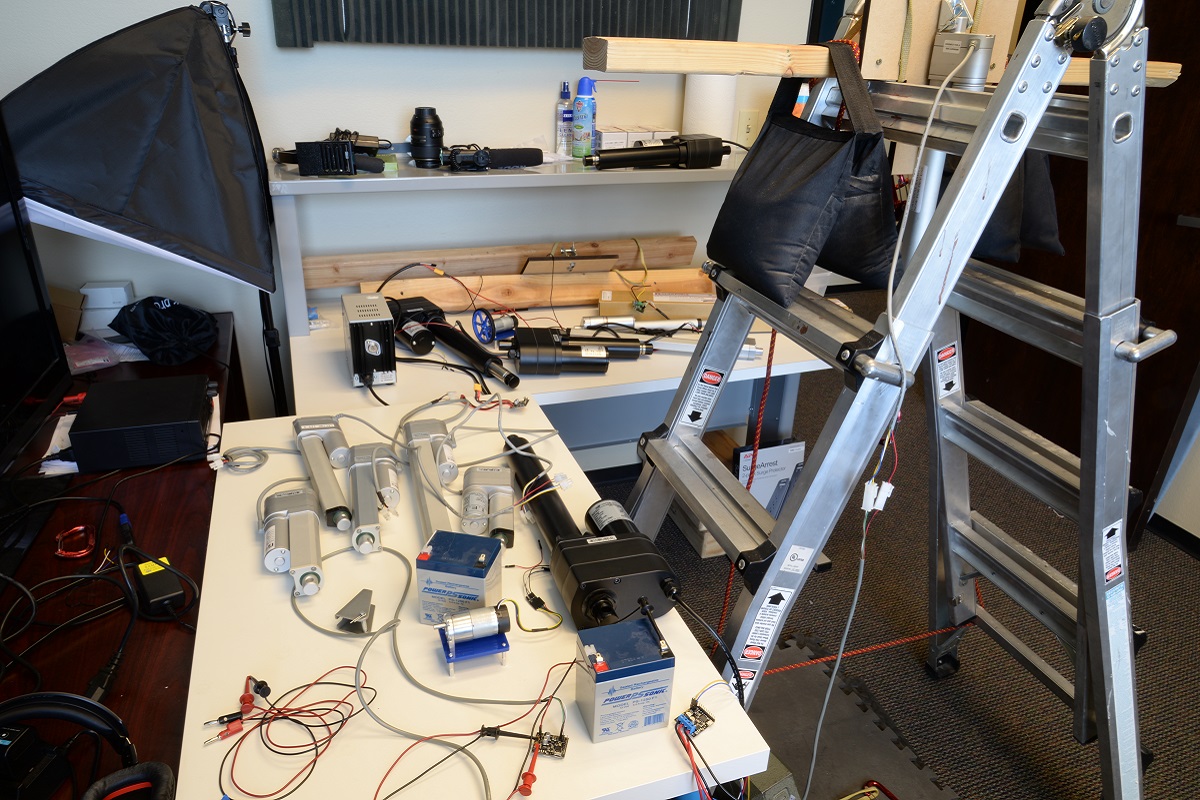
I set the proportional and derivative terms first, selecting terms that allowed the actuators to move at their highest speeds but not overshoot their target position. In general, you can get fairly good control over the actuator just using the proportional and derivative terms. In fact, if you are just testing your motor without a load, it might seem like you don’t need an integral term at all. However, there are situations where the control system can get stuck without moving all the way to its target. The controller will continue to apply power to get the actuator to the set position, but it won’t be enough to actually move the actuator. This can be fixed using the integral term of the PID loop. The error will add up over time and eventually get big enough to get things moving again. I was able to test this with the light-duty actuators using the setup below:
 |
Testing Jrk settings with a load. |
|---|
That’s one of our 20:1 light-duty actuators lifting 105 lbs (5 lbs less than its max dynamic load rating). Once I had a large enough load on the actuator, I could see that without an integral term set, the actuator would stall just short of its target position, continuing to apply power but not getting anywhere. Once the integral term was added, the Jrk was able to move it that last little bit to the target.
Unfortunately, I wasn’t able to perform the same test with our medium- and heavy-duty actuators; my makeshift testing rig couldn’t support a load high enough to produce the steady state error issue. However, I did add a little bit of an integral term to the files for those actuators anyway, making sure that doing so didn’t have an obvious negative effect on their performance.
If you want to learn some more about PID control, I found this video and its follow up from Brian Douglas’s channel on YouTube a helpful starting point.
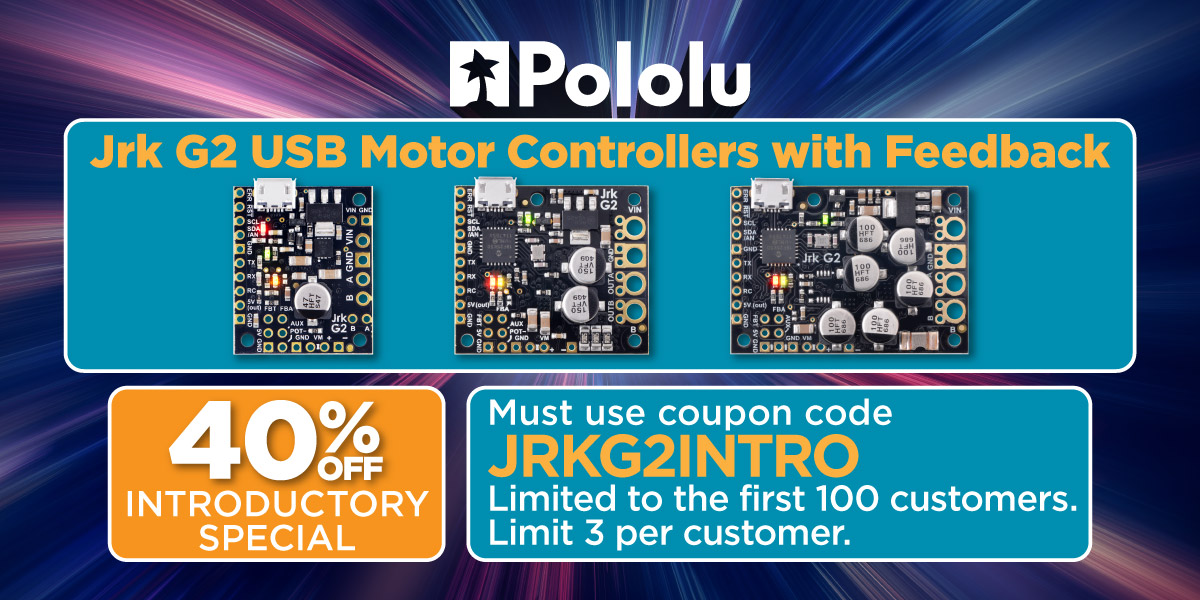
One last note: the intro coupon for our Jrk G2 controllers still has some uses left. Add coupon code JRKG2INTRO to your cart and get up to three Jrk G2 motor controllers for 40% off!
Related products


PyTic - Python interface for Pololu Tic Stepper Motor Controllers
 |
Customer Daniel Castelli of the Allen Institute has released a Python package for interfacing with our Tic Stepper Motor Controllers. Currently, he only supports 64-bit Windows, but the source code is available and should be straightforward to extend to other operating systems. Here is example code using PyTic to control a stepper motor:
import pytic
from time import sleep

# - Initialization -------------------------------------------

tic = pytic.PyTic()

# Connect to first available Tic Device serial number over USB
serial_nums = tic.list_connected_device_serial_numbers()
tic.connect_to_serial_number(serial_nums[0])

# Load configuration file and apply settings
tic.settings.load_config('path\\to\\config.yml')
tic.settings.apply()

# - Motion Command Sequence ----------------------------------

# Zero current motor position
tic.halt_and_set_position(0)

# Energize Motor
tic.energize()
tic.exit_safe_start()

# Move to listed positions
positions = [1000, 2000, 3000, 0]
for p in positions:
  tic.set_target_position(p)
  while tic.variables.current_position != tic.variables.target_position:
    sleep(0.1)

# De-energize motor and get error status
tic.enter_safe_start()
tic.deenergize()
print(tic.variables.error_status)
The code and documentation for this package are available on GitHub.
Related products


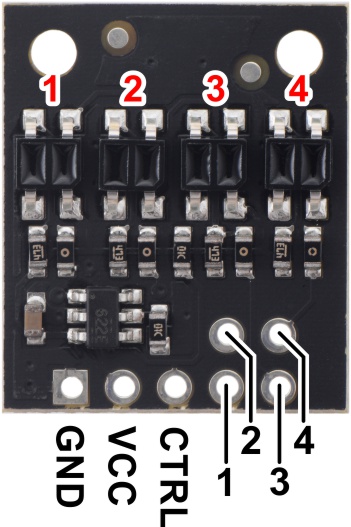
New product: high-density QTR reflectance sensor arrays
|
|

I am excited to announce the first of a new line of reflectance sensor arrays that feature a high-density 4-mm pitch and dimmable IR emitter brightness control. In addition to versions with our familiar IR emitter/phototransistor pair modules without lenses, which we will keep calling “QTR,” we have versions with a higher-performance sensor with lenses on the IR emitter and phototransistor, which we are calling “QTRX.” These higher-performance sensors allow similar performance at a much lower IR LED current, which can really start adding up at higher channel counts. (High-brightness, “QTRXL” versions of these boards are coming soon, too.)
These new sensor arrays also feature LED brightness control that is independent of the supply voltage (which can be 2.9 V to 5.5 V) and separate controls for the odd-numbered LEDs and the even-numbered LEDs, which gives you extra options for detecting light reflected at various angles. As with our older QTR sensors, we are offering these in “A” versions with analog voltage outputs and “RC” versions that can be read with a digital I/O line on a microcontroller by first setting the line high and then releasing it and timing how long it takes for the voltage to get pulled to the logic low threshold:
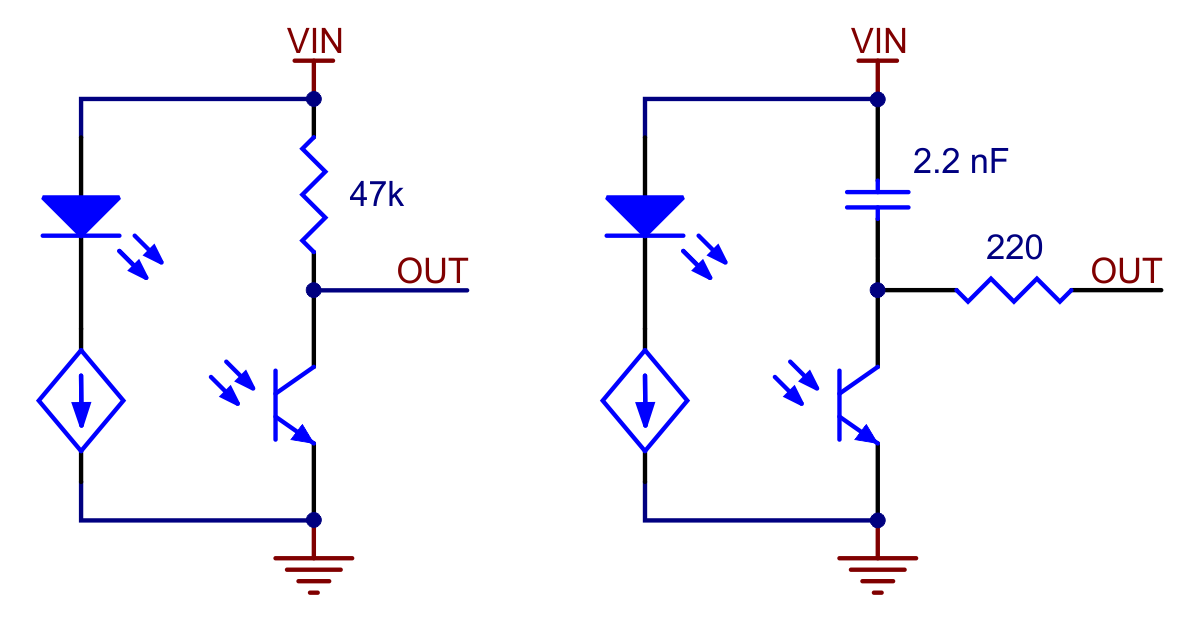 |
Schematic diagrams of individual QTR sensor channels for A version (left) and RC version (right). This applies only to the newer QTRs with dimmable emitters. |
|---|
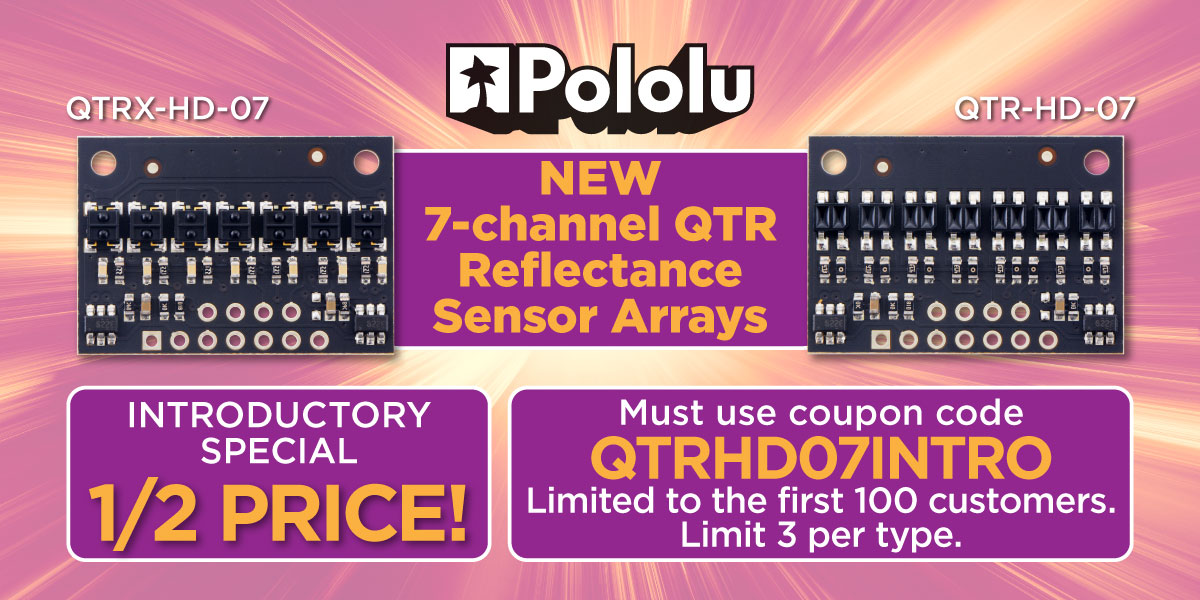
This announcement therefore covers four total new products:
- QTR-HD-07RC Reflectance Sensor Array
- QTR-HD-07A Reflectance Sensor Array
- QTRX-HD-07RC Reflectance Sensor Array
- QTRX-HD-07A Reflectance Sensor Array
As with all our new products this year, we are offering a special introductory promotion, and this one is for half off up to three of each sensor type, limited to the first 100 customers using coupon code QTRHD07INTRO.
Related products


Home | Forum | Blog | Support | Ordering Information | Lists | Distributors | BIG Order Form | About | Contact
© 2001–2026 Pololu Corporation


