Pololu Blog » Posts tagged “community projects” »
Posts tagged “community projects” (Page 8)
You are currently viewing a selection of posts from the Pololu Blog. You can also view all the posts.
Popular tags: community projects new products raspberry pi arduino more…
Laser cut 6-string banjo frame
Here is a brief video a customer just sent us showing how he used our custom laser cutting service to create the frame on his custom 6-string banjo.
“Knock knock unlock” puzzle box
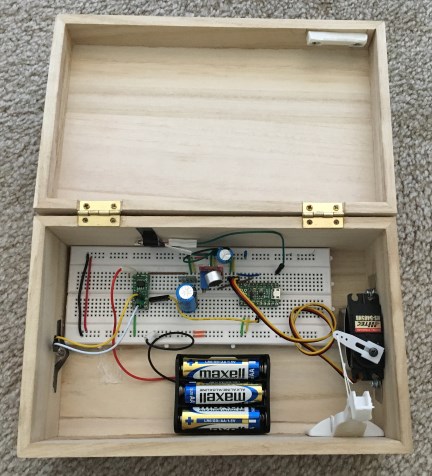 |
With the holiday season upon us, many are on the hunt for interesting projects that we can give as gifts. This year, why not make your project about unveiling your gift? You would still have to get an actual gift to put inside the box, but you’d win major style points. Forum member Bob Day’s knock knock unlock puzzle box has no visible way of opening it, but given the right combination of knocks will unlatch itself with the help of a servo and several other electronic components inside. The puzzle box is controlled by an A-Star Micro, which is powered by our S7V8F5 voltage regulator and a mini LV pushbutton power switch. The power switch is turned on by a mercury tilt switch and turned off by the A-Star if no knocks are received for about 30 seconds. This power switch circuit allows power to be completely turned off, which should extend the battery life tremendously over just leaving the A-Star on. (For advanced microcontroller programmers, another option would be to put the A-Star into a low-power mode.) A list of the parts and connections used and some example code for the box are given on Bob’s blog.
 |
“Knock Knock Unlock” Puzzle Box outside view. |
|---|
If you found this project interesting, you might also like a similar GPS puzzle box, also created by Bob, that we featured on our blog last year. That box unlocked when brought to a specific location and included a simpler toggle switch for power and an LCD screen.
Automated typewriter that takes dictation using Maestro
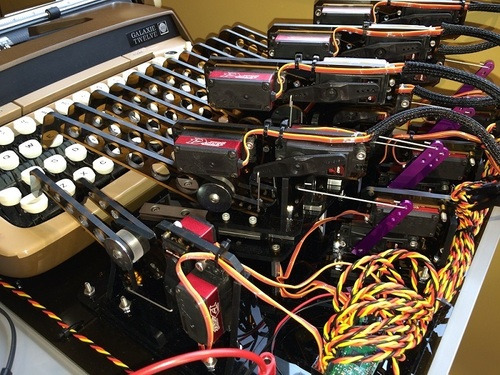
Forum user ZipZaps shared a fantastically charming project that uses a 24-channel Maestro servo controller to automate a Smith Corona typewriter using the speech recognition built into Windows. The Maestro controls a mechanism consisting of multiple rows of servos on some small linear rails to strike the keys in a manner resembling the way a person would normally interact with the typewriter. An Arduino paired with a Big Easy driver controls the stepper motor used to slide the carriage return system.
 |
You can find more pictures and information about this project in ZipZaps forum post.
Reaper puppet master Halloween prop using a Mini Maestro 24
If you are looking for some inspiration for scary Halloween prop ideas, check out the truly creepy reaper puppet master that forum user rasco66 built! The prop is a tall, menacing installation: a grim reaper with glowing red eyes and outstretched hands overlooks a dark stage containing a lone skeleton. Once activated, the reaper commands the puppet to dance and animates its movement to a cover of Blue Oyster Cult’s Don’t Fear the Reaper. The skeleton animation is achieved with seven servos and a linear actuator; a Mini Maestro 24 controls all of the servo sequences and is triggered by a PicoBoo Max, which also coordinates the music, strobe, and linear actuator. You can watch a video of the prop on YouTube or read more about the project, including some code, in this forum post.
By the way, there are still 10 days left to take advantage of our Halloween sale and save on parts for your own grim reaper puppet master or whatever other terrifying thing you want to create (but you really shouldn’t wait that long if you want something done by Halloween as these things almost never work on the first try!).
Remote control food
With Halloween on its way, and trick-or-treating eminent, you might be asking yourself if there are any alternative uses for the mountain of candy bars your kids will soon be bringing home. Well, customer Mike Kohn, whose projects we previously blogged about, has a solution for giving new life to not just candy, but all sorts of unwanted food items: remote controlled food!
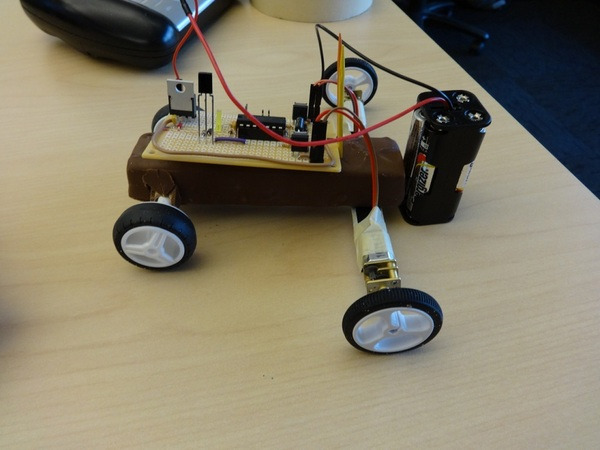
For this project, Mike ditched plastic and aluminum and tried out a sampling of more savory chassis materials like candy bars, a carrot, a bell pepper, a grapefruit, and a chicken sausage. The candy bars, carrot, and sausage were used for four-wheeled differential drive cars and the pepper and grapefruit were used for boats. All the vehicles were actuated by a pair of micro metal gearmotors and the cars also used our 32mm wheels. Below is a picture of one car made with a 3 Musketeers bar.
 |
Mike also wrote his own firmware for decoding the IR signals from a Syma S107 controller. You can find out which foods made the best chassis and plenty more information about the vehicles, including a parts list, schematic, and several other videos, on Mike’s website.
RC wildlife photography usingTReX motor controllers and RC switches
Wildlife photographer Stéphane Simoëns uses a remote-controlled, camouflaged vehicle to bring his camera closer to animals without scaring them away. The vehicle is a custom-built, metal-framed, 4-wheeled chassis that is controlled with a pair of our TReX dual motor controllers. One TReX drives while the other provides tilt control for the onboard camera. The vehicle also features three of our RC switches; one switches on and off the video transmitter and the other two control camera shutter and focus. You can find more information about this project in Stéphane’s forum post.
|
|
Animatronic tentacle mechanism using Pololu Universal Mounting Hubs
|
|
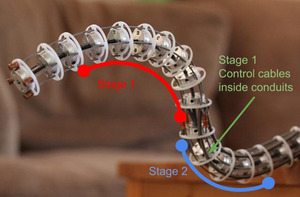
While our Universal Mounting Hubs are mainly intended as general-purpose adapters for motor shafts, it seems that they can also be used to help build a cable-actuated animatronic tentacle. Joshua Vasquez posted an article on Hackaday about his two-stage tentacle mechanism with “vertebrae” made from Universal Mounting Hubs and laser-cut Delrin pieces. (We didn’t do the laser cutting for this project, but our custom laser cutting service might be interesting for anyone wanting to make similar parts.) If you want to simultaneously impress and creep out your friends this Halloween, this seems like an interesting project to try!
Read more about Joshua’s project on Hackaday.
Control a GoPro remotely using a CamDo Bullet and RC switch
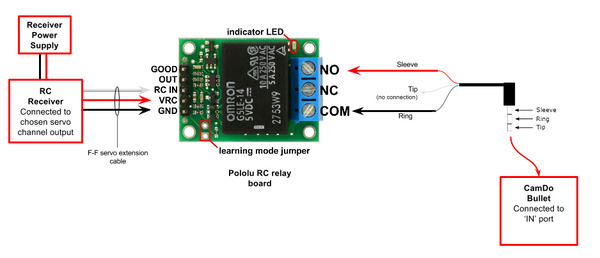
When capturing photographs of wildlife, it is not always feasible to be close enough to trigger your camera with a standard wired remote. In these cases, using an RC transmitter and receiver pair would be ideal, but most cameras and their remotes do not accept hobby RC signals. This blog post, written by CamDo, explains how to use one of our RC switches with a built-in relay and their Bullet wired remote interface to trigger a GoPro camera from an RC transmitter from hundreds of meters away. The setup can be used with any standard RC transmitter and receiver pair, and you only need one pair and one RC switch to control several cameras at once.
Video: Smart lane changing Zumo robot
Forum member WaterBoy23 recently shared his robot which expanded upon the line following capabilities of our Zumo Robot for Arduino by adding in lane changing capabilities. The robot changes lanes when it detects a vehicle ahead of it, and is programmed to either pass the vehicle or return quickly to its original lane if it detects oncoming traffic. His robot uses two Arduino Uno boards, one for following the line and the other for reading ultrasonic position sensors. More information about the robot can be found in WaterBoy23’s post on our forum.
A Raspberry Pi robot without a HAT
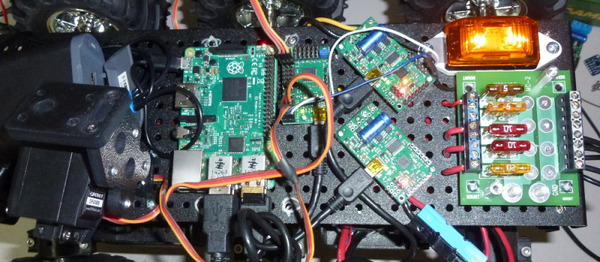 |
Using an Arduino shield or Raspberry Pi add-on board is often a quick and convenient way to get started on a robotics project, but for maximum flexibility, nothing beats building your own system from standalone boards. Rud Merriam’s Hackaday article describes the design of his Raspberry Pi-controlled robot, for which he opted to use separate modules instead of daughterboards on the Pi, and mentions some of the trade-offs involved in making that decision.
The robot is built on a Wild Thumper chassis and uses a Maestro USB servo controller and two Simple Motor Controllers to interface the Raspberry Pi with the robot’s motors and actuators. In Rud’s writeup, he explains how he made use of some of the more advanced features of the Maestro and SMCs, like using servo channels for general-purpose I/O and setting up daisy-chained serial communications. Check out the full article for all of the details.


