Support » Qik 2s12v10 User’s Guide » 3. Connecting the Qik »
3.d. Jumpers
The qik jumpers allow you to easily alter the behavior of the device. These jumpers can be left off for most applications. If you use a jumper, it must be in place when the unit first starts up; changing the jumpers while the unit is running does not take effect until the qik is reset or power is cycled. The only exception to this is the removal of the demo mode jumper while the qik is in demo mode, which takes the qik out of demo mode.
 |
Fixed-Baud Modes
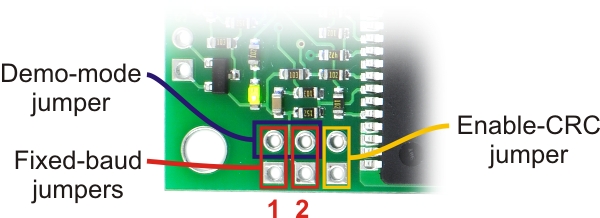
The jumpers labeled BAUD1 and BAUD2 on the bottom of the qik (i.e. the two closest to the logic connection side of the board) can be used to set the qik to fixed-baud mode when a shorting block is in place across one or both jumper locations. When neither of these jumper locations has a shorting block, the qik is in auto-detect mode and determines the baud rate automatically when it receives the first 0xAA (170 in decimal) byte. If you have a noisy serial connection or find that the automatic baud detection is not working well for your application, you can use a shorting block or some other jumper to ground pins BAUD1 and/or BAUD2 (the circular pads right next to the silkscreen labels). This sets the baud rate to a predetermined value, as described in the table below, and the qik skips the automatic baud detection phase that normally occurs on start-up.
| BAUD1 Jumper | BAUD2 Jumper | Baud Mode |
|---|---|---|
| OFF | OFF | auto-detect baud rate (1200 – 115,200 bps) |
| ON | OFF | fixed baud rate at 115,200 bps |
| OFF | ON | fixed baud rate at 38,400 bps |
| ON | ON | fixed baud rate at 9,600 bps |
Enable-CRC Mode
The jumper labeled CRC on the bottom of the qik enables cyclic redundancy check (CRC) mode when the shorting block is in place. This allows you to increase the robustness of your qik connection through the addition of a CRC error-checking byte to the end of the command packets you send to the qik. The default behavior of the qik is to simply respond to a command packet once it receives the last byte. Grounding pin CRC (the circular pad right next to the “CRC” silkscreen label) causes the qik to expect an additional CRC byte at the end of every command packet. The CRC byte is the result of a CRC-7 computation on the entire command packet, as described in Section 6. If this byte does not match the expected CRC, the qik ignores the command and uses the ERR pin to announce a CRC error. When in this mode, the green heartbeat LED will flicker twice per heartbeat rather than the single flash that occurs when CRC error checking is disabled.
Demo Mode
If you short pin BAUD1 to pin BAUD2 (the circular pads right next to the silkscreen labels) and reset the qik, it enters demo mode and remains in demo mode for as long as the short is maintained. Demo mode gives you an easy way to test your qik and troubleshoot your application for potential problems. In demo mode, the qik smoothly ramps motor M0 from stopped to full-speed forward to full-speed reverse to stopped again over a few seconds. It then does the same for motor M1. The red (error) LED is on while motor M0 is active and off while motor M1 is active. The green (status) LED is on while the active motor is driving forward and off while the active motor is driving in reverse. The motor indicator LEDs also light in response to the motor driver outputs.
Demo mode can help you determine before you’ve even written any code if you have an issue with your power supply, such as insufficient ability to supply the current your motors are drawing or interference from motor noise.
While in demo mode, any serial data that is received by the qik on the RX line is echoed on the TX line, giving you an easy way to test your serial connection. It accomplishes this by repeatedly checking the state of the serial input pin and setting the state of the output pin to match. This process works reliably at low baud rates, but it is not fast enough to keep up well at higher baud rates, which can result in an echoed byte that does not match the one you transmitted.


