Support » Pololu Maestro Servo Controller User’s Guide » 4.f. Upgrading Firmware »
4.f.1. Hard Bootloader Reset
The instructions below describe how to force the Maestro into bootloader mode by performing a hard bootloader reset. Most customers do not need to use these instructions, but they can be used as a last resort in case something has gone wrong.
One reason to do a hard bootloader reset is if you accidentally loaded the wrong firmware onto your Maestro. The result of loading the wrong firmware is that your Maestro will have corrupted, unusable firmware. The Maestro will not be recognized by your computer and it will probably not blink any of its LEDs. In this case, the normal method for getting the Maestro into bootloader mode through the Maestro Control Center will not work, and you will have to resort to a hard bootloader reset. After that, the Maestro will be in bootloader mode and you can restore the Maestro’s correct firmware.
- To perform a hard bootloader reset, first make sure the Maestro is powered off. It is best if you can just disconnect everything from it.
- Using a screwdriver, a small piece of wire, or some other conductive tool, short the two exposed bootloader pads together. The pads are shown in the pictures below:
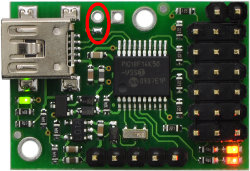 |
Bootloader pads for the Micro Maestro 6-Channel USB Servo Controller. |
|---|
 |
Bootloader pads for the Mini Maestro 12-, 18-, or 24-Channel USB Servo Controller. |
|---|
- While the pads are shorted together, connect the Maestro to USB. Usually the easiest way to do this is to have one end of the USB cable already plugged into the Maestro, and connect the other end to the computer after you have shorted the pads.
This might require a few tries. Once it works, you should see the green LED double-blinking, and the Maestro’s bootloader should be visible in your Device Manager (if you are using Windows). Then you can stop shorting together the pads and retry the firmware upgrade procedure in Section 4.f starting at step 7.
Related products


Home | Forum | Blog | Support | Ordering Information | Wish Lists | Distributors | BIG Order Form | About | Contact
© 2001–2024 Pololu Corporation
