Pololu Blog »
Maestro Servo Controller Arduino library
It has always been possible to control your Maestro Servo Controller from your Arduino-compatible controller with the Maestro’s serial interface, but now it is easier to get started using our new Arduino library. The library implements (and documents) all of the serial commands available on the Maestro controllers and supports all three sub-protocols (Compact, Pololu, and MiniSSC).
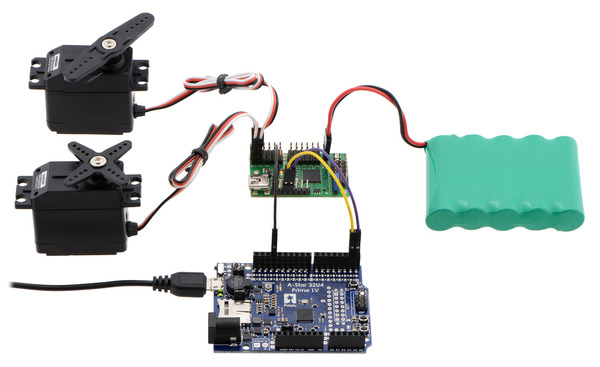
The picture above shows an example project using the new library. A Mini Maestro 18-Channel USB Servo Controller that controls two RC hobby servos is receiving commands from an A-Star 32U4 Prime LV, which we like for this application because of its free hardware serial port. The A-Star 32U4 Prime LV is also a great choice for battery-powered servo projects because its on-board switching regulator can be powered from typical RC battery packs like 4- or 5-cell NiMH packs (though in the picture we are powering it from USB). Here is the sketch we used:
#include <PololuMaestro.h>

MiniMaestro maestro(Serial1);

void setup()
{
  // Set the serial port's baud rate.
  Serial1.begin(115200);
}

void loop()
{
  /* setTarget takes the channel number you want to control, and
     the target position in units of 1/4 microseconds. A typical
     RC hobby servo responds to pulses between 1 ms (4000) and 2
     ms (8000). */

  // Set the target of channel 0 to 1500 us and channel 1 to 1750 us.
  maestro.setTarget(0, 6000);
  maestro.setTarget(1, 7000);

  // Wait 2 seconds.
  delay(2000);

  // Set the target of channel 0 to 1250 us and channel 1 to 2000 us.
  maestro.setTarget(0, 5000);
  maestro.setTarget(1, 8000);

  // Wait 2 seconds.
  delay(2000);
}
If you want to use this code on a board without a free hardware serial port, like the Arduino Uno, the sketch will need to be modified. The example sketches included with our library show how to use Arduino’s SoftwareSerial class instead.
You can find the library and instructions for using it on its GitHub page.


