Pololu Blog »
Motion tracking skull Halloween prop
 |
Concept
If you read Grant’s Creepy eyes Halloween prop post, then you already know that several of us here at Pololu are working on Halloween projects. I based my project on a motion tracking Halloween prop tutorial by Jason Poel Smith that I saw last year on the Make magazine website. The concept is simple: make a Halloween prop mysteriously follow an unsuspecting person as they walk by. The tutorial by Jason Smith uses photoresistors to track a person by detecting their shadow and moving a servo with a Halloween prop attached to it. This works well, but there are a few things that I thought could be improved. For example, the photoresistors placed in specific locations give discrete positions for the servo to turn to, which results in a jerky motion that appears as if the prop is moving in steps instead of smoothly following a person as they walk by. Another problem is that photoresistors are dependent on lighting, so this setup can only be used in well lit (or strategically lit) areas, and I wanted to be able to use this prop in a dimly lit hallway (this is for Halloween after all, right?).
|
|

Implementation
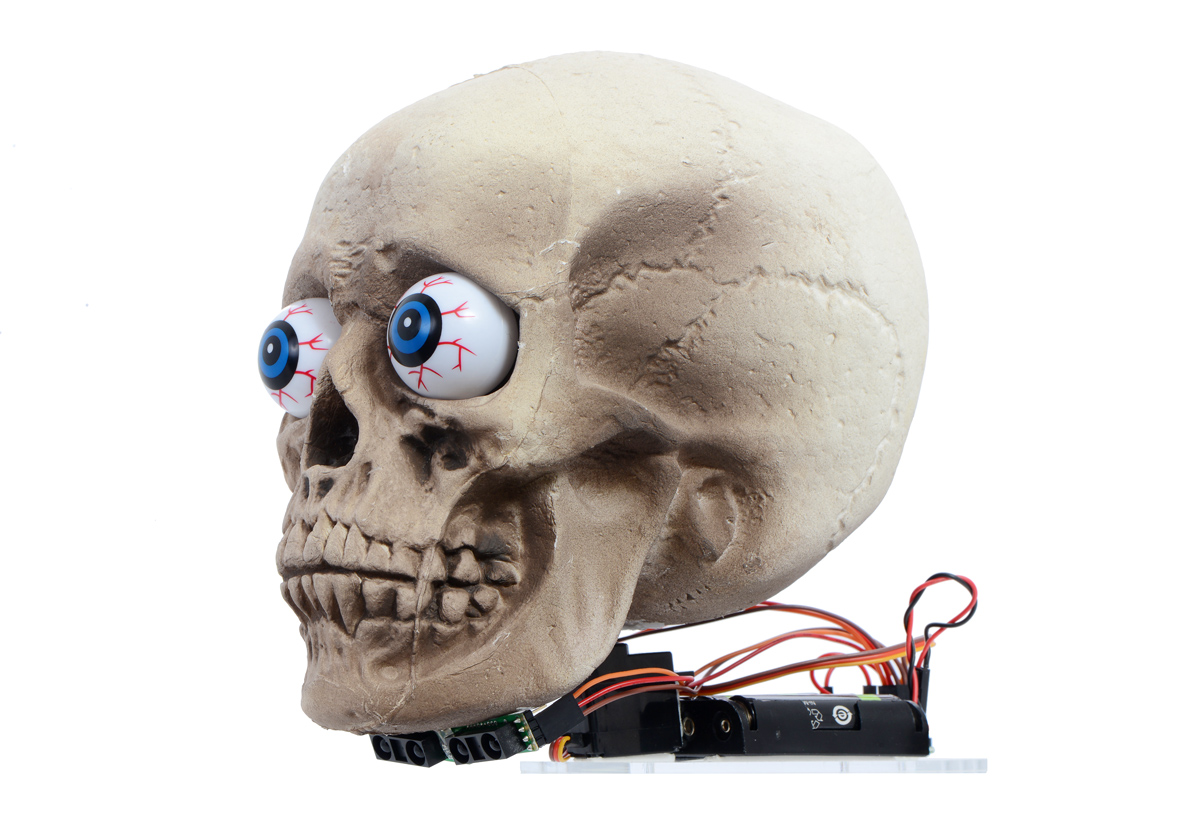
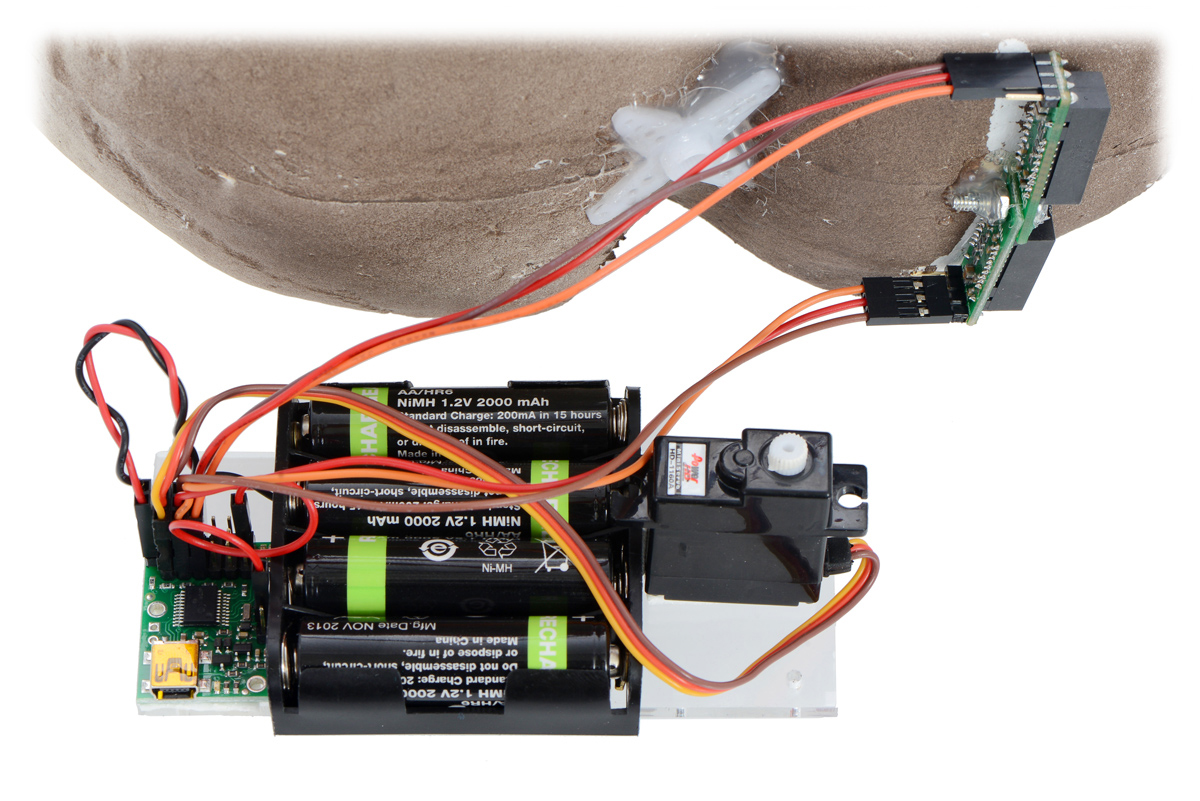
Both of the aspects of the original tutorial I wanted to improve came from the use of photoresistors, so I decided to swap them out for two Sharp GP2Y0A60SZ analog distance sensors. These sensors can be used to detect the distance to an object up to around 5 feet away. I used the Micro Maestro as the main controller, because the Maestro makes it easy to read the analog outputs from the sensors and control the servo. Hot glue was used to attached the Sharp distance sensors and servo horn to the skull, which was made of Styrofoam. Using a light-weight prop made of Styrofoam allowed me to use a small Power HD Mini Servo. My batteries, Micro Maestro, and mini servo were all mounted to a scrap piece of clear acrylic using double-sided tape, and our Premium Jumper Wires were used to make the necessary electrical connections (though servo cables would have worked well for this, also). Finally, I wrote a Maestro script (copied below) to compare the analog signals from the Sharp distance sensors and turn the servo toward whichever sensor was detecting something closer. The GIF below is an example of the result:
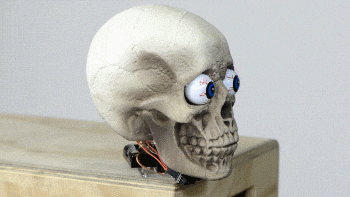 |
The motion tracking skull following someone walking in front of it. |
|---|
6000 #initial position
dup 0 servo #initialize servo

5000 delay #delay for set up purposes

begin
  #take the difference between the two analog signals
  1 get_position 2 get_position minus

  #compare the difference to a threshold and update servo
  #position if it is within the limits (900us - 2200us)
  dup -140 less_than if
    swap dup 3600 greater_than if
      5 minus
      swap
      else swap
    endif
  endif

  140 greater_than if
    dup 8800 less_than if
      5 plus
    endif
  endif

  dup 0 servo #update servo position

repeat
Complete parts list
Here is a list of all the parts I used to make this project (many of which are on sale until Oct. 22, 2014 for our Polo-BOO! Halloween Sale)
- Micro Maestro USB Servo Controller
- Power HD Mini Servo HD-1711MG
- Sharp GP2Y0A60SZ analog distance sensors
- 4-AA battery holder
- Note: The leads from the battery holder do not come with a connector on them. I used a crimping tool to make a connector using Female Crimp Pins and a 1×2 Crimp Connector Housing.
- NiMH AA batteries
- Premium Jumper Wire 50-Piece Rainbow Assortment F-F 6″
- Styrofoam skull
- Ping pong eyeballs
- Scrap acrylic
Looking forward
The motion tracking skull still has plenty of room for improvement, such as coming up with a clever and festive way of hiding the electronics, adding LEDs for lighting effects, or maybe even adding a sound module like the MP3 Trigger for an extra scare. The whole prop currently only uses 3 of the 6 channels on the Micro Maestro, so it is possible to use one Micro Maestro to control two independent motion tracking props. I haven’t decided what I want to add to it yet, but I plan on continuing to improve it as Halloween approaches. The script that I used is simple right now, and while it works, it can probably be improved to get even smoother motion, so I can continue to work on that as well.
Las Vegas Mini Maker Faire 2016 update
We recently attended the 2016 Las Vegas Mini Maker Faire, and I decided to revisit this motion-tracking skull prop for a demonstration. When I first brought the prop to the LVBots Halloween Hack Night back in 2014, I noticed that the first instinct people had (especially kids) was to try to walk fast enough that it could not keep up with them, so I wanted to make it more reactive, and still keep it simple, so I used proportional control. The updated code (shown below) uses the difference of the sensors as an error value since the two sensors would ideally output the same analog voltage when the object is the same distance from each of them. The error is then multiplied by a proportional coefficient (1/40 worked pretty well in my tests) and added to the target position. A larger error results in a larger correction, making the prop harder to outrun.
6000 #initial position
dup 0 servo #initialize servo

5000 delay #delay for set up purposes

begin
  #calculate the error (the difference between the two analog signals)
  1 get_position
  2 get_position
  minus

  #multiply the error by a proportional coefficient
  #(1/40 worked well for me) and add the stored target
  #position to the offset inferred from sensors

  40 divide
  plus

  #make sure the target position stays between the limits
  #if outside a limit, overwrite the target with the limit

  dup 4000 less_than if
    drop 4000
  endif

  dup 8000 greater_than if
    drop 8000
  endif

  #the target position is being stored on the stack, so duplicate it and update servo position

  dup 0 servo

repeat
If you try making this prop, one thing to keep in mind is that you should check that your signs are right. Some servos will turn counterclockwise when the pulse width is lower than 1.5 ms and some will turn clockwise, so you will probably have to do some testing. A sign error will produce unstable, positive feedback; if your motion tracking prop is turning away from the object instead of toward it, you might have a simple sign error.
Related products


-

Polo-BOO! Halloween Sale
- 6 October 2014Halloween is just a few short weeks away, and that means it’s time to start making an awesome costume or building an extravagant yard display...
-

Ghastly gas ghost
- 9 October 2014This project turns a innocent-looking ghost decoration into an ambush in wait for unsuspecting passersby. The basic idea is straightforward:...
10 comments


That's exciting that you are trying to make this project! I hope you are in a timezone where you can still celebrate Halloween with your skeleton, if you get it working.
The servo should be on channel zero. One analog sensor should be on channel 1 and one on channel 2.
Which channel the analog signals are on definitely matters. If it is not going in the correct direction, with power off, you can try swapping which analog signal is on channel 1 and 2.
The code is checking for a difference between the two analog sensors. If the difference is greater than 140 it moves one way; if it is less than -140 it moves the other way.
Ryan

I decided to get to work on my halloween stuff a little earlier this year. I want to get this finished and bullet proof.
Everything is loaded and working. Is there a way to smooth the action of the head. It is quite jerky.
I also thought that it would be fun to add a heartbeat to my full size skeleton. Because this is a distance sensor,
when my guests get close, it would speed up.
You can see what I am working on here: http://www.cedargablesinn.com/ssp/photo_gallery?category=29
Thanks,
Ken

One way that you might try smoothing out the motion of the servo could be using some combination of an acceleration and a speed limit, which can be configured in the "Channel Settings" tab of the Maestro Control Center.
Your project looks like it is coming along nicely; thank you for sharing it with us! You might also consider sharing it on our forum when it is done.
-Brandon

You are correct about setting the channels to input mode; any channel that has a sensor connected to it should be configured as an input, which can be done in the "Status" tab of the Maestro Control Center.
As far as modifying to code, if you want all of your servos to react to the same 2 sensors, you could just add "dup n servo" to the end of the updated code (before "repeat") for each additional servo, where n is the servo channel that the extra servos are connected to. Alternatively, you could leave the code unchanged and split the signal coming from channel 0 to each servo.
If you run into additional questions about doing this, or would like to share your project when it is finished, you might consider posting on our forum.
-Brandon


we wanted to make the skull for our school project but with a camera. Also we have a basic stamp 2,5. Do you have any tips for us?
Nice Greetings from germany:)
I do not have any specific advice for using a camera and a Basic Stamp to do a project like this; I suspect it will be a much different experience than I had doing this project. If you run into problems or have more specific questions, you might try posting on our forum. However, since the Basic Stamp is made by Parallax you will probably get better results posting on theirs.
Brandon

Thanks for a great write up on your project. I did this for a friend this past halloween and it turned out great. Her 3 skulls were painted and going to be wearing light masks, so we opted for a higher torque servo. I also recommend the convenience of the 4-AA battery holder, enclosed with switch. Handy when testing and transporting around. For anyone else that might work on this, I'd also point out the analog sensor leads need soldering.
If we evolve the design for next halloween, I'd like to swap the analog sensors for something with a little more distance. The response on these drops off pretty quickly after a couple feet.
Thanks again!
Jerry
Post a comment


Home | Forum | Blog | Support | Ordering Information | Lists | Distributors | BIG Order Form | About | Contact
© 2001–2026 Pololu Corporation

