Support » Pololu AVR C/C++ Library User’s Guide »
4. Using the Pololu AVR Library for your own projects
After getting one of the example projects to work with an Orangutan controller or 3pi robot, you can start working on more complicated programs of your own. The library provides easy access to all of the features of the Orangutans and 3pi, including the LCD screen, buttons, LEDs, motors, and buzzer. There are also functions in the library that make it easy for you to do more general-purpose operations with the AVR, such as timing and analog-to-digital conversion. The library also provides support for the Pololu QTR sensors and the Pololu Wheel Encoders (it should actually work for quadrature encoders in general). For a complete list of functions provided by the library, see the command reference.
Usually, the easiest way to adapt this code to your own projects will be to start with a working example and gradually add the things that you need, one step at a time. For Microchip Studio users, we recommend using the New Project templates installed by the library, which are documented in the Pololu AVR Programming Quick Start Guide. However, if you want to start from scratch, there are just a few things that you need to know. First, to use the library with C, you must place one of the following lines
C
#include <pololu/orangutan.h>
#include <pololu/3pi.h>
#include <pololu/qtr.h>
#include <pololu/encoders.h>
at the top of any C file that uses functions provided by the library. To use the library with C++, the equivalent lines are
C++
#include <pololu/orangutan>
#include <pololu/Pololu3pi.h>
#include <pololu/PololuQTRSensors.h>
#include <pololu/PololuWheelEncoders.h>
The line or lines that you include depend on which product you are using with the library.
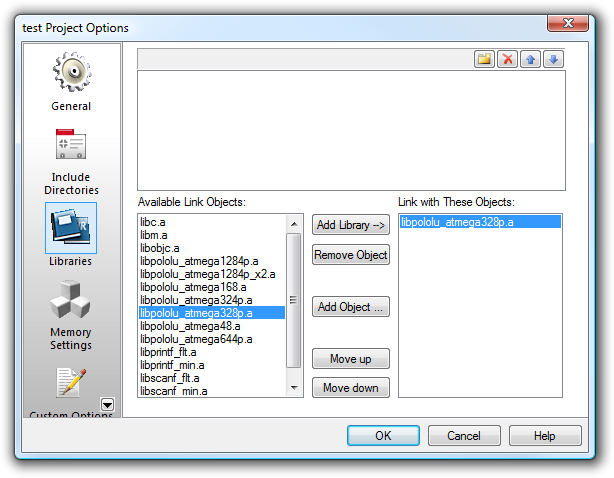
Second, when compiling, you must link your object files with the appropriate libpololu_atmegaX.a file. This is accomplished by passing the -lpololu_atmegaX option to avr-gcc during the linking step, where X can be 48, 168, 328p, 324p, 644p, 1284p, or 1284p_x2.
To add the -lpololu_atmegaX option within AVR Studio 4, select Project > Configuration Options > Libraries. You should see libpololu_atmega48.a, libpololu_atmega168.a, libpololu_atmega328p.a, libpololu_atmega324p.a, libpololu_atmega644p.a, libpololu_atmega1284p.a, and libpololu_atmega1284p_x2.a listed as options in the left column. Select the file that matches the microcontroller you are programming and click “add library” to add it to your
project.
Note:
- 3pi robots with serial numbers less than 0J5840 use the ATmega168 microcontroller; 3pi robots with serial number 0J5840 or greater use the ATmega328P microcontroller.
- Original Orangutan X2s use the ATmega644P microcontroller; new X2s use the ATmega1284P microcontroller and require you link the libpololu_atmega1284p_x2.a library file.
- The Orangutan SVP-1284 requires you link the libpololu_atmega1284p.a library file.
 |
AVR Studio 4 library settings for using the Pololu AVR library (libpololu). |
|---|
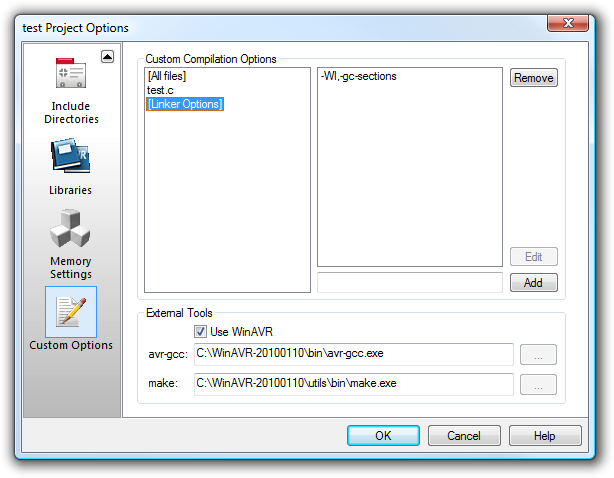
Finally, we also strongly recommend the linker option -Wl,-gc-sections. This causes unused library functions to not be included, resulting in a much smaller code size. To include this in AVR Studio 4, select Project > Configuration Options > Custom Options. Click on [Linker options] and add -Wl,-gc-sections to the list. This linker option is included in both the AVR Studio and Linux-based example programs described earlier.
 |
Recommended AVR Studio 4 linker options for projects using the Pololu AVR Library. |
|---|
Special option necessary for Orangutan X2
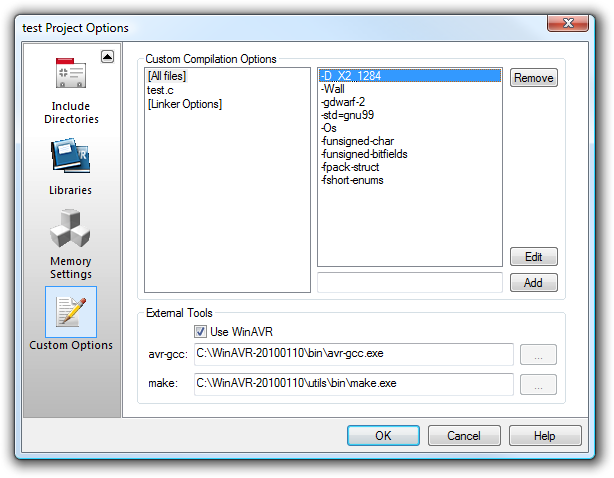
If you are using one of the newer Orangutan X2s that comes with a ATmega1284p processor, you must define the _X2_1284 preprocessor macro so that the Pololu AVR Library Header files know that you are programming an X2 rather than an Orangutan SVP-1284. To include this in AVR Studio 4, select Project > Configuration Options > Custom Options. Click on [All files] and add: -D_X2_1284. This compilation option is included in both the AVR Studio and Linux-based example programs for the Orangutan X2 1284.
 |
This picture shows how to configure AVR Studio 4 to use the -D_X2_1284 option, which is required when compiling a program a newer Orangutan X2 that has a ATmega1284p. |
|---|


