Support » Pololu Wixel User’s Guide » 9. Wixel Apps »
9.h. Wireless Tilt Mouse App
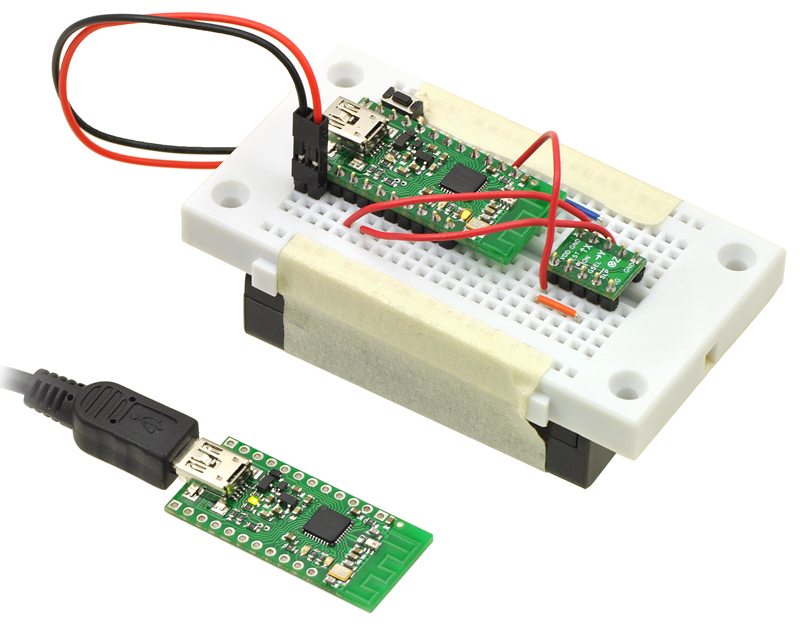 |
Wireless tilt mouse made with two Wixels and an accelerometer. |
|---|
Overview
This app allows you to make a wireless tilt mouse for your computer. By tilting the mouse, you can control the position of the mouse cursor. The mouse also supports two buttons for clicking.
This app requires two Wixels: a transmitter and a receiver. The transmitter Wixel detects a tilt using an accelerometer and wirelessly transmits that information to the receiver Wixel, which relays it to the computer as mouse movements. The receiver appears to the computer as a standard USB Human Interface Device (HID); after the Wixels have been configured, no driver installation is necessary to use the mouse.
Parts Needed
There are many different ways to build this project. Here are the parts we used:
- Wixel Pair (Fully Assembled) + USB Cable
- MMA7361L 3-Axis Accelerometer ±1.5/6g
- 3-AAA Battery Holder, Enclosed with Switch and 3 AAA batteries
- 270-Point Breadboard
- Mini Pushbutton Switches
You will need wires and connectors to make the electrical connections. We suggest our jumper wire kits or premium jumper wires.
You will need a soldering iron to solder the included header pins into the accelerometer.
The pushbuttons are optional, and any normally-open (NO) pushbutton or switch will work. If you want to have both a left mouse button and a right mouse button you should get two pushbuttons. Note that only one button (on P1_2) is shown in the picture above.
Pinout of Transmitter Wixel
| Pin | Function |
|---|---|
| P0_1 | analog input for vertical mouse speed |
| P0_2 | analog input for horizontal mouse speed |
| P1_2 | left mouse button input, internally pulled high |
| P1_7 | right mouse button input, internally pulled high |
Wixel Configuration
Download the Wireless Tilt Mouse App (v1.0) (26k wxl). Open it with the Wixel Configuration Utility, choose your settings, and write it to the transmitter Wixel. The transmitter Wixel should now appear to your computer as a USB virtual COM port (with USB product ID 0x2200). You can not send or receive data on this COM port. Its only purpose is to let the Wixel Configuration Utility easily get the transmitter Wixel into bootloader mode when the transmitter Wixel is connected to the computer via USB.
Download the Wireless Tilt Mouse Receiver App (v1.0) (15k wxl). Open it with the Wixel Configuration Utility, choose your settings, and write it to the receiver Wixel. The receiver Wixel should now appear to your computer as a Human Interface Device. If you are using Windows there should be a new entry entitled “HID-compliant mouse” in your Device Manager in the “Mice and other pointing devices” section. The receiver will also show up as a keyboard, but it does not use that interface.
The Wixel Configuration Utility does not detect Wixels with USB HID interfaces. Therefore, if you need to reconfigure your receiver Wixel, you will need to manually get it into bootloader mode (set pin P2_2 high and reset – although this app monitors P2_2 all the time and enters the bootloader if it goes high, so the reset is not strictly necessary).
Assembly
With the battery pack switched off, connect power for the transmitter Wixel. The black wire from the battery pack should connect to a GND pin on the Wixel. The red wire from the battery pack should connect to VIN. To test the connection, turn on the battery pack: the transmitter Wixel’s yellow LED should turn on. Remember to turn off the battery pack while you are making connections.
Connect the GND of the Wixel to the GND (ground) pin of the accelerometer. Connect power for the accelerometer. The MMA7361L accelerometer we used can run off of 3.3 V and draws relatively little current, so we powered it from the Wixel’s 3V3 line by connecting 3V3 to the accelerometer’s VDD.
Make any connections necessary to enable your accelerometer. For the MMA7361L, we connected SLP to VDD.
Choose which axis of the accelerometer will control the mouse cursor’s horizontal movement and connect its output to the transmitter Wixel’s P0_2 pin. If your accelerometer is oriented as shown in the picture above, you should use the Y axis.
Choose which axis of the accelerometer will control the mouse cursor’s vertical movement and connect its output to the transmitter Wixel’s P0_1 pin. If your accelerometer is oriented as shown in the picture above, you should use the X axis.
Connect a normally-open (NO) pushbutton between the transmitter Wixel’s P1_2 pin and GND. This will be the left mouse button. The P1_2 input line has an internal pull-up resistor, so the voltage on that line should be high (3.3 V) when the button is not pressed. When the button is pressed, the voltage should go low (0 V).
In the same manner, connect a pushbutton between the transmitter Wixel’s P1_7 pin and GND. This will be the right mouse button.
Parameters
Both the transmitter and receiver app have a parameter called radio_channel. The channel number is from 0 to 255 and determines which frequency to broadcast on. The default is 128. The transmitter and receiver must be on the same channel to talk to each other. To avoid interference, Wixels that aren’t supposed to talk to each other should be at least 2 channels away from each other. For example, you could have one pair of Wixels on channel 128 and another pair on 130.
The transmitter app has additional parameters to configure the behavior of the mouse:
- invert_x: Set to 1 to invert the horizontal movement of the mouse. Default is 0.
- invert_y: Set to 1 to invert the vertical movement of the mouse. Default is 0.
- speed: A positive number that determines the speed of the mouse. Default is 100. This speed is linearly proportional to this number.
Alternative Parts
You could replace the battery pack with a single 9 V battery and a step-down regulator that outputs voltage within the Wixel’s 2.7–6.5 V operating range, such as our step-down voltage regulator D24V3ALV, or you could use a 1- or 2-cell holder along with an appropriate step-up voltage regulator, such as our 5V boost regulator NCP1402.
You could replace the accelerometer by any other accelerometer whose outputs are equal to one half of the input voltage when the acceleration on the corresponding axis is 0.
Mouse Speed Calculation
The mouse speed is calculated from the measured acceleration vector of the device. The acceleration vector normally points straight upwards and has a magnitude of 1 g due to the Earth’s gravity. The Wixel measures the X and Y outputs from the accelerometer, which tell it the components of the device’s acceleration vector in the plane of the accelerometer. The resulting two-dimensional vector is then multiplied by its own magnitude to achieve greater control at lower speeds. The vector is then multiplied by the speed parameter to convert it into a mouse speed which is reported wirelessly to the computer.


Home | Forum | Blog | Support | Ordering Information | Wish Lists | Distributors | BIG Order Form | About | Contact
© 2001–2024 Pololu Corporation
