Support » Sample Project: Simple Hexapod Walker »
2. Materials and Tools
 |
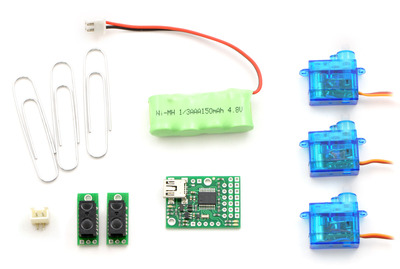
Parts you will need to build the hexapod. NOTE: the new version of the battery works with headers included with the Maestro instead of the special connector shown. |
|---|
Parts list:
| Quantity | Part # | Part | Notes |
|---|---|---|---|
| 1 | 1351 | Pololu Micro Maestro Partial Kit | Get the kit version so that you can solder in your own wires for the most compact possible robot. |
| 3 | 1053 | Sub-Micro Servo 3.7g Generic | These generic servos provide the lowest possible cost and weight, but you may substitute other servos, such as the Power HD sub-micro servo HD-1440A, to customize the design. |
| 2 | 1134 | Pololu Carrier with Sharp GP2Y0D810Z0F Digital Distance Sensor 10cm | This is a tiny distance sensor with a long enough range to keep your hexapod out of trouble. |
| 1 | 2251 | Battery Pack: 4.8 V, 200 mAh | This battery pack will provide enough power at about 5 V to power the hexapod for five or ten minutes. |
| 3 | – | “Jumbo” paper clip | Used to form the legs of the hexapod. These should be 6" long when unfolded. |
Tools required:
- Soldering iron and solder
- Hot glue gun
- Wire stripper
- Long-nose pliers
- Diagonal cutter
- Some wire for connecting the parts
Most of these parts are available in the Tools section of the Pololu web site. A hot glue gun is available at most craft stores for a few dollars.


