Pololu Blog »
New products (and demo): Force-sensing linear potentiometers and resistors
We are now carrying four exciting new sensors from Interlink Electronics:
- 0.25″-diameter circle, short tail force-sensing resistor (FSR)
- 0.6″-diameter circle, short tail FSR
- 1.4″ × 0.4″ force-sensing linear potentiometer (FSLP) strip
- 4.0″ × 0.4″ customizable-length FSLP strip
The two force-sensing resistors (or FSRs, for short) are short-tail versions of the small, circular FSRs we already carry, which allows them to be integrated into applications with tighter space constraints. These sensors act just like variable resistors that depend on the applied pressure, so you can put them into a simple voltage divider circuit and measure the force on them with a single analog-to-digital (ADC) microcontroller input.
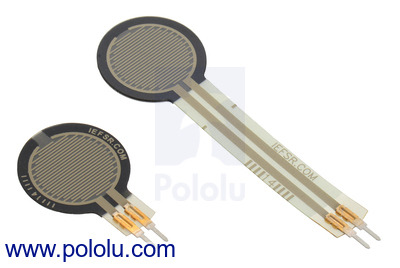 |
0.6″-diameter short-tail force sensing resistor (FSR) next to a 0.6″-diameter FSR with a standard tail. |
|---|
The two force-sensing linear potentiometers (or FSLPs) take the force-measuring functionality of FSRs and add in the ability to detect the location of the force, all while being an entirely passive component that is incredibly easy to use.
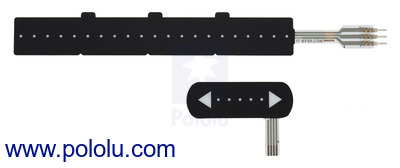 |
The two force-sensing linear potentiometers (FSLPs). |
|---|
These FSLPs are exciting because they enable fun new touch interfaces, not only for you to interact with your project but for your project to interact with the world. We decided to make a quick demo for the Las Vegas Mini Maker Faire 2014 to show just how easy it was to do something cool with this sensor. The video at the top of this blog post shows the demo in action.
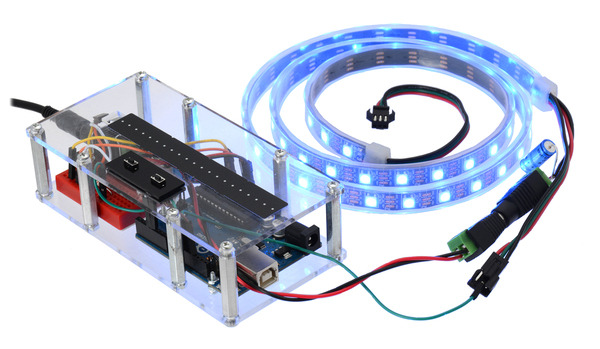 |
In the demo, a 4.0″×0.4″ FSLP is used with an Arduino Uno R3 to meassure the position and pressure of the user’s finger. (For applications where space is tight, smaller modules like our Arduino-compatible A-Star Micro can be directly substituted for the Uno.) Using the strip requires four connections to a microcontroller and one additional resistor. Two of the required connections must be analog inputs. Four connections for one sensor might seem like a lot to deal with, but step-by-step procedures in section 5 of the sensor’s integration guide (513k pdf) make it easy to get the sensor working, and the Arduino code used in this demo is available on github to help get you started. A diagram of the connections made between the sensor, Arduino, and LED strip in this demo are shown below.
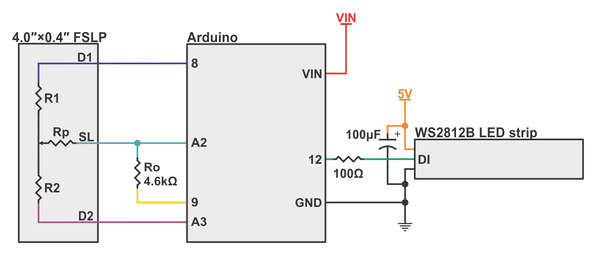 |
The connections shown in the diagram also work with the shorter 1.4″×0.4″ FSLP (referred to as “standard FSLP” in the integration guide), though the pin numbers that correspond to each of the sensors outputs (SL, D1, and D2) are different for the two sizes of FSLP. The pin numbers for each FSLP can be seen in Figure 9 of the FSLP Integration Guide. In the guide the 4.0″×0.4″ FSLP is referred to as a “10 cm FSLP”.
Once the Arduino reads the position and pressure data from the sensor, it sends signals to a WS2812B addressable LED strip that control the number of LEDs that turn on and their color. The further along the strip your finger moves the greater the number of LEDs that light up, and the more pressure you apply the more the color of all the LEDs changes from blue to red.
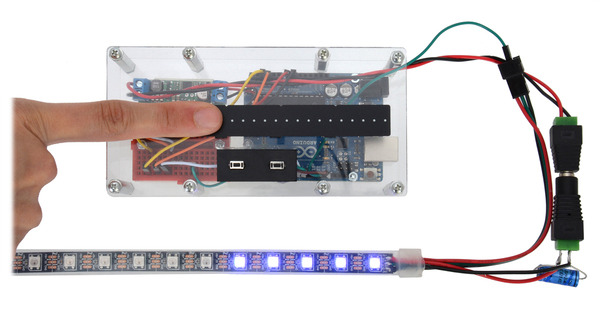 |
To make the demo easy to transport and able to be left on all day, a 9V wall adapter was used to power the Arduino and 5V step-down regulator. The power connections from the regulator’s 5V output to the power input of the LED strip were also simplified by using a DC barrel jack to terminal block adapter and a DC barrel plug to terminal block adapter. The structure of the demo was laser cut from 1/8″ clear acrylic, and aluminum standoffs were used as spacers.
If you guys do something cool with our force-sensing linear potentiometers or resistors, we’d love to hear about it!
4 comments
The code for the FSLP demo program shown in the video is linked to in the post above, and you can find it under the
"Resources" tab of the Force-Sensing Linear Potentiometer: 4.0″×0.4″ Strip product page as well.
Brandon
You can find a wiring diagram for the Force Sensing Linear Potentiometers on page 9 of their integration guide. You can also find it under the "Using the sensor" heading of our FSLP product pages.
Brandon


